RADIATOR ON-VEHICLE INSPECTION
PROCEDURE
CHECK RADIATOR CAP SUB-ASSEMBLY
CAUTION:Do not remove the radiator cap while the engine and radiator are still hot. Pressurized, hot engine coolant and steam may be released and cause serious burns.
-
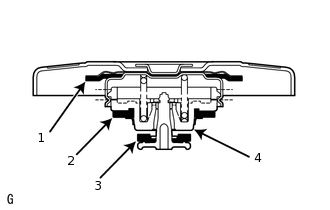
Measure the valve opening pressure.
If there are water stains or foreign matter on rubber packing 1, 2 or 3, clean it by using water and finger scouring.
Check that rubber packing 1, 2 and 3 are not deformed, cracked or swollen.
Check that rubber packing 3 and 4 are not stuck together.
Apply engine coolant to rubber packing 2 and 3.
-
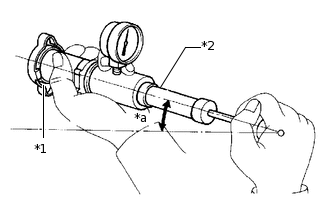
*1
Radiator Cap
*2
Radiator Cap Tester
*a
More than 30°
When using a radiator cap tester, tilt it more than 30°.
Pump the radiator cap tester several times and check the maximum pressure.*1
Pumping speed
1 pump per second
Tip:*1: Even if the radiator cap cannot maintain the maximum pressure, it is not necessarily defective.
Standard Judgment Criterion
Item
Specified Condition
Standard value
(for brand-new cap)
93 to 123 kPa (1.0 to 1.3 kgf/cm2, 13.5 to 18 psi)
Minimum standard value
(for used cap)
79 kPa (0.8 kgf/cm2, 11.4 psi)
If the maximum pressure is less than the minimum standard value, replace the radiator cap sub-assembly.
-
INSPECT FINS FOR BLOCKAGE
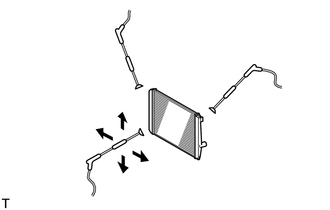
If the fins are clogged, wash them with water or a steam cleaner and dry them with compressed air.
Note:To avoid damaging the fins, the injection direction should be at right angles to the core surface.
If the steam cleaner is too close to the core, there is a possibility of damaging the fins, so maintain the following injection distances.
Standard Injection Distance
Injection Pressure
Specified Condition
2942 to 4903 kPa
(30.0 to 50.0 kgf/cm2, 427 to 711 psi)
300 mm (11.8 in.)
4903 to 7845 kPa
(50.0 to 80.0 kgf/cm2, 711 to 1138 psi)
500 mm (19.7 in.)
If the fins are bent, straighten them with a screwdriver or pliers.
Do not expose electronic components to water.
Dry the fins with compressed air.