SHIFT LEVER ASSEMBLY INSTALLATION
PROCEDURE
-
INSTALL CONTROL SHAFT
-
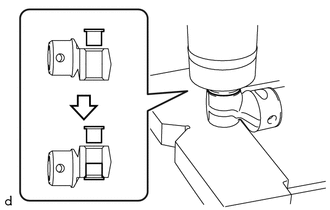
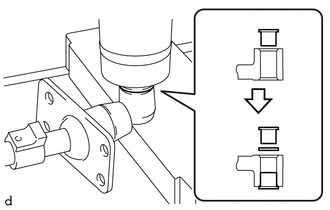
While holding the collar with your hand, press the collar slowly straight into the control shaft hole using a press.
Note
Be careful that your hand does not get caught.
Tech Tips
Use the same procedure as above to press-fit the other collar from the opposite end of the control shaft.
-
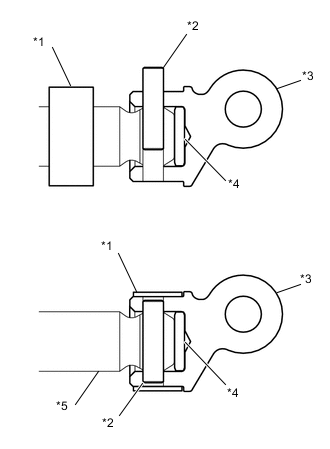
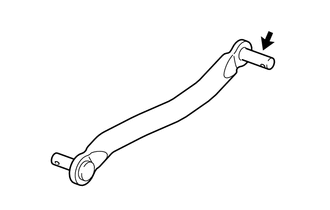
Install a new control shaft collar onto the shift shaft.
-
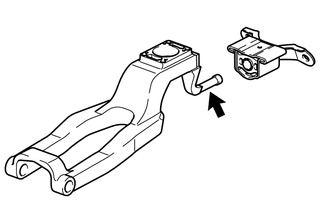
Install the shift lever damper and control shaft to the shift shaft.
-
Using a pin punch (5 mm (0.197 in.)) and a hammer, align the control shaft hole and the shift shaft hole with the cutout of the control shaft collar, and insert the shaft pin from above.
-
Slide the control shaft collar until it comes into contact with the stopper of the control shaft, then stake it to the cutout.
Text in Illustration *1 Control Shaft Collar *2 Shaft Pin *3 Control Shaft *4 Shift Lever Damper *5 Shift Shaft
-
-
INSTALL FLOOR SHIFT CONTROL SHAFT
-
Apply a light coat of MP grease to the floor shift control shaft.
Text in Illustration 
MP grease -
Install the plate washer and clip.
-
-
INSTALL SHIFT LEVER RETAINER BUSHING
-
Install the 4 shift lever retainer bushings to the floor shift control shift lever retainer.
-
-
INSTALL FLOOR SHIFT CONTROL SHIFT LEVER RETAINER
-
Apply a light coat of MP grease to new 2 shift lever pins.
Text in Illustration MP grease -
Install the floor shift control shift lever retainer with the 2 shift lever pins.
-
Secure the shift lever pins to the extension housing sub-assembly.
-
-
INSTALL MANUAL TRANSMISSION ASSEMBLY
-
INSTALL SHIFT AND SELECT LEVER BOOT
-
Temporarily install a new shift and select lever boot to the floor shift lever assembly.
-
-
INSTALL FLOOR SHIFT LEVER ASSEMBLY
-
While holding the collar with your hand, press the collar slowly straight into the floor shift lever assembly hole using a press.
Note
Be careful that your hand does not get caught.
-
Install the O-ring to the floor shift lever assembly.
-
While holding the collar with your hand, press the collar slowly straight into the floor shift lever assembly hole using a press.
Note
Be careful that your hand does not get caught.
-
Apply a light coat of MP grease to the floor shift control shaft.
Text in Illustration MP grease -
Install the plate washer to the floor shift lever assembly.
-
Install the shift lever assembly with the clip.
-
Install the shift and select lever boot.
Note
Do not damage the shift and select lever boot.
-
-
INSTALL FLOOR SHIFT CONTROL SHIFT LEVER RETAINER SUB-ASSEMBLY
-
Apply a light coat of MP grease to the floor shift control shift lever retainer sub-assembly.
Text in Illustration MP grease -
Install the floor shift control shift lever retainer sub-assembly to the floor shift control shift lever retainer.
-
Install the floor shift control shift lever retainer sub-assembly with the 2 bolts.
- Torque:
- 18 N*m { 184 kgf*cm, 13 ft.*lbf }
-
-
INSTALL PROPELLER SHAFT WITH CENTER BEARING ASSEMBLY
-
INSTALL SHIFT LEVER CAP
-
Install the shift lever cap with the 4 bolts.
- Torque:
- 7.5 N*m { 76 kgf*cm, 66 in.*lbf }
-
-
ADJUST SHIFT LEVER POSITION
-
INSTALL SHIFT LEVER BOOT
-
Install the shift lever boot and shift and select lever retainer with the 4 bolts.
- Torque:
- 18 N*m { 184 kgf*cm, 13 ft.*lbf }
-
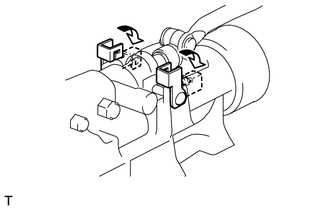
Connect the wire harness clamp.
-
Install the shift and select lever cover with the 2 clips.
-
-
INSTALL CONSOLE BOX ASSEMBLY
-
CONNECT CABLE TO NEGATIVE BATTERY TERMINAL