SHIFT CONTROL ACTUATOR REMOVAL

PROCEDURE
-
REMOVE NO. 1 ENGINE UNDER COVER
-
DRAIN COOLANT (for Inverter)
-
REMOVE WATER HOSE
-
REMOVE SHIFT CONTROL ACTUATOR ASSEMBLY
-
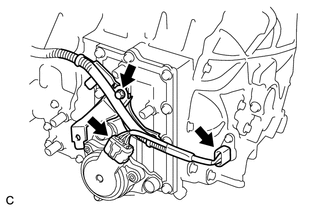
Disconnect the 2 connectors.
-
Remove the bolt and disconnect the wire harness clamp bracket.
-
Remove the 3 shift control actuator bolts and shift control actuator assembly.
Tech Tips
-
Please refer to Service Bulletin for details on the removal procedure of the shift control actuator bolt.
-
This actuator is a precision instrument. Do not strike it with a plastic hammer or the like during installation.
-
This actuator detects its own position when a battery is reinstalled. Thus it does not require initialization.
-
-
-
REMOVE SHIFT CONTROL ACTUATOR SEAL
Note
It is not always necessary to replace or remove/install the shift control actuator seal at the same time when replacing the shift control actuator assembly.
Tech Tips
Remove/install the shift control actuator seal only if oil leaks from the shift control actuator seal or other faults are found when the shift control actuator assembly is removed.
-
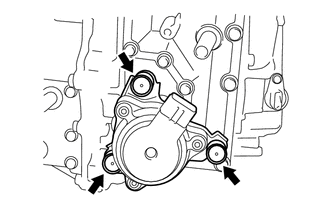
Using a screwdriver with its tip taped, remove the shift control actuator seal.
Note
When removing the shift control actuator seal, be sure not to damage the case or manual shaft with the screwdriver.
-