ECM INSTALLATION
PROCEDURE
INSTALL NO. 2 ECM BRACKET
Install the No. 2 ECM bracket with the 2 screws.
3.0 N*m
31 kgf*cm
27 in.*lbf
INSTALL NO. 1 ECM BRACKET
Install the No. 1 ECM bracket with the 2 screws.
3.0 N*m
31 kgf*cm
27 in.*lbf
INSTALL ECM
Install the ECM with the 3 bolts.
6.5 N*m
66 kgf*cm
58 in.*lbf
-
Connect the 2 ECM connectors and lower the 2 levers.
Note:When connecting a connector, make sure that dirt, water and other foreign matter is not stuck between the connector and ECM.
Make sure that the 2 levers are securely lowered.
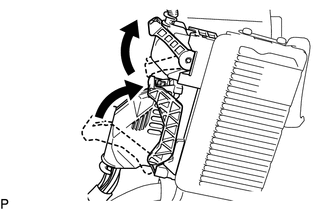
INSTALL AIR CLEANER CASE SUB-ASSEMBLY
Install the air cleaner case sub-assembly with the 3 bolts.
5.0 N*m
51 kgf*cm
44 in.*lbf
Attach the wire harness clamp to the air cleaner case sub-assembly.
INSTALL AIR CLEANER CAP SUB-ASSEMBLY
INSTALL NO. 2 CYLINDER HEAD COVER
CONNECT CABLE TO NEGATIVE BATTERY TERMINAL
Note:When disconnecting the cable, some systems need to be initialized after the cable is reconnected.
PERFORM INITIALIZATION
RESET MEMORY (for CVT)
When replacing the ECM, perform the Reset Memory procedure (initialization).