RADIATOR INSTALLATION
PROCEDURE
INSTALL FAN SHROUD
-
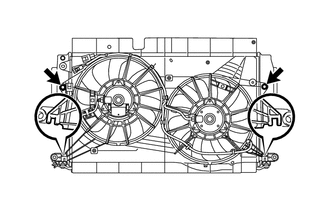
Insert the fan shroud hooks into the radiator holes and install the fan shroud with the 2 bolts.
7.0 N*m
71 kgf*cm
62 in.*lbf
-
INSTALL INTERCOOLER ASSEMBLY
INSTALL LOWER RADIATOR SUPPORT SUB-ASSEMBLY
INSTALL NO. 2 RADIATOR HOSE
Install the No. 2 radiator hose to the radiator assembly, and slide the hose clamp to secure the hose.
INSTALL RADIATOR ASSEMBLY
Install the 2 cushions.
Install the radiator assembly together with the intercooler assembly.
Note:Do not allow the radiator assembly to interfere with other parts.
Attach the clamp and connect the 2 connectors.
INSTALL CONDENSER ASSEMBLY WITH RECEIVER (w/ Air Conditioning System)
INSTALL HOOD LOCK SUPPORT SUB-ASSEMBLY
Install the hood lock support sub-assembly with the 4 bolts.
13 N*m
127 kgf*cm
9 ft.*lbf
Attach the clamp to connect the hood lock control cable assembly to the hood lock support sub-assembly.
INSTALL HOOD LOCK ASSEMBLY
INSTALL UPPER RADIATOR SUPPORT SUB-ASSEMBLY
Install the 2 upper radiator support sub-assemblies with the 4 bolts.
7.0 N*m
71 kgf*cm
62 in.*lbf
Install the 2 cushions.
INSTALL UPPER RADIATOR SUPPORT
Install the 2 upper radiator supports with the 2 bolts.
19 N*m
194 kgf*cm
14 ft.*lbf
CONNECT AIR CONDITIONING TUBE AND ACCESSORY ASSEMBLY (w/ Air Conditioning System)
CONNECT DISCHARGE HOSE SUB-ASSEMBLY (w/ Air Conditioning System)
CONNECT NO. 2 RADIATOR HOSE
Note:Check that the retainer is closed when the connector is inserted.
If replacing the hose, apply fresh engine coolant to the O-ring.
Push on the connector until it makes a click sound which indicates that the connection is complete. After connecting the connector, check that the connector cannot be disconnected by pulling the connector.
Do not use a quick connector that has been dropped.
Push in the retainer and connect the No. 2 radiator hose to the water inlet.
CONNECT NO. 3 AIR HOSE
Connect the No. 3 air hose to the intercooler assembly, and tighten the hose clamp to secure the hose.
6.5 N*m
66 kgf*cm
58 in.*lbf
CONNECT INTERCOOLER AIR HOSE
Note:If replacing the intercooler air hose, check for deposits in the intercooler assembly and intercooler air hose. If necessary, wipe up deposits.
Connect the intercooler air hose to the intercooler assembly, and tighten the hose clamp to secure the hose.
6.5 N*m
66 kgf*cm
58 in.*lbf
CONNECT NO. 1 RADIATOR HOSE
Connect the No. 1 radiator hose to the radiator assembly, and slide the hose clamp to secure the hose.
CONNECT NO. 3 WATER BY-PASS HOSE
Connect the No. 3 water by-pass hose to the radiator assembly, and slide the hose clamp to secure the hose.
Attach the clamp to connect the No. 3 water by-pass hose to the fan shroud.
CONNECT NO. 2 WATER BY-PASS HOSE
Attach the 3 clamps to connect the No. 2 water by-pass hose to the 2 hose clamp brackets and No. 1 water hose clamp bracket.
INSTALL NO. 2 RADIATOR SIDE AIR SEAL
Attach the 2 clamps to install the No. 2 radiator side air seal.
INSTALL NO. 1 RADIATOR SIDE AIR SEAL
Attach the 2 clamps to install the No. 1 radiator side air seal.
INSTALL LOW PITCHED HORN ASSEMBLY
CONNECT AMBIENT TEMPERATURE SENSOR
INSTALL BATTERY CARRIER
INSTALL BATTERY TRAY
INSTALL BATTERY
INSTALL BATTERY INSULATOR
INSTALL BATTERY CLAMP SUB-ASSEMBLY
CONNECT CABLE TO POSITIVE BATTERY TERMINAL
CONNECT CABLE TO NEGATIVE BATTERY TERMINAL
Note:When disconnecting the cable, some systems need to be initialized after the cable is reconnected (Click here).
ADD ENGINE COOLANT
CHARGE REFRIGERANT (w/ Air Conditioning System)
WARM UP ENGINE (w/ Air Conditioning System)
INSPECT FOR REFRIGERANT LEAK (w/ Air Conditioning System)
INSPECT FOR COOLANT LEAK
INSTALL FRONT LOWER BUMPER ABSORBER
Insert the 2 hooks of the front lower bumper absorber into the installation holes in the body to install the front lower bumper absorber.
Install the 4 bolts.
Install the 2 clips.
INSTALL NO. 1 ENGINE UNDER COVER
Install the No. 1 engine under cover with the 11 clips and 6 bolts.
INSTALL NO. 1 ENGINE COVER
INSTALL FRONT BUMPER REINFORCEMENT SUB-ASSEMBLY