PARK / NEUTRAL POSITION SWITCH INSTALLATION
-
INSTALL PARK/NEUTRAL POSITION SWITCH ASSEMBLY
-
Install the park/neutral position switch to the automatic transmission.
-
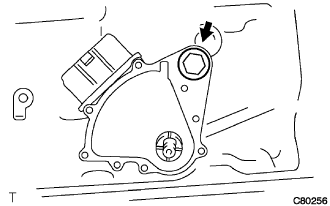
Temporarily install the bolt.
-
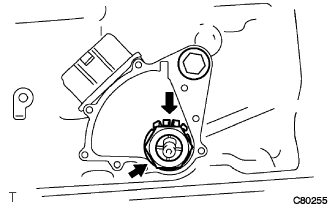
Install a new lock washer and the nut.
- Torque:
- 6.9 N*m { 70 kgf*cm, 61 in.*lbf }
-
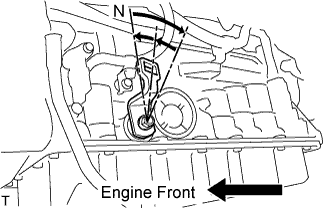
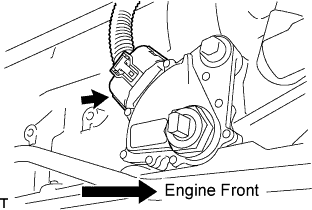
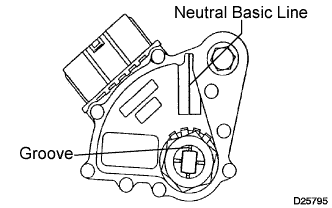
Turn the control shaft lever clockwise until it stops, and turn it counterclockwise 2 notches to set it to the N position.
-
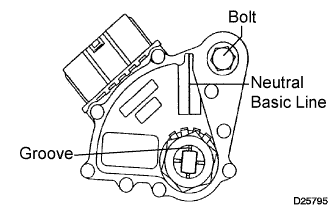
Align the neutral basic line with the switch groove, and tighten the adjusting bolt.
- Torque:
- 13 N*m { 130 kgf*cm, 9 ft.*lbf }
-

Using a screwdriver, bend the tabs of the lock washer.
-
Connect the park/neutral position switch connector.
-
-
INSTALL TRANSMISSION CONTROL CABLE ASSEMBLY
-
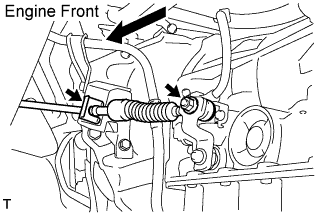
Connect the control cable with a new clip to the bracket.
-
Temporarily install the control cable to the control shaft lever with the nut.
- Torque:
- 15 N*m { 150 kgf*cm, 10 ft.*lbf }
-
-
INSTALL FRONT EXHAUST PIPE ASSEMBLY (w/ DPF)
-
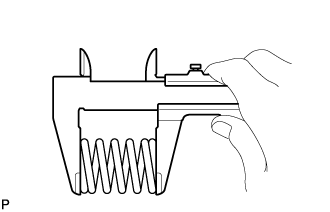
Using a vernier caliper, measure the free length of the compression spring.
Minimum free length 40.5 mm (1.59 in.)
-
If the free length is less than the minimum, replace the compression spring.
-
-
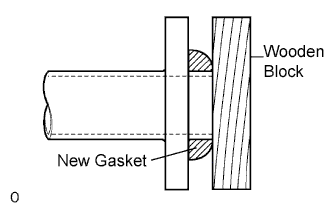
Using a plastic-faced hammer and wooden block, tap on a new gasket until its surface is flush with the front exhaust pipe.
Note
-
Be sure to install the gasket so that it faces the correct direction.
-
Do not reuse the gasket.
-
Do not damage the gasket.
-
When connecting the exhaust pipe, do not push in the gasket with the exhaust pipe.
-
-
Install a new gasket and the front exhaust pipe to the catalytic converter with pipe with 3 new nuts.
- Torque:
- 63 N*m { 642 kgf*cm, 46 ft.*lbf }
-
Connect the front exhaust pipe to the 2 exhaust pipe supports.
-

Text in Illustration *a No.1 Exhaust Pipe Air Hose Side *b No.7 Exhaust Pipe Air Hose Side *c No.1 Exhaust Pipe Air Hose Paint Mark (Green) *d front exhaust pipe Assembly Marking (Green) *e No.7 Exhaust Pipe Air Hose Paint Mark (Pink) *f front exhaust pipe Assembly Marking (Pink) *g Stopper *h 4 to 10 mm Connect the No. 1 exhaust pipe air hose and No. 7 exhaust pipe air hose to the front exhaust pipe with 2 new clips.
Note
-
Align the paint marks of the front exhaust pipe and exhaust pipe air hose and push on the exhaust pipe air hose until it contacts the stopper.
-
Make sure the clip is 4 to 10 mm (0.157 to 0.394 in.) from the end of the exhaust pipe air hose when installing the clip.
-
Make sure that there is no slack in the exhaust pipe air hose, and that it is not twisted or bent.
-
Take care not to damage the inner or outer surface of the exhaust pipe air hose when installing it. If the exhaust pipe air hose is damaged, replace it with a new one.
-
-
Connect the No. 3 exhaust gas temperature sensor connector and attach the 2 clamps.
-
Connect the No. 2 exhaust gas temperature sensor connector and attach the 2 clamps.
-
Connect the exhaust gas temperature sensor connector and attach the clamp.
-
-
CONNECT CABLE TO NEGATIVE BATTERY TERMINAL
-
INSPECT PARK/NEUTRAL POSITION SWITCH ASSEMBLY
-
Apply the parking break and turn ignition switch on.
-
Depress the break pedal and check that the engine starts only when the shift lever is set in N or P position and it does not start in other positions.
-
Check that the back up light is lit and the reverse warning buzzer sounds only when the shift lever is set in R position and these do not function.
-
If a failure is found, check the park/neutral position switch for continuity.
-
-
ADJUST PARK/NEUTRAL POSITION SWITCH ASSEMBLY
-
Loosen the bolt of the park/neutral position switch and move the shift lever to the N position.
-
Align the groove and the neutral basic line.
-
Hold the switch in position and tighten the bolt.
- Torque:
- 13 N*m { 130 kgf*cm, 9 ft.*lbf }
-
After adjustment, perform the switch operation check.
-
-
INSPECT SHIFT LEVER POSITION
-
When shifting from P position only with ignition switch ON and depress the break pedal.
-
Make sure that the shifting lever moves smoothly and can be moderately operated.
-
When starting engine, make sure that the vehicle moves forward when shifting from N to D position and moves reward when shifting R position.
-
-
ADJUST SHIFT LEVER POSITION
-
Loosen the bolt of the park/neutral position switch and move the shift lever to the N position.
-
Align the groove and the neutral basic line.
-
Hold the switch in position and tighten the bolt.
- Torque:
- 13 N*m { 130 kgf*cm, 9 ft.*lbf }
-
After adjustment, perform the switch operation check.
-
-
PERFORM INITIALIZATION