ECD SYSTEM (w/ EGR Cooler) Turbocharger Noise
DESCRIPTION
Tech Tips
Turbocharger noise is classified into 2 types. One is whistling noise, and the other is whining noise. When troubleshooting, the type of noise should be determined first.
| Noise Type | Noise Description | Main Trouble Area |
|---|---|---|
| Whistling noise | The volume and pitch of this noise are proportional to turbocharger speed or engine speed. Therefore, the noise level will become more obvious when engine speed increases. |
|
| Whining noise | This noise has a lower pitch than whistling noise. It generally occurs in the engine speed range of 1500 to 2500 rpm, and has a relatively constant pitch, independent of engine speed and vehicle speed. | Turbocharger Tech Tips
|
-
Faults and Symptoms of Diesel Engine Components
Turbocharger System Main fault Turbocharger turbine shaft imbalance Symptoms High-pitched whistling noise
Tech Tips
The pitch and volume change in proportion to the turbocharger speed.
Intake System Main fault Leakage Symptoms Leak flow noise Gear inside Engine Symptoms Gear noise
Tech Tips
The pitch and volume change in proportion to the engine speed.
Transmission Gear Symptoms Gear noise
Tech Tips
The pitch and volume change in proportion to the transmission gear speed.
INSPECTION PROCEDURE
PROCEDURE
-
CONFIRM CONDITION IN WHICH NOISE OCCURRED
-
Confirm with the customer the conditions in which the noise occurred.
Tech Tips
To clearly understand the conditions in which the noise occurred, the items in the table below are useful.
Item Note Engine speed Engine speed range Vehicle speed Vehicle speed range Transmission gear Which gear? Accelerator pedal position During acceleration or deceleration? Temperature
-
Ambient temperature
-
Engine temperature (cold, warmed up, etc.)
Road conditions
-
City or highway driving
-
Uphill or downhill
Noise level
-
Did the noise occur suddenly, or build gradually?
-
Has the noise gradually been getting louder?
Other symptoms
-
Lack of power
-
High fuel consumption, etc.
Noise recognition What made the customer determine the noise to be abnormal? -
NEXT 
-
-
CONFIRM NOISE CUSTOMER MENTIONED (PROCEDURE 2)
-
Check for the noise described by the customer.
Tech Tips
If a noise is heard, make sure that the noise matches the noise described by the customer.
Result Result Proceed to Obvious abnormal noise matching noise described by customer is confirmed A Obvious abnormal noise matching noise described by customer is not confirmed B
B 
EXPLAIN TO THE CUSTOMER THAT THE NOISE IS NORMAL Click here
A
-
-
CHECK INTAKE SYSTEM
-
Check for air leakage between the air cleaner and turbocharger, and between the turbocharger and intake manifold.
Tech Tips
-
Check for disconnected or improperly connected hoses, and gaps between hoses and parts.
-
Check for foreign matter between the air cleaner and turbocharger.
-
NG 
REPAIR OR REPLACE MALFUNCTIONING PARTS
OK
-
-
CONFIRM NOISE SOURCE (FROM TURBOCHARGER OR NOT)
-
For DC motor type:
-
Connect the intelligent tester to the DLC3.
Tech Tips
The software version installed on the intelligent tester must be V2009.2 or later.
-
Start the engine and warm it up.
-
Turn the tester ON.
-
Enter the following menus: Powertrain / Engine (and ECT) / Active Test / Activate the VN Turbo Open.
-
Perform the Active Test and rev the engine up several times.
-
Check whether the noise is reduced or not compared with the noise under the condition that the Active Test is not performed.
-
-
For waste gate type:
-
Disconnect the actuator hose from the compressor housing.
-
Stop up the compressor housing side tube with a hose clip or equivalent.
-
Using SST, apply pressure to the actuator to open the waste gate valve.
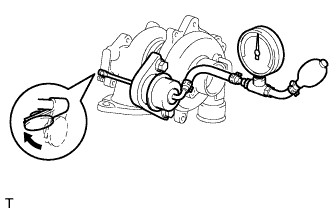
Valve opening pressure Specified pressure* (See attached table below) Note
Never apply more than predetermined maximum pressure*to the actuator.
Tech Tips
*: Valve opening pressure and predetermined maximum pressure above differ according to the turbocharger. For the specifications, see attached table below.
Specifications: Engine Type Turbocharger Sub-assembly
(Part No.)
Valve Opening Pressure
(kPa: Gauge Pressure)
Maximum Pressure
(kPa: Gauge Pressure)
Reference:
Rod Stroke
(mm)
2KD-FTV 17201-0L030
17201-30120
114 136 0.98 to 1.91 17201-0L050 123 147.8 0.89 to 1.74 17201-30141 135 156.5 0.72 to 1.39 -
Check that the actuator rod moves and that the waste gate valve opens.
-
Start the engine and allow it to idle.
-
Rev the engine up several times, depressing the accelerator pedal.
Note
Do not accelerate the engine while sufficient pressure is not applied to the actuator. The boost pressure (turbocharged air pressure) may exceed the prescribed booster pressure limit and the engine may be damaged due to overboost.
-
Check whether the noise is reduced or not compared with the noise under the original conditions.
-
Reconnect the actuator hose to the compressor housing.
Result Result Proceed to The noise is reduced (or disappears) A The noise is the same as in Procedure 2 (The noise does not change) B Tech Tips
-
When the variable nozzle of the turbocharger opens fully (the waste gate valve opens) regardless of the engine condition, the turbocharger speed slows down and the cause of noise can be confirmed that is from the turbocharger or not.
-
If the turbocharger is the cause of the noise, the noise will be reduced when the variable nozzle (the waste gate valve) opens because turbocharger speed does not increase.
-
-
B
CHECK FOR NOISE FROM SOURCE OTHER THAN TURBOCHARGER (PROCEDURE 7) Click here
A
-
-
CONFIRM THE NOISE TYPE
-
Check whether the noise can be heard even when the engine speed is more than 3000 rpm, and whether the noise gradually gets louder as the engine speed increases.
Tech Tips
If so, the noise is likely to be whistling noise. If not, the noise is likely to be whining noise.
Result Result Proceed to Yes (The noise is likely to be whistling noise) A No (The noise is likely to be whining noise) B
B
PERFORM ALIGNMENT OF EXHAUST PIPE AND CONFIRM THE NOISE Click here
A 
REPLACE TURBOCHARGER SUB-ASSEMBLY Click here
-
-
PERFORM ALIGNMENT OF EXHAUST PIPE AND CONFIRM THE NOISE
-
Disconnect the exhaust pipe at the ball joint and from each exhaust pipe support, and then realign the exhaust pipe and reconnect it to each exhaust pipe support and at the ball joint Click here.
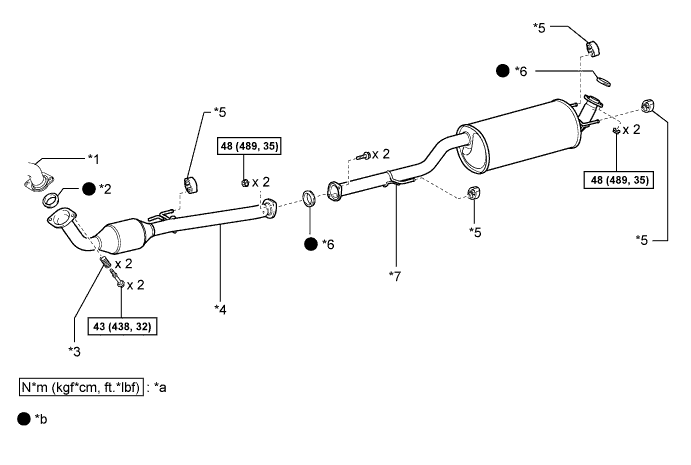
Text in Illustration *1 Outlet Pipe *2 Gasket (Ball Joint) *3 Compression Spring *4 Front Exhaust Pipe Assembly *5 Exhaust Pipe Support *6 Gasket *7 Center Exhaust Pipe Assembly - - *a Specified torque *b Non-reusable part Tech Tips
Above illustration is an example.
-
Confirm whether the noise problem is solved or not.
Tech Tips
The alignment of the exhaust pipe affects whining noise.
Result Result Proceed to The noise problem is solved A The noise problem remains B
B
REPLACE TURBOCHARGER SUB-ASSEMBLY Click here
A
END
-
-
CHECK FOR NOISE FROM SOURCE OTHER THAN TURBOCHARGER (PROCEDURE 7)
-
Check for the noise source with a sound scope.
Note
When performing this check, make sure that the sound scope, your body, etc., do not get caught on the V-belt.
Tech Tips
-
The source of the noise is not the turbocharger, but a part other than the turbocharger (e.g. a part inside the engine, transmission, or vacuum pump).
-
Sometimes gear noise may be mistaken for turbocharger noise. For gear noise, pay attention to the gear inside the engine and transmission gear.
-
Rev the engine up and check if the noise reduces at the same time the engine speed decreases. If the noise reduces at the same time the engine speed decreases, it is gear noise. If the noise reduces a short time after the engine speed decreases, it is turbocharger noise.
-
The following illustration is a reference for checking whether the noise source is from the engine.
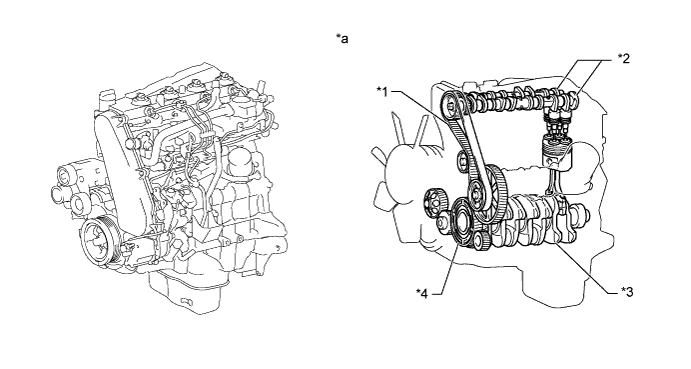
Text in Illustration *1 Timing Belt *2 Camshafts *3 Crankshaft *4 Timing Gear Train *a Gear Location inside Engine - - Tech Tips
-
Above illustration is an example.
-
Gear noise can be confirmed with a sound scope. Put the sound scope on the cylinder block near the gear, and if the noise heard through the sound scope has the same timing as the noise heard without the sound scope, it is gear noise.
-
NEXT
-
-
REPLACE THE PARTS DETECTED IN PROCEDURE 7
-
Replace the parts detected in Procedure 7 as the noise source.
NEXT
-
-
CONFIRM WHETHER MALFUNCTION HAS BEEN SUCCESSFULLY REPAIRED
-
Check whether the noise problem has been successfully solved.
NEXT
END
-
-
EXPLAIN TO THE CUSTOMER THAT THE NOISE IS NORMAL
-
Explain to the customer that the noise the customer mentioned is not abnormal.
Tech Tips
To help the customer understand, test driving another car with the customer may be helpful.
NEXT
END
-