FUEL TANK REMOVAL
PROCEDURE
REMOVE FUEL SUCTION TUBE WITH PUMP AND GAUGE ASSEMBLY
DRAIN FUEL
REMOVE REAR FLOOR SIDE MEMBER COVER LH (w/ Cover)
REMOVE REAR FLOOR SIDE MEMBER COVER RH (w/ Cover)
REMOVE REAR FLOOR SIDE MEMBER BRACE SUB-ASSEMBLY
REMOVE CENTER EXHAUST PIPE ASSEMBLY
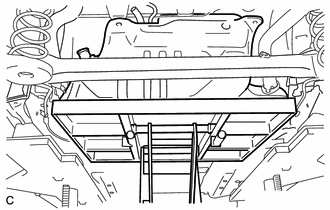
REMOVE REAR NO. 1 FLOOR UNDER COVER (w/ Cover)
-
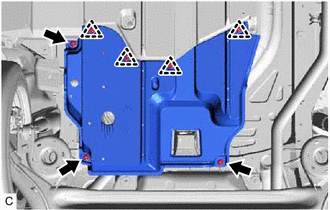
Remove the 4 clips and nut.
Loosen the 2 grommets, then remove the rear No. 1 floor under cover.
-
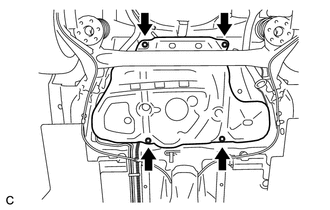
REMOVE NO. 1 FUEL TANK PROTECTOR
-
Remove the 3 bolts, nut and No. 1 fuel tank protector.
-
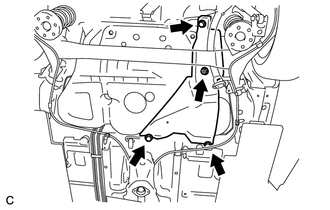
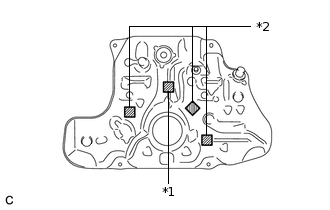
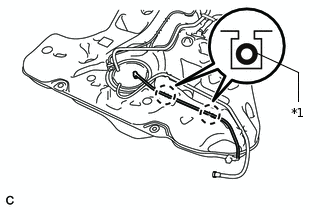
DISCONNECT FUEL TANK BREATHER TUBE
-
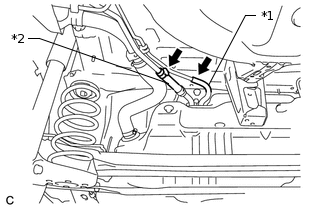
*1
No. 1 Charcoal Canister Outlet Hose
*2
Fuel Tank Breather Tube
Loosen the clamp, then disconnect the fuel tank breather tube from the fuel tank filler pipe sub-assembly.
-
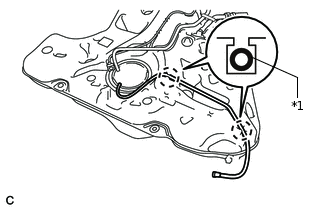
DISCONNECT NO. 1 CHARCOAL CANISTER OUTLET HOSE
Disconnect the No. 1 charcoal canister outlet hose from the fuel tank filler pipe sub-assembly.
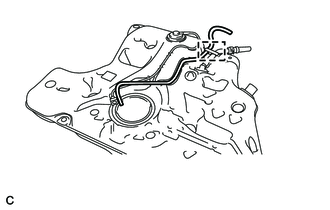
DISCONNECT FUEL TANK TO FILLER PIPE HOSE
-
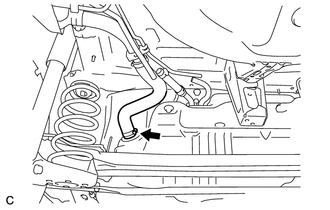
Loosen the clamp, then disconnect the fuel tank to filler pipe hose from the fuel tank assembly.
-
DISCONNECT NO. 1 FUEL EVAPORATION TUBE SUB-ASSEMBLY
-
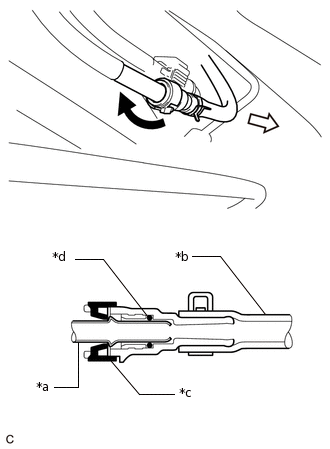
*a
Fuel Pipe
*b
Rubber Hose
*c
Retainer
*d
O-ring

Turn

Pull
Turn the projections of the retainer to disengage the lock claws, and then disconnect the No. 1 fuel evaporation tube sub-assembly.
Note:Remove any dirt or foreign matter on the fuel tube connector and fuel pipe before performing this work.
Do not allow any scratches or foreign matter to get on the parts when disconnecting them as the fuel tube connector has an O-ring that seals the fuel pipe.
Only disconnect the fuel tube connector by hand.
Protect the disconnected part by covering it with a plastic bag after disconnecting the fuel tube connector.
If the fuel tube connector and fuel pipe are stuck, push and pull to release them.
-
DISCONNECT FUEL TANK MAIN TUBE SUB-ASSEMBLY
Type A:
-
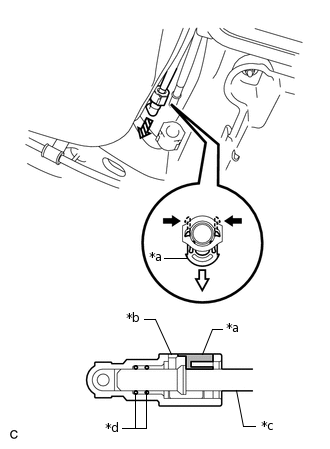
*a
Retainer
*b
Fuel Tube Connector
*c
Fuel Pipe
*d
O-ring
Push
Pull Out

Pull Off
Disengage the 2 claws of the retainer. Pull out the retainer as shown in the illustration.
Disconnect the fuel tank main tube sub-assembly from the fuel pipe.
Note:Remove any dirt or foreign matter on the fuel tube connector and fuel pipe before performing this work.
Do not allow any scratches or foreign matter to get on the parts when disconnecting them as the fuel tube connector has O-rings that seal the fuel pipe.
Only disconnect the fuel tube connector by hand.
Protect the disconnected part by covering it with a plastic bag after disconnecting the fuel tube connector.
If the fuel tube connector and fuel pipe are stuck, push and pull to release them.
-
Type B:
-
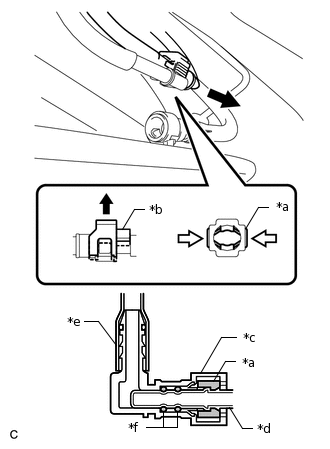
*a
Retainer
*b
Fuel Tube Connector Cover
*c
Fuel Tube Connector
*d
Fuel Pipe
*e
Nylon Tube
*f
O-ring
Release the lock of the fuel tube connector cover as shown in the illustration, then pull off the fuel tank main tube sub-assembly.
Note:Check that there are no scratches or foreign matter on the connecting parts of the fuel tube connector and fuel pipe before performing this work.
Do not allow any scratches or foreign matter to get on the parts when disconnecting them as the fuel tube connector has O-rings that seal the fuel pipe.
Only disconnect the fuel tube connector by hand.
Do not forcibly bend, twist or turn the nylon tube.
Protect the disconnected part by covering it with a plastic bag after disconnecting the fuel tube connector.
If the fuel tube connector and fuel pipe are stuck, push and pull to release them.
-
REMOVE FUEL TANK ASSEMBLY
-
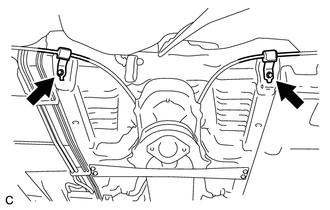
Remove the 2 bolts and disconnect the parking brake cable assembly.
-
Support the fuel tank assembly using an engine lifter.
Tip:Using height adjustment attachments and plate lift attachments, place the fuel tank assembly horizontally.
-
Remove the 4 bolts.
Lower the engine lifter to remove the fuel tank assembly.
Note:Do not drop the fuel tank assembly.
When removing the fuel tank assembly, tilt it slightly to prevent it from interfering with the suspension arm or other surrounding parts.
-
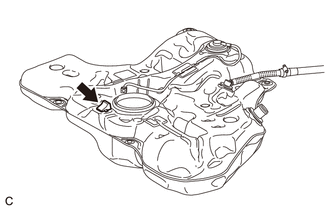
REMOVE NO. 1 FUEL TANK CUSHION
-
*1
No. 1 Fuel Tank Cushion
*2
No. 2 Fuel Tank Cushion
Remove the No. 1 fuel tank cushion from the fuel tank assembly.
-
REMOVE NO. 2 FUEL TANK CUSHION
Remove the 3 No. 2 fuel tank cushions from the fuel tank assembly.
REMOVE NO. 4 FUEL TANK CUSHION
-
Remove the No. 4 fuel tank cushion from the fuel tank assembly.
-
REMOVE FUEL TANK MAIN TUBE SUB-ASSEMBLY
-
*1
Fuel Tank Main Tube Sub-assembly
Disengage the 2 claws to remove the fuel tank main tube sub-assembly from the fuel tank assembly.
-
REMOVE NO. 1 FUEL EVAPORATION TUBE SUB-ASSEMBLY
-
*1
No. 1 Fuel Evaporation Tube Sub-assembly
Disengage the 2 claws and remove the No. 1 fuel evaporation tube sub-assembly from the fuel tank assembly.
-
REMOVE NO. 1 CHARCOAL CANISTER OUTLET HOSE
-
Disconnect the clamp, and remove the No. 1 charcoal canister outlet hose from the fuel tank assembly.
-