QUARTER WINDOW GLASS INSTALLATION
CAUTION / NOTICE / HINT
Tech Tips
-
Use the same procedure for both the RH and LH sides.
-
The following procedure is for the LH side.
PROCEDURE
-
CLEAN QUARTER WINDOW ASSEMBLY
-
Clean the outer edges of the quarter window assembly with a non-residue solvent.
Note
-
Do not touch the glass surface after cleaning it.
-
Be careful not to damage the glass or clips.
-
-
-
INSTALL QUARTER WINDOW ASSEMBLY LH
-
Using a brush or a sponge, apply primer (3M N-200) to the quarter window glass adhesive dam attachment surface of the quarter window assembly LH.
-
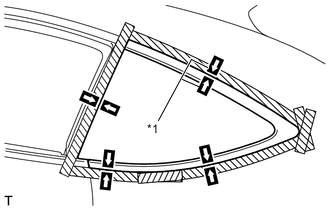
Install the new quarter window glass adhesive dam, applying double-sided tape all the way around the glass except where the dam is installed, as shown in the illustration.
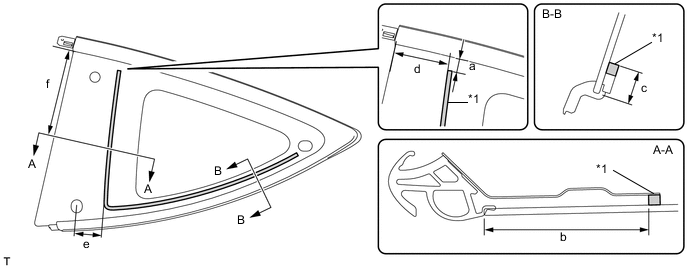
Standard Dimension Area Dimension a 13.0 mm (0.5118 in.) b 72.5 mm (2.8543 in.) c 13.0 mm (0.5118 in.) d 62.3 mm (2.4528 in.) e 23.4 mm (0.9213 in.) f 123.8 mm (4.874 in.) Text in Illustration *1 Quarter Window Glass Adhesive Dam - - Tech Tips
If an area other than that specified is coated by accident, wipe off the primer with a non-residue solvent before it dries.
Note
-
Allow the primer to dry for 3 minutes or more.
-
Throw away any leftover primer.
-
Do not apply too much primer.
-
-
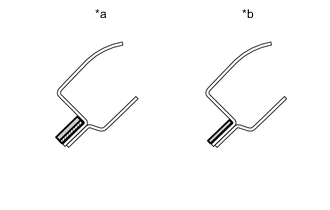
Text in Illustration *a NG *b OK 
Primer (Sunstar #435-40) 
Adhesive Using a brush, coat the installation surface on the vehicle body with Primer (Sunstar #435-40).
Note
-
Do not coat the adhesive with Primer (Sunstar #435-40).
-
Do not apply too much primer.
-
Allow the primer to dry for 3 minutes or more.
Tech Tips
If an area other than that specified is coated by accident, wipe off the primer with a clean piece of cloth before it dries.
-
-
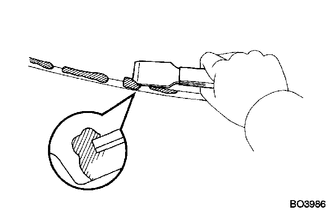
Using a brush or a sponge, coat the application area of adhesive with Primer (3M N-200).
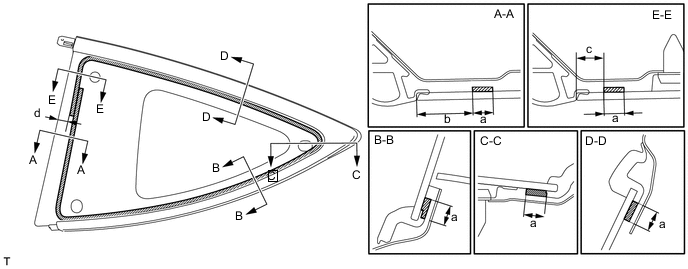
Standard Dimension Item Dimension a 8.0 mm (0.315 in.) b 22.3 mm (0.878 in.) c 10.1 mm (0.398 in.) d 13.9 mm (0.547 in.) Text in Illustration Primer (3M N-200) - - Note
-
Do not apply too much primer.
-
Allow the primer to dry for 3 minutes or more.
Tech Tips
If an area other than that specified is coated by accident, wipe off the primer with a clean piece of cloth before it dries.
-
-
Apply adhesive to the quarter window assembly LH.
Adhesive Toyota Genuine Windshield Glass Adhesive or equivalent
-
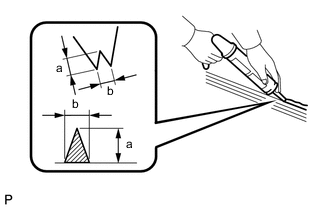
Cut off the tip of the cartridge nozzle, as shown in the illustration.
Standard Dimension Item Dimension a 12.0 mm (0.472 in.) b 8.0 mm (0.315 in.) -
Load the sealer gun with cartridge.
-
Apply adhesive to the quarter window assembly LH, as shown in the illustration.
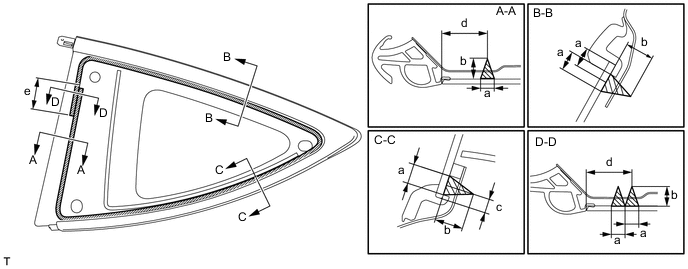
Standard Dimension Item Dimension a 8.0 mm (0.315 in.) b 12.0 mm (0.4724 in.) c 5.6 mm (0.2205 in.) d 26.3 mm (1.0354 in.) e 50.0 mm (1.9685 in.) Text in Illustration Adhesive - - Tech Tips
Apply adhesive onto the ceramic notches.
-
-
Install the quarter window assembly LH to the vehicle body (When reusing the quarter window assembly LH).
-
Install the butyl tape (If the clips are broken).
-
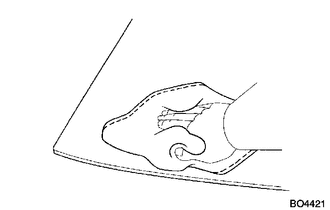
Text in Illustration *1 Matchmark Position the quarter window assembly LH so that the matchmarks are aligned, and press it in gently along the rim.
-
Lightly press the front surface of the windshield glass to ensure that the windshield glass is securely fit to the vehicle body.
Tech Tips
Press the glass with a force of 98 N (10 kgf, 22 lbf) or more.
-
-
Install the quarter window assembly LH (When using a new quarter window assembly LH).
-
Engage the 3 clips to install the quarter window assembly LH.
Note
Allow the primer to dry for 3 minutes or more.
Tech Tips
Press the glass with a force of 98 N (10 kgf, 22 lbf) or more.
-
-
Hold the quarter window assembly LH in place securely with protective tape or equivalent until the adhesive hardens.
Note
-
Check that the clips are attached to the body correctly.
-
Check the clearance between the body and the glass.
-
-
Lightly press the outer surface of the glass to ensure that the glass is securely fit to the vehicle body.
-
Using a scraper, remove any excess or protruding adhesive.
Tech Tips
Apply adhesive onto the glass rim.
-
Hold the quarter window assembly LH using protective tape until the applied adhesive becomes hard.
-
-
INSPECT WATER LEAK
-
After the adhesive has hardened, apply water from the outside of the vehicle. Check that no water leaks into the cabin.
-
If water leaks into the cabin, allow the water to dry and add adhesive.
-
Remove the protective tape.
-
-
INSTALL CENTER PILLAR GARNISH LH
-
INSTALL REAR QUARTER TRIM GARNISH FRONT LH
-
INSTALL REAR WINDOW SIDE GARNISH LH
-
INSTALL QUARTER TRIM LID SUB-ASSEMBLY LH
-
INSTALL LUGGAGE COMPARTMENT TRIM COVER LH
-
INSTALL LUGGAGE COMPARTMENT INNER TRIM COVER LH
-
INSTALL FRONT DOOR OPENING TRIM WEATHERSTRIP LH
-
INSTALL FRONT DOOR SCUFF PLATE LH
-
CONNECT FRONT SEAT OUTER BELT ASSEMBLY LH
-
INSTALL SEPARATE TYPE REAR SEAT CUSHION ASSEMBLY LH