REAR DOOR OUTSIDE MOULDING REASSEMBLY
CAUTION / NOTICE / HINT
Use the same procedure for the RH and LH sides.
The procedure listed below is for the LH side.
PROCEDURE
INSTALL REAR DOOR UPPER OUTSIDE MOULDING PAD
Clean the rear door upper outside moulding pad installation surface with a non-residue solvent.
Apply primer to the rear door upper outside moulding pad installation area on the rear door outside moulding.
Note:Apply primer evenly so that there are no uncoated areas.
Remove the peeling paper on a new rear door upper outside moulding pad while making sure not to touch the adhesional surface.
-
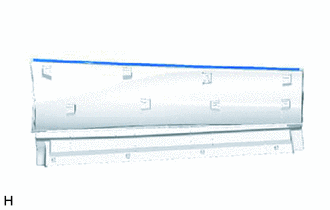
Install a new rear door upper outside moulding pad in the position shown in the illustration.
Note:Press the double-sided tape on the rear door upper outside moulding pad firmly to attach.
After the primer dries (3 minutes or more), install the rear door upper outside moulding pad.
After applying primer, reapply primer after 24 hours elapse.
INSTALL REAR DOOR NO. 1 MOULDING PAD
Tip:When installing the rear door No. 1 moulding pad, heat the rear door outside moulding using a heat light.
Standard
Item
Temperature
Rear Door Outside Moulding
20 to 30°C (68 to 86°F)
Note:Do not heat the rear door outside moulding excessively.
Clean the rear door outside moulding surface.
Using a heat light, heat the rear door outside moulding surface.
Remove the double-sided tape from the rear door outside moulding.
Wipe off any tape adhesive residue with cleaner.
-
Install a new rear door No. 1 moulding pad.
Using a heat light, heat the rear door outside moulding.
Remove the peeling paper from the face of the rear door No. 1 moulding pad.
Tip:After removing the peeling paper, keep the exposed adhesive free from foreign matter.
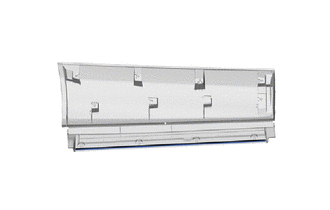
Install the rear door No. 1 moulding pad as shown in the illustration.
Tip:Press the rear door No. 1 moulding pad firmly to install it.
INSTALL REAR DOOR REAR OUTSIDE MOULDING PAD
Tip:When installing the rear door rear outside moulding pad, heat the rear door outside moulding using a heat light.
Standard
Item
Temperature
Rear Door Outside Moulding
20 to 30°C (68 to 86°F)
Note:Do not heat the rear door outside moulding excessively.
Clean the rear door outside moulding surface.
Using a heat light, heat the rear door outside moulding surface.
Remove the double-sided tape from the rear door outside moulding.
Wipe off any tape adhesive residue with cleaner.
-

Install 4 new rear door rear outside moulding pads.
Using a heat light, heat the rear door outside moulding.
Remove the peeling paper from the face of the rear door rear outside moulding pad.
Tip:After removing the peeling paper, keep the exposed adhesive free from foreign matter.
Install the 4 rear door rear outside moulding pads as shown in the illustration.
Tip:Press the rear door rear outside moulding pad firmly to install it.
INSTALL NO. 2 OUTSIDE MOULDING SEAL
Tip:When installing the No. 2 outside moulding seal, heat the rear door outside moulding using a heat light.
Standard
Item
Temperature
Rear Door Outside Moulding
20 to 30°C (68 to 86°F)
Note:Do not heat the rear door outside moulding excessively.
Clean the rear door outside moulding surface.
Using a heat light, heat the rear door outside moulding surface.
Remove the double-sided tape from the rear door outside moulding.
Wipe off any tape adhesive residue with cleaner.
-
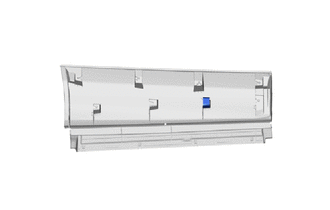
Install a new No. 2 outside moulding seal.
Using a heat light, heat the rear door outside moulding.
Remove the peeling paper from the face of the 2 No. 2 outside moulding seals.
Tip:After removing the peeling paper, keep the exposed adhesive free from foreign matter.
Install the No. 2 outside moulding seal as shown in the illustration.
Tip:Press the No. 2 outside moulding seal firmly to install it.