WATER PUMP WITH MOTOR INSTALLATION
PROCEDURE
-
INSTALL HV WATER PUMP BRACKET SUB-ASSEMBLY
Tech Tips
Perform this procedure only when replacement of the HV water pump bracket sub-assembly is necessary.
-
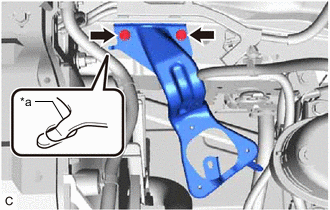
*a Claw Engage the claw to the vehicle body and install the HV water pump bracket sub-assembly with the 2 bolts.
- Torque:
- 12.5 N*m { 127 kgf*cm, 9 ft.*lbf }
-
Engage the 3 clamps to the HV water pump bracket sub-assembly.
-
Install the air cleaner assembly with No. 2 air cleaner hose.
-
-
INSTALL INVERTER WATER PUMP ASSEMBLY
-
Install the inverter water pump assembly to the HV water pump bracket sub-assembly with the 3 bolts.
- Torque:
- 6.1 N*m { 62 kgf*cm, 54 in.*lbf }
-
Connect the inverter water pump assembly connector.
-
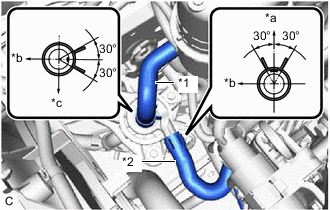
*1 Inlet Hybrid Water Pump Hose *2 Outlet No. 1 Hybrid Water Pump Hose *a Up *b Front *c Left Connect the inlet hybrid water pump hose and outlet No. 1 hybrid water pump hose, and slide the 2 clips to secure them.
Note
To prevent foreign matter from entering the inverter water pump assembly and cooling system, do not remove the pieces of cloth from the pipe and disconnected hose until installation.
Tech Tips
-
Make sure that the clips are positioned as shown in the illustration.
-
Make sure to align the alignment marks of the hoses with the ribs of the inverter water pump assembly.
-
-
-
INSTALL INLET NO. 1 AIR CLEANER
-
INSTALL COOL AIR INTAKE DUCT SEAL
-
ADD COOLANT (for Inverter)
-
INSPECT FOR COOLANT LEAK (for Inverter)
-
INSTALL ENGINE ROOM SIDE COVER
-
INSTALL NO. 1 ENGINE UNDER COVER ASSEMBLY