HV BATTERY INSTALLATION

PROCEDURE
-
INSTALL NO. 2 HYBRID BATTERY PACK WIRE
-
Install the No. 2 hybrid battery pack wire with the 2 clamps.
-
-
INSTALL HYBRID BATTERY JUNCTION BLOCK ASSEMBLY
-
INSTALL NO. 2 HYBRID BATTERY SHIELD SUB-ASSEMBLY
CAUTION:
Wear insulated gloves.
-
Install the No. 2 hybrid battery shield sub-assembly with the 4 bolts.
- Torque:
- 7.5 N*m { 76 kgf*cm, 66 in.*lbf }
-
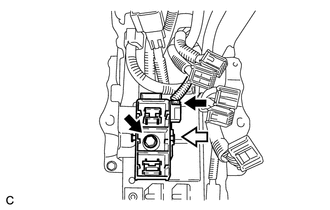
Install the electric vehicle battery plug assembly with the bolt as shown in the illustration.
- Torque:
- 7.5 N*m { 76 kgf*cm, 66 in.*lbf }
-
Connect the connector.
Note
Make sure that the connector is connected securely.
-
Connect the clamp.
-
Connect the connector and clamp.
Note
Make sure that the connector is connected securely.
-
-
INSTALL BATTERY SMART UNIT
-
INSTALL NO. 2 HYBRID VEHICLE BATTERY COVER PANEL LH
CAUTION:
Wear insulated gloves.
-
Install the No. 2 hybrid vehicle battery cover panel LH with the 4 bolts.
- Torque:
- 7.5 N*m { 76 kgf*cm, 66 in.*lbf }
-
Connect the connector.
-
-
INSTALL HV BATTERY
CAUTION:
Wear insulated gloves.
Note
-
Insulate the removed connectors and terminals with insulating tape.
-
Since the HV battery is very heavy, 2 people are needed to remove the HV battery.
-
Use cardboard or other similar material to protect the HV battery and vehicle body from damage.
-
When moving the hybrid battery, make sure to use an engine lifter.
-
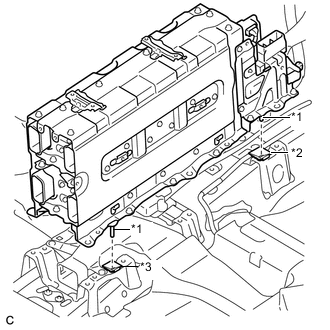
Text in Illustration *1 Guide Pin *2 Front Hybrid Battery Guide *3 Rear Hybrid Battery Guide Insert the guide pins into the front hybrid battery guide and rear hybrid battery guide to temporarily install the HV battery in the vehicle.
Note
Take care not to deform the guide pins.
-
Install the HV battery to the vehicle with the 6 bolts.
- Torque:
- 19 N*m { 194 kgf*cm, 14 ft.*lbf }
-
Install the floor carpet to the HV battery.
-
Connect the 2 connectors to the battery smart unit.
-
-
INSTALL NO. 4 HYBRID BATTERY INTAKE DUCT
-
Install the No. 4 hybrid battery intake duct with the 2 clips.
-
-
INSTALL NO. 1 HYBRID BATTERY EXHAUST DUCT
-
Install the No. 1 hybrid battery exhaust duct with the 2 clips.
-
-
CONNECT FRAME WIRE
CAUTION:
Wear insulated gloves.
-
Using an insulated tool, connect the frame wire with the 3 nuts.
- Torque:
- 9.0 N*m { 92 kgf*cm, 80 in.*lbf }
Note
Be sure to connect the frame wires to the correct terminals.
-
-
INSTALL NO. 1 HYBRID BATTERY SHIELD SUB-ASSEMBLY
CAUTION:
Wear insulated gloves.
-
Connect the 4 connectors to the battery smart unit.
-
Check high voltage cable connection condition.
-
Check that each wire harness is being installed securely.
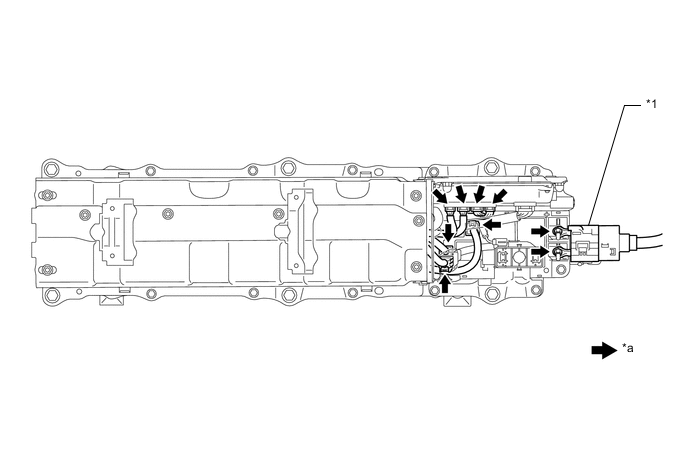
Text in Illustration *1 Frame Wire *a Front of Vehicle Note
-
Be sure to connect the frame wire to the correct terminals as shown in the illustration.
-
The connectors should be connected securely.
-
The nuts should be fastened securely.
-
-
-
Install the No. 1 hybrid battery shield sub-assembly with the 4 bolts.
- Torque:
- 7.5 N*m { 76 kgf*cm, 66 in.*lbf }
-
Connect the 2 clamps and electrical key oscillator clamp.
-
-
INSTALL CONSOLE BOX ASSEMBLY
-
INSTALL FRONT NO. 2 CONSOLE BOX INSERT
-
INSTALL UPPER CONSOLE PANEL SUB-ASSEMBLY
-
INSTALL CENTER FLOOR CARPET COVER LH
-
INSTALL CENTER FLOOR CARPET COVER RH
-
INSTALL FRONT SEAT ASSEMBLY RH
-
for Manual Seat:
-
for Power Seat:
-
-
INSTALL SERVICE PLUG GRIP
-
PERFORM UTILITY
Note
Perform "Battery Status Info Update" after replacing the malfunctioning HV battery Click here.