CONDENSER(except 1WW, 8NR-FTS) REMOVAL
PROCEDURE
RECOVER REFRIGERANT FROM REFRIGERATION SYSTEM
REMOVE FRONT BUMPER ASSEMBLY (for Sedan)
REMOVE FRONT BUMPER ASSEMBLY (except Sedan)
REMOVE HEADLIGHT ASSEMBLY LH (for Sedan)
REMOVE HEADLIGHT ASSEMBLY RH (for Sedan)
Tip:Use the same procedure as for the LH side.
REMOVE HEADLIGHT ASSEMBLY LH (except Sedan)
for 1ND-TV:Click here
REMOVE HEADLIGHT ASSEMBLY RH (except Sedan)
for 1ND-TV:
Tip:Use the same procedure as for the LH side.
REMOVE BATTERY CLAMP SUB-ASSEMBLY
-
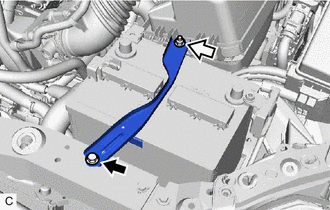

Bolt

Nut
Remove the bolt, nut and battery clamp sub-assembly, battery clamp bolt.
-
DISCONNECT NO. 1 WATER HOSE CLAMP BRACKET (for 1ND-TV)
for Sedan:Click here
except Sedan:Click here
DISCONNECT NO. 1 WATER HOSE CLAMP BRACKET (for 1NR-FE)
for Sedan:Click here
except Sedan:Click here
DISCONNECT NO. 1 WATER HOSE CLAMP BRACKET (for 1ZR-FAE)
for Sedan:Click here
except Sedan:Click here
DISCONNECT NO. 1 WATER HOSE CLAMP BRACKET (for 1ZR-FE)
DISCONNECT NO. 1 WATER HOSE CLAMP BRACKET (for 2ZR-FE)
REMOVE HOOD LOCK ASSEMBLY (for Sedan)
for LHD:Click here
for RHD:Click here
REMOVE UPPER RADIATOR SUPPORT SUB-ASSEMBLY (for 1ND-TV)
for Sedan:Click here
except Sedan:Click here
REMOVE UPPER RADIATOR SUPPORT SUB-ASSEMBLY (for 1NR-FE)
for Sedan:Click here
except Sedan:Click here
REMOVE UPPER RADIATOR SUPPORT SUB-ASSEMBLY (for 1ZR-FAE)
for Sedan:Click here
except Sedan:Click here
REMOVE UPPER RADIATOR SUPPORT SUB-ASSEMBLY (for 1ZR-FE)
REMOVE UPPER RADIATOR SUPPORT SUB-ASSEMBLY (for 2ZR-FE)
REMOVE NO. 1 RADIATOR SUPPORT (for 1ND-TV)
REMOVE NO. 2 FAN SHROUD
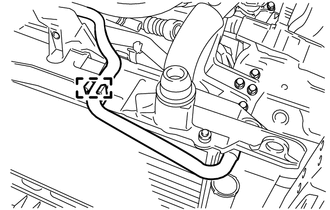
Disengage the clamp and disconnect the No. 3 water by-pass hose from the No. 2 fan shroud.
-
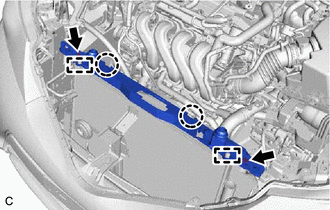
Remove the 2 bolts.
Disengage the 2 claws and 2 guides, and remove the No. 2 fan shroud.
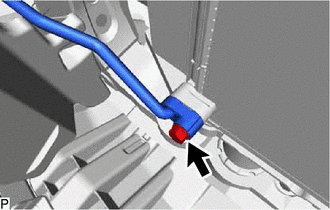
DISCONNECT DISCHARGE HOSE SUB-ASSEMBLY
-
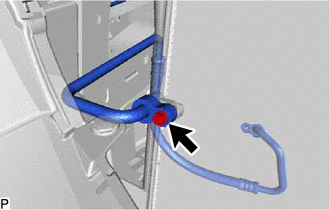
Remove the bolt and disconnect the discharge hose sub-assembly from the condenser with receiver assembly.
Remove the O-ring from the discharge hose sub-assembly.
Note:Seal the openings of the disconnected parts using vinyl tape to prevent entry of moisture and foreign matter.
-
DISCONNECT AIR CONDITIONER TUBE ASSEMBLY
-
Remove the bolt and disconnect the air conditioner tube assembly from the condenser with receiver assembly.
Remove the O-ring from the air conditioner tube assembly.
Note:Seal the openings of the disconnected parts using vinyl tape to prevent entry of moisture and foreign matter.
-
REMOVE CONDENSER WITH RECEIVER ASSEMBLY
-

Disengage the 2 guides and remove the condenser with receiver assembly as shown in the illustration.
Note:Do not damage the condenser with receiver assembly or radiator when removing the condenser with receiver assembly.
-