FRONT SEAT ASSEMBLY DISASSEMBLY
CAUTION / NOTICE / HINT
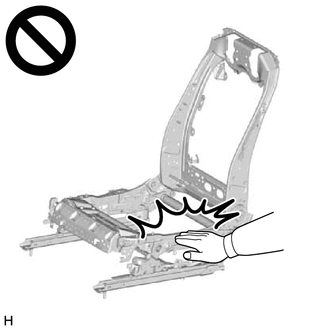
CAUTION:
-
Wear protective gloves. Sharp areas on the parts may injure your hands.
-
This may result in injury.
Tech Tips
-
Use the same procedure for RHD and LHD vehicles.
-
The procedure listed below is for LHD vehicles.
-
Use the same procedure for the RH side and LH side.
-
The following procedure is for the LH side.
PROCEDURE
-
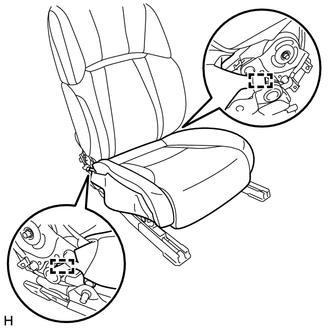
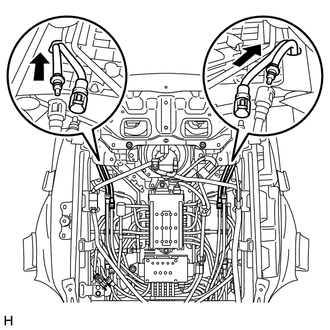
REMOVE FRONT SEAT INNER BELT ASSEMBLY LH (for Driver Side)
-
REMOVE FRONT SEAT INNER BELT ASSEMBLY RH (for Front Passenger Side)
-
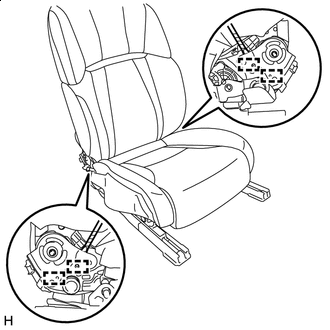
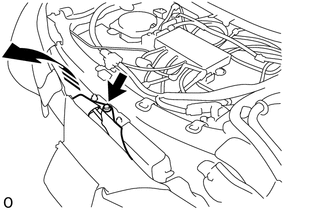
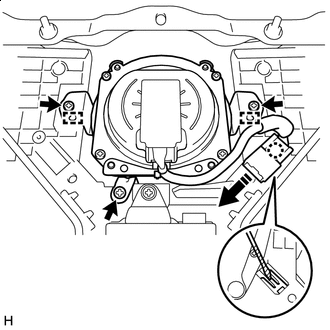
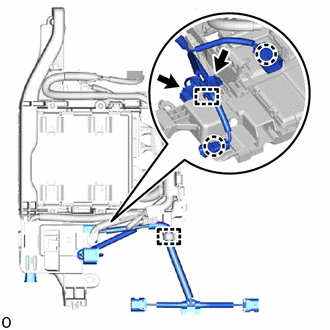
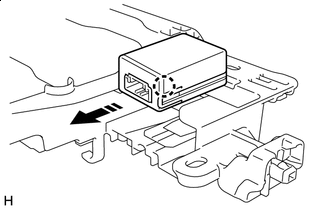
REMOVE SEAT POSITION AIRBAG SENSOR (for Driver Side)
-
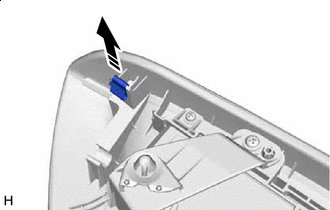
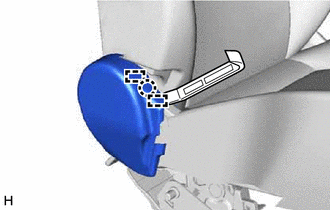
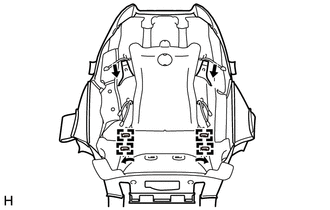
REMOVE SLIDE AND VERTICAL POWER SEAT SWITCH KNOB
-
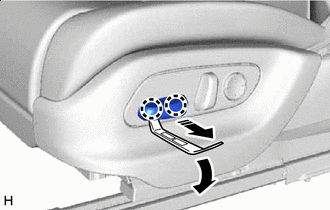

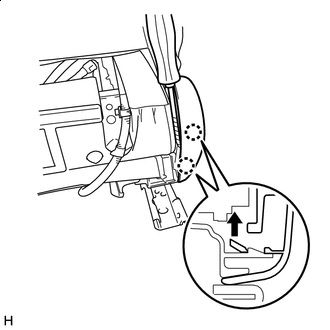
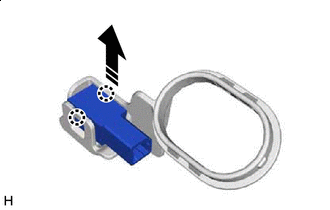
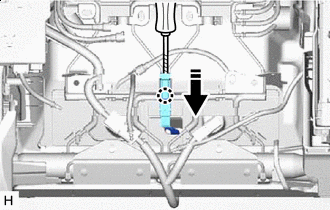
Remove in this Direction Using moulding remover A, detach the claw and remove the slide and vertical power seat switch knob.
-
-
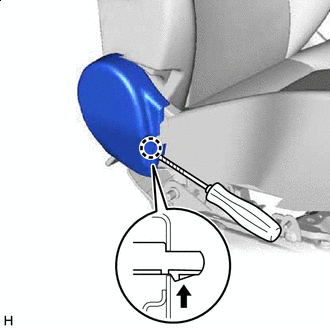
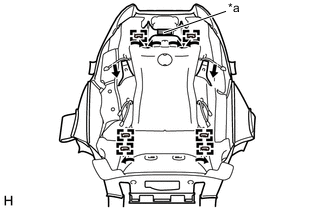
REMOVE RECLINING POWER SEAT SWITCH KNOB
-
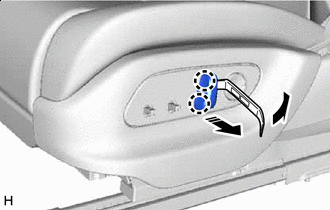
Remove in this Direction Using moulding remover A, detach the claw and remove the reclining power seat switch knob.
-
-
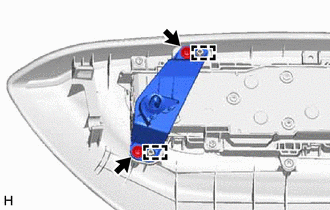
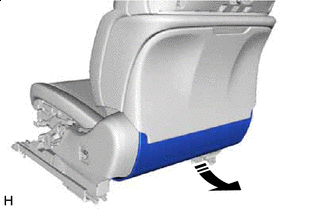
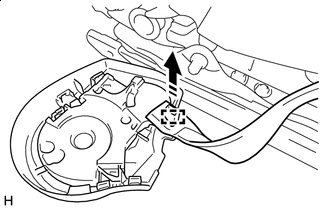
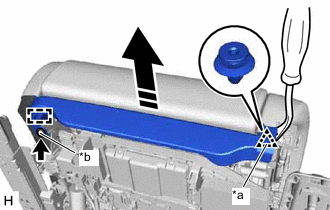
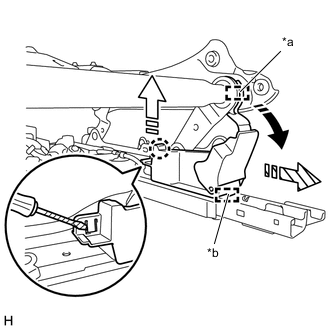
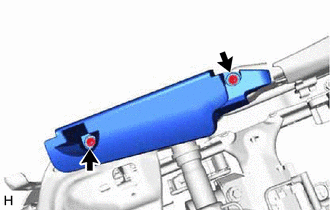
REMOVE FRONT POWER ADJUSTER SHIELD LH
Note
If the front power adjuster shield is removed, replace the seat cover fastener with a new one.
-
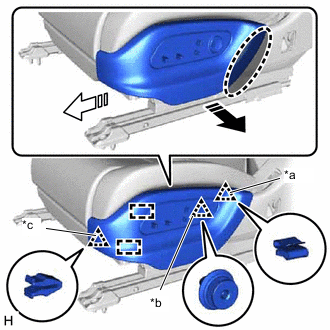
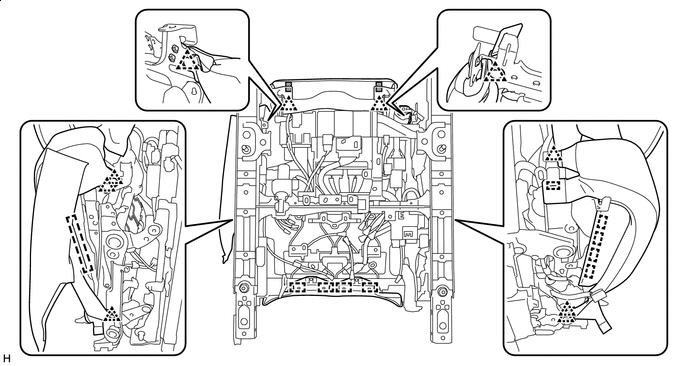
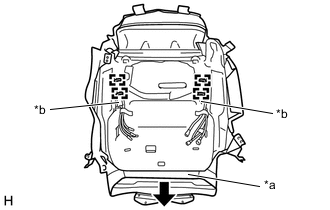
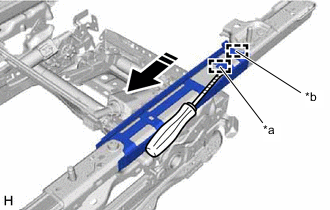
*a Seat Cover Fastener *b Clip A *c Clip B 
Place Hand Here Remove in this Direction (1) 
Remove in this Direction (2) Place your hand at the position shown in the illustration and pull in the removal direction (1) to detach the seat cover fastener and clip A.
-
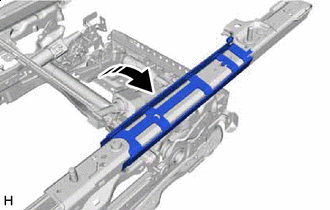
Place your hand in the position shown in the illustration and slide in the removal direction (2) to detach the guide and clip B.
-

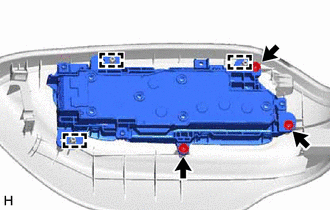
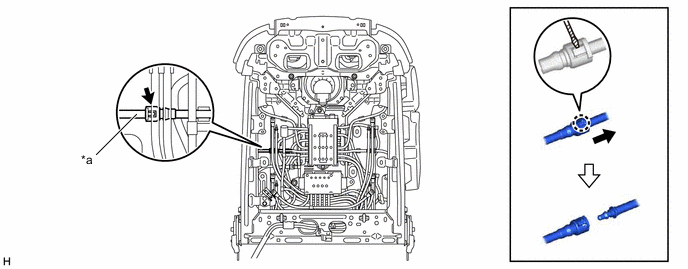
Remove the wire harness from the clamp.
-
Disconnect the connector and remove the front power seat switch assembly LH together with the front power adjuster shield LH.
-
Remove in this Direction Remove the seat cover fastener.
-
-
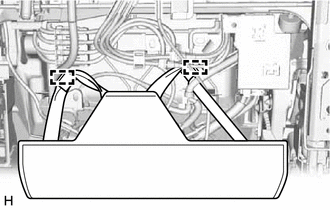
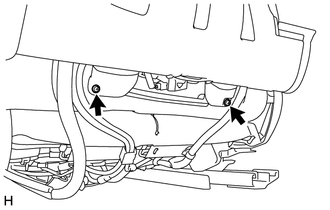
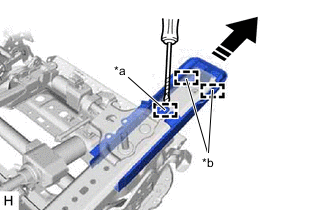
REMOVE SEAT ADJUSTER SHIELD CLAMP BRACKET LH
-
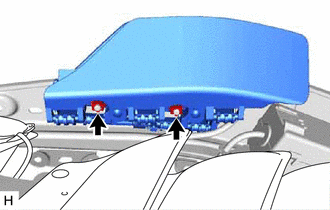
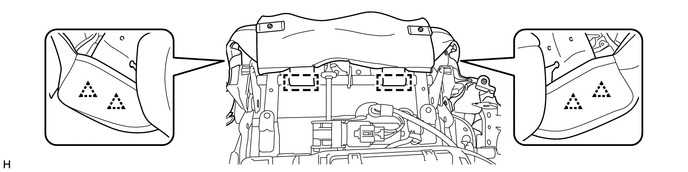
Remove the 2 screws.
-
Detach the guides and seat adjuster shield clamp bracket LH.
-
-
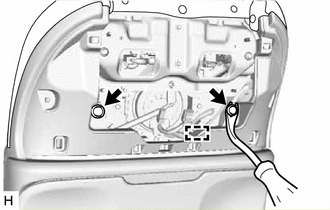
REMOVE BEZEL SWITCH HOLE COVER
-
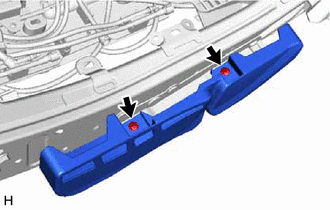
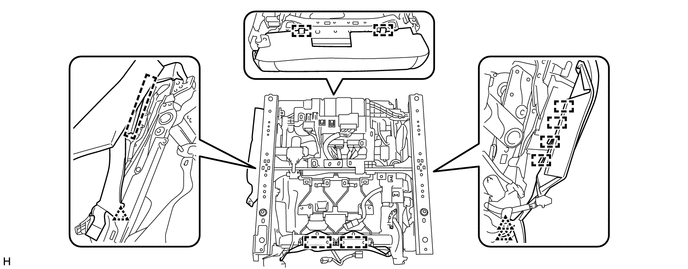
Remove the 3 screws.
-
Detach the guide and remove the front power seat switch assembly LH together with the bezel switch hole cover.
-
-
REMOVE FRONT POWER SEAT SWITCH ASSEMBLY LH
-
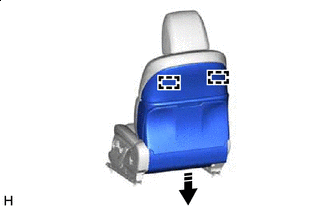
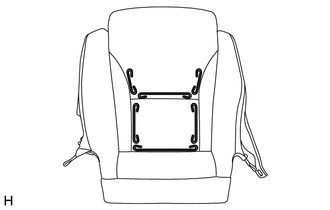
REMOVE FRONT SEATBACK BOARD SUB-ASSEMBLY LH
-
Detach the hook of the front seatback board sub-assembly LH.
-
Remove in this Direction Fold back the front seatback board sub-assembly LH in the direction of the arrow shown in the illustration.
-
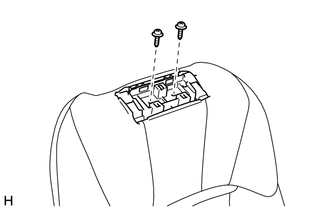
Remove the 2 screws.
-
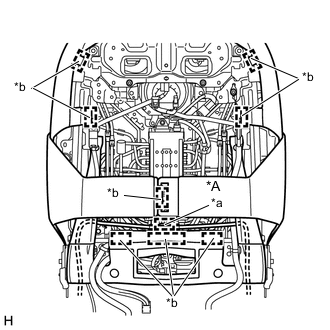
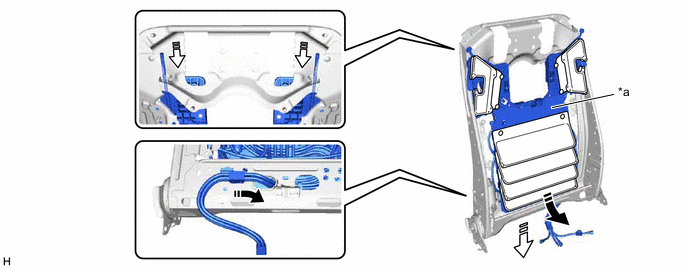
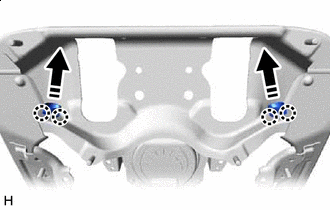
w/ Rear Seat Entertainment System:
-
Using a clip remover, remove the 2 clips.
-
Remove the wire harness from the clamp.
-
-
Remove in this Direction While pulling in the removal direction shown in the illustration to detach the guide and remove the front seatback board sub-assembly LH.
-
-
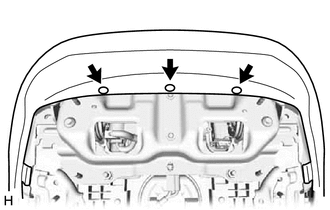
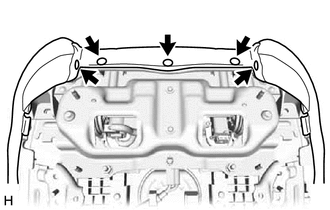
REMOVE FRONT SEATBACK PANEL A (w/o Rear Seat Entertainment System)
-
Remove in this Direction Remove the 5 screws and front seatback panel A.
-
-
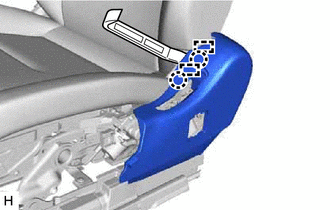
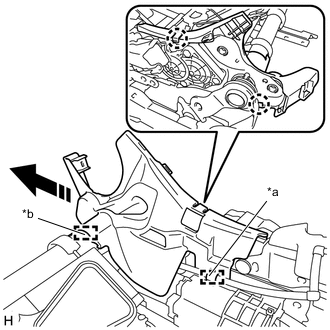
REMOVE FRONT SEAT CUSHION SHIELD LH
-
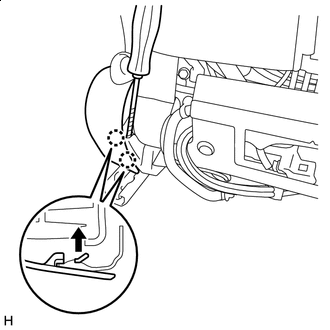

Protective Tape Using a screwdriver with its tip wrapped with protective tape, detach the claw.
-
Using moulding remover A, detach the claw and guide.
-
Remove in this Direction Protective Tape Using a thin-bladed screwdriver with its tip wrapped with protective tape, detach the claw and slide the front seat cushion shield LH in the removal direction shown in the illustration.
-

Protective Tape Using a thin-bladed screwdriver with its tip wrapped with protective tape, detach the claw and remove the front seat cushion shield LH.
-
-
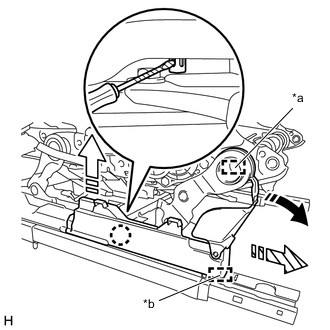
REMOVE FRONT INNER SEAT CUSHION SHIELD LH
-
Protective Tape Using a screwdriver with its tip wrapped with protective tape, detach the claw.
-
Using moulding remover A, detach the claw and guide.
-
Protective Tape Using a thin-bladed screwdriver with its tip wrapped in protective tape, detach the claw.
-
Remove in this Direction Detach the strap of the separate type front seat cushion cover and remove the front inner seat cushion shield LH.
-
-
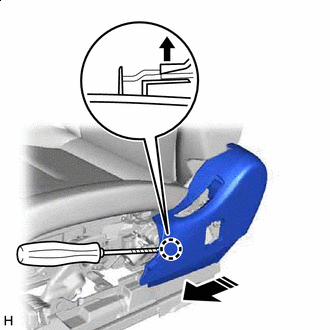
REMOVE FRONT SEAT FRONT CUSHION SHIELD LH
-
*a Clip A *b Clip B Remove in this Direction Using a clip remover, detach clip A.
-
Using a clip remover, remove clip B.
-
Pull in the removal direction shown in the illustration to detach the guide and remove the front seat front cushion shield LH.
-
-
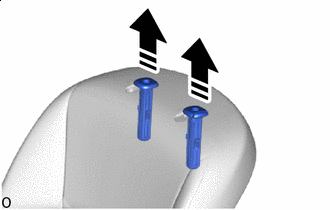
REMOVE FRONT SEAT HEADREST ASSEMBLY
-
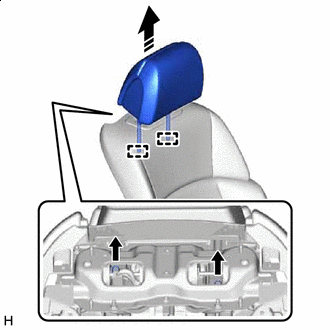
Remove in this Direction for Power Headrest:
Lift up the pin and detach it to remove the front seat headrest assembly.
-
for Manual Headrest:
Remove the front seat headrest assembly.
-
-
REMOVE FRONT SEATBACK BOARD (except Front Passenger Side Folding Headrest)
-
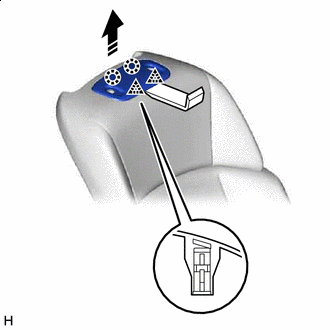
Remove in this Direction Using moulding remover B, detach the clip.
-
Detach the claw and remove front seatback board.
-
-
REMOVE FRONT SEAT HEADREST SUPPORT (for Manual Headrest)
-
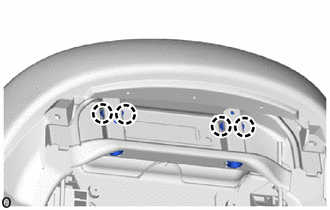
Detach the claw.
-
Remove in this Direction Remove the 2 front seat headrest supports.
-
-
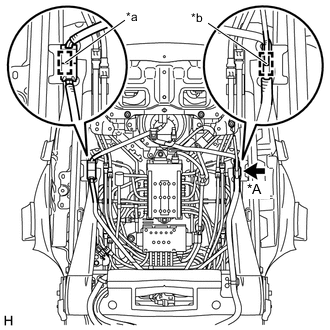
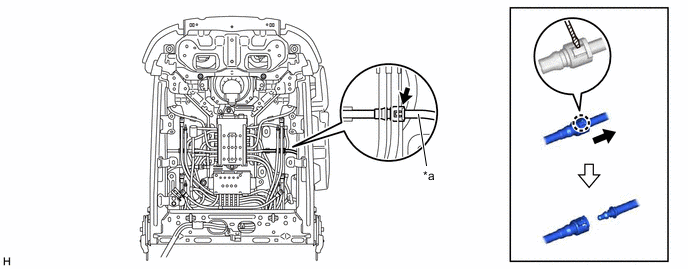
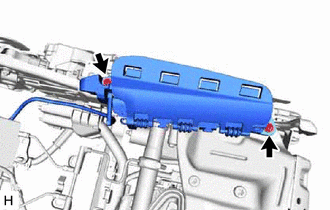
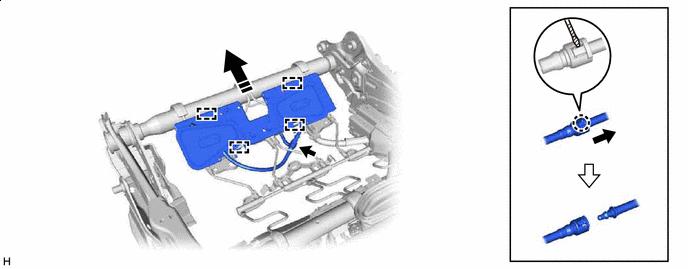
REMOVE SEPARATE TYPE FRONT SEATBACK ASSEMBLY
-
Disconnect the 2 front No. 2 seat wire LH connectors and remove the wire harness clamp.
-
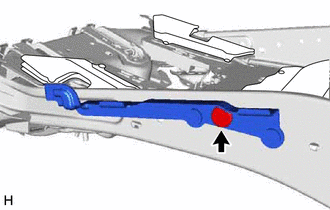
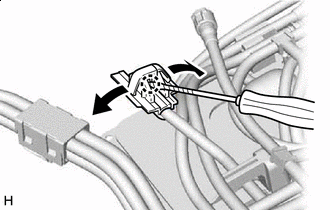
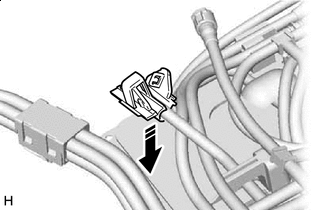
Remove in this Direction Protective Tape Detach the wire harness clamp.
-
Using a thin-bladed screwdriver with its tip wrapped with protective tape, detach the claw and disconnect the wire harness of the front seat airbag assembly LH.
-
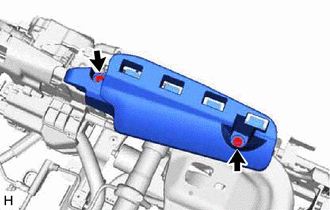
w/ Seat Heater System:
-
Disconnect seatback heater connector and detach the wire harness clamp.
-
-
Remove in this Direction Protective Tape w/ Rear Seat Entertainment System:
-
Detach the wire harness clamp.
-
Using a thin-bladed screwdriver with its tip wrapped with protective tape, detach the claw and disconnect the seat audio wire.
-
-
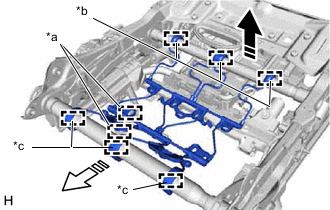
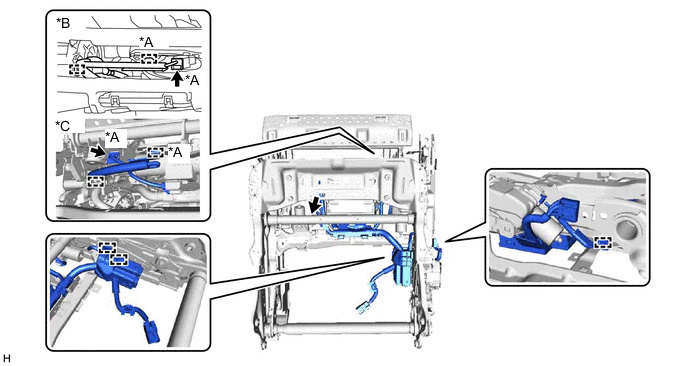
w/ Refresh Seat, Seat Cushion Side Support, Seat Cushion Pelvic Support:
-
Using a thin-bladed screwdriver with its tip wrapped with protective tape, detach the claw and disconnect the joint.
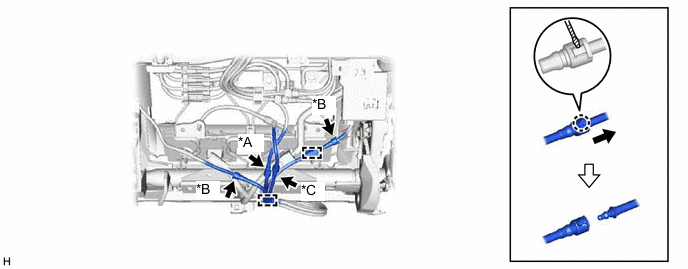
*A w/ Refresh Seat *B w/ Seat Cushion Side Support *C w/ Seat Cushion Pelvic Support - - Protective Tape - - -
Detach the tube clamp and remove the tube.
-
-
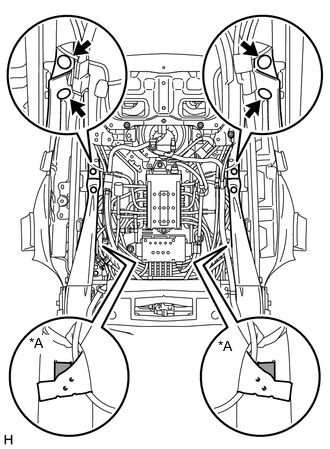
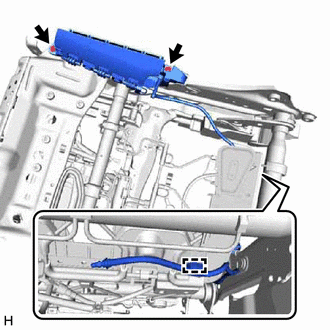
Detach the hook.
-

Remove the 4 bolts.
-
Protective Tape Using a screwdriver with its tip wrapped with protective tape, detach the guide and remove the separate type front seatback assembly.
-
-
REMOVE SEPARATE TYPE FRONT SEATBACK COVER WITH PAD
-
except Front Passenger Side Folding Headrest:
-
Remove the 2 screws.
-
-
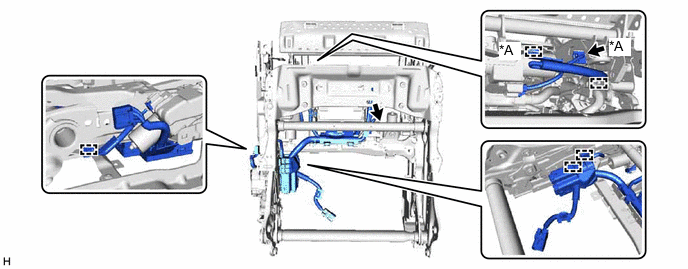
w/ Seat Heater System:
-
*A w/ Seat Heater System *a Wire Harness Clamp *b Hook Detach the wire harness clamp of the seatback heater.
-
-
Detach the hook.
-
Using a clip remover, remove the 3 clips.
-
w/ Rear Seat Entertainment System:
-
Using a clip remover, remove the 5 clips.
-
-
*A w/ Rear Seat Entertainment System *a Connector Clamp *b Wire Harness Clamp Detach the connector clamp.
-
w/ Rear Seat Entertainment System:
-
Detach the wire harness clamp.
-
-
*A w/ Seat Heater System 
Fastening Tape Using a clip remover, remove the 4 clips.
-
w/ Seat Heater System:
Detach the fastening tape and remove the wire harness of the seatback heater.
-
w/ Refresh Seat:
-
Using a thin-bladed screwdriver with its tip wrapped with protective tape, detach the claw and disconnect the joint.
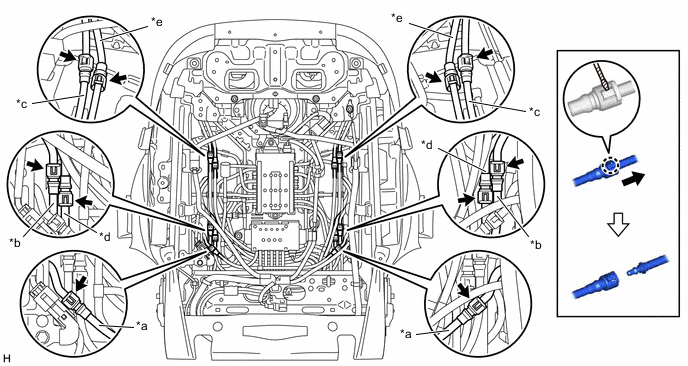
*a Orange Tube Color *b Yellow Tube Color *c Blue Tube Color *d Green Tube Color *e Clear Tube Color - - Protective Tape - -
-
-
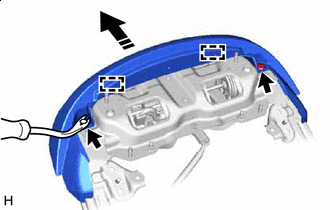
for Standard Seat Type:
-
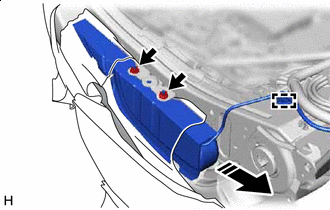
Remove in this Direction Remove the 2 nuts.
-
Detach the wire harness clamp.
-
Pull in the removal direction shown in the illustration to remove the front seat airbag assembly LH.
-
-
for Sports Seat Type:
-
Remove the nut and bracket of the separate type front seatback cover.
-
-
w/ Refresh Seat:
-
Pull the tube out through the hole in the lumbar support adjuster assembly LH.
-
-
Remove the separate type front seatback cover with pad.
-
-
REMOVE SEPARATE TYPE FRONT SEATBACK COVER
-
except Front Passenger Side Folding Headrest:
-
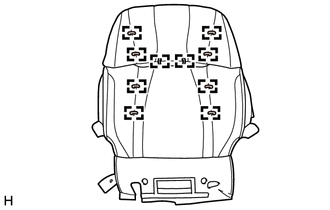
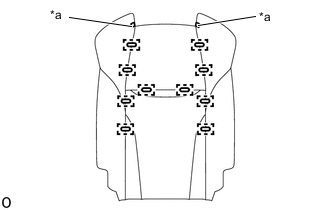
Remove the 4 hog rings and pull out the strap.
-
-
*a Fastening Tape w/ Front Passenger Side Folding Headrest:
-
Remove the 6 hog rings.
-
Detach the fastening tape and pull out the strap.
-
-
for Standard Seat Type:
-
Remove the 10 hog rings and separate type front seatback cover.
-
-
*a Fastening Tape for Sports Seat Type:
-
Remove the 10 hog rings.
-
Detach the fastening tape and remove the separate type front seatback cover.
-
-
except Front Passenger Side Folding Headrest:
-
Detach the guide and remove the headrest base.
-
-
-
REMOVE SEAT COVER WIRE
-
Remove the seat cover wire.
-
-
REMOVE FRONT SEAT AIRBAG ASSEMBLY LH (for Sports Seat Type)
-
REMOVE SEAT AUDIO WIRE (w/ Rear Seat Entertainment System)
-
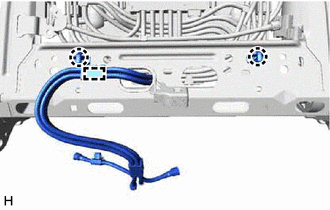
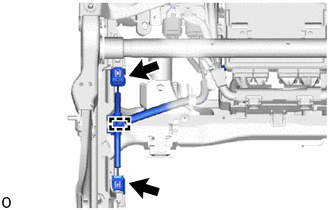
*a Guide *b Wire Harness Clamp Remove the bolt.
-
Detach the guide and wire harness clamp and remove the seat audio wire.
-
-
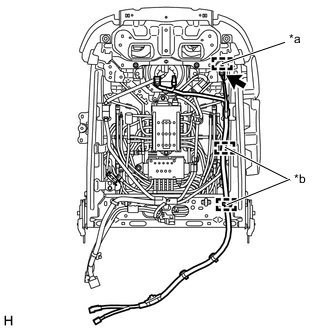
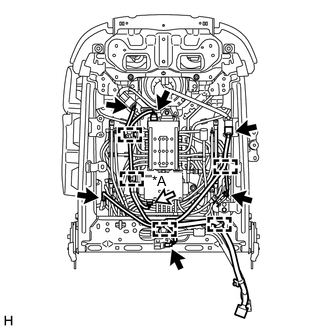
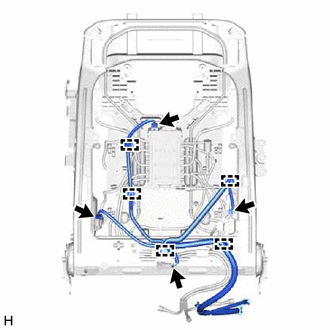
REMOVE FRONT NO. 2 SEAT WIRE LH
-
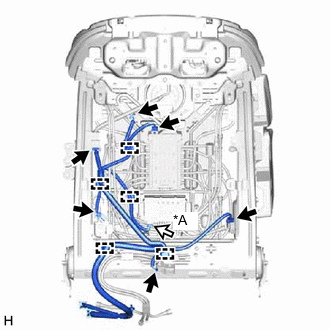
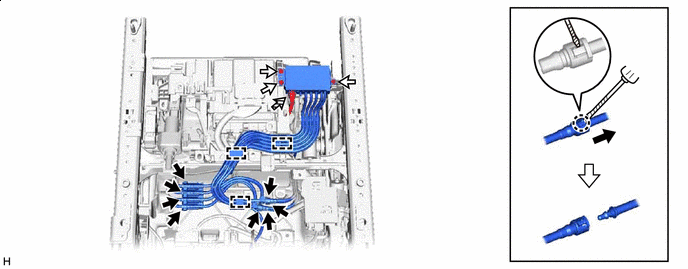
*A w/ Refresh Seat w/o Refresh Seat:
-
Disconnect the 6 connectors.
-
-
w/ Refresh Seat:
-
Disconnect the 7 connectors.
-
-
for Manual Headrest:
-
Disconnect the 4 connectors.
-
-
Detach the wire harness clamp and remove the front No. 2 seat wire LH.
-
-
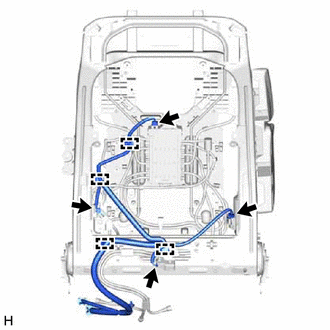
REMOVE FRONT NO. 2 SEAT WIRE RH
-
*A w/ Refresh Seat w/o Refresh Seat:
-
Disconnect the 6 connectors.
-
-
w/ Refresh Seat:
-
Disconnect the 7 connectors.
-
-
for Manual Headrest:
-
Disconnect the 4 connectors.
-
-
Detach the wire harness clamp and remove the front No. 2 seat wire RH.
-
-
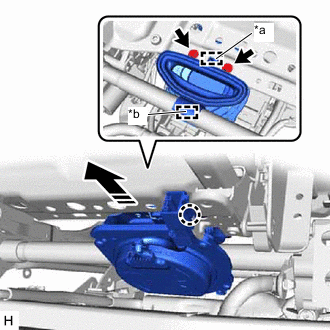
REMOVE SEATBACK CLIMATE CONTROL BLOWER LH (w/ Climate Control Seat System)
-
Remove in this Direction Protective Tape Using a thin-bladed screwdriver with its tip wrapped with protective tape, detach the claw and remove the connector.
-
Remove the 3 screws.
-
Detach the guide and remove the seatback climate control blower LH.
-
-
REMOVE FRONT NO. 2 SEATBACK SUPPORT LH (w/ Seatback Side Support)
-
Using a thin-bladed screwdriver with its tip wrapped with protective tape, detach the claw and disconnect the joint.
*a Yellow Tube Color - - Protective Tape - - -
Remove the 2 nuts and front No. 2 seatback support LH.
-
-
REMOVE FRONT NO. 3 SEATBACK SUPPORT LH (w/ Seatback Side Support)
-
Using a thin-bladed screwdriver with its tip wrapped with protective tape, detach the claw and disconnect the joint.
*a Yellow Tube Color - - Protective Tape - - -
Remove the 2 nuts and front No. 3 seatback support LH.
-
-
REMOVE FRONT SEATBACK SUPPORT RH
-
Remove the 2 screws and front seatback support RH.
-
-
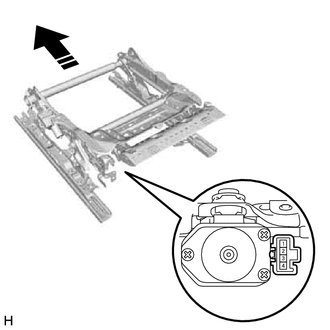
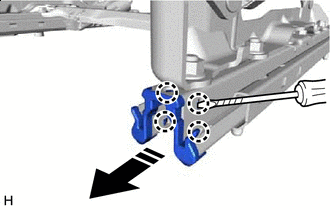
REMOVE FRONT SEAT SET BRACKET SUB-ASSEMBLY LH
-
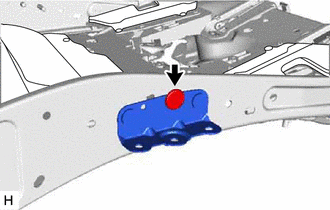
Using a clip remover, remove the clip and front seat set bracket sub-assembly LH.
-
-
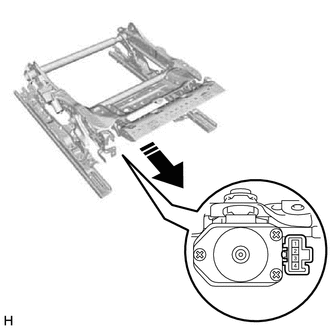
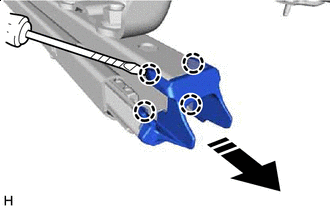
REMOVE FRONT SEAT SET BRACKET SUB-ASSEMBLY RH
-
Using a clip remover, remove the clip and front seat set bracket sub-assembly RH.
-
-
REMOVE LUMBER SUPPORT PUMP SUB-ASSEMBLY LH
-
REMOVE FRONT SEATBACK BEZEL
-
Remove in this Direction Using a clip remover, remove the 2 clips.
-
Slide in the removal direction shown in the illustration to detach the guide and remove the front seatback bezel.
-
-
REMOVE FRONT SEAT HEADREST INSERT SUB-ASSEMBLY LH (for Power Headrest)
-
REMOVE LUMBAR SUPPORT ADJUSTER ASSEMBLY LH
Note
When servicing, always hold the lumbar base and do not hold only the tube and joint areas.
-
Detach the claw and the tube clamp.
-
While pulling in the removal direction (1) shown in the illustration to pull the tube out through the hole.
*a Lumbar Base - - Remove in this Direction (1) Remove in this Direction (2) -
Pull down in the removal direction (2) shown in the illustration to remove the lumbar support adjuster assembly LH.
-
-
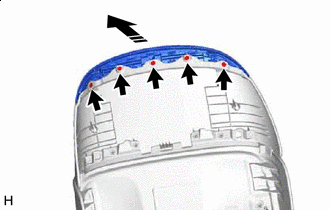
REMOVE FRONT SEATBACK EDGE PROTECTOR
Tech Tips
Use the same procedure for the other locations.
-
Protective Tape Using a thin-bladed screwdriver with its tip wrapped in protective tape, detach the claw.
-
Remove in this Direction Remove the front seatback edge protector.
-
-
REMOVE FRONT SEATBACK HOOK
-
Remove in this Direction Detach the claw and remove the 2 front seatback hooks.
-
-
REMOVE FRONT SEATBACK BEZEL
-
Remove in this Direction Detach the claw and remove the No. 3 interior illumination light assembly together with the front seatback bezel.
-
-
REMOVE NO. 3 INTERIOR ILLUMINATION LIGHT ASSEMBLY
-
Remove in this Direction Detach the claw and remove the No. 3 interior illumination light assembly from the front seatback bezel.
-
-
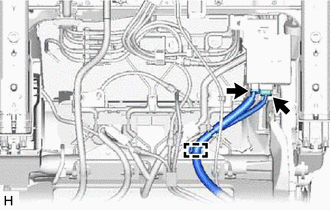
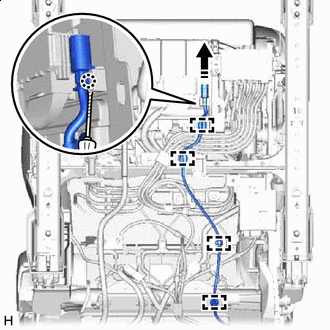
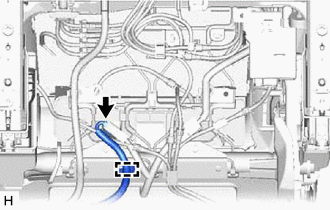
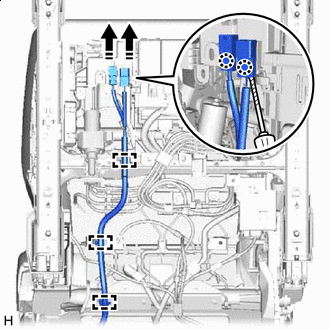
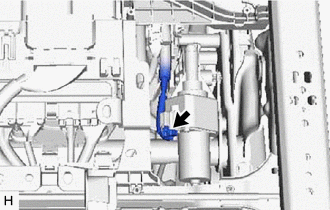
REMOVE SEAT CHECK VALVE WITH HOSE LH (w/ Refresh Seat)
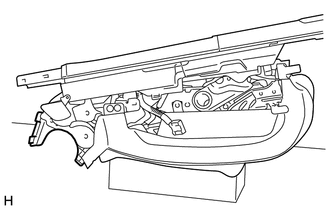
Note
Perform work with the reclining adjuster inside cover on top of a box to prevent it from becoming damaged.
-
Using a thin-bladed screwdriver with its tip wrapped with protective tape, detach the claw and disconnect the joint.

Joint 
Screw 
Connector Protective Tape -
Disconnect the connector.
-
Remove the 3 screws.
-
Detach the tube clamp and remove the seat check valve with hose LH.
-
-
REMOVE SEPARATE TYPE FRONT SEAT CUSHION COVER WITH PAD
-
Disconnect the connector of the front vertical motor.
-
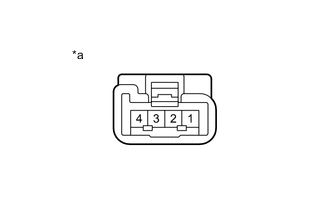
*a Component without harness connected
(Front Vertical Motor (Front Seat Adjuster Assembly))
Connect the No. 1 terminal of the front vertical motor to the positive (+) battery terminal, and the No. 4 terminal to the negative (-) battery terminal and then raise the cushion height to the uppermost position.
Note
After performing this procedure, initialize the seat ECU (position control ECU assembly).
-

Disconnect the connector of the rear lifter motor.
-
*a Component without harness connected
(Rear Lifter Motor (Front Seat Adjuster Assembly))
Connect the No. 1 terminal of the rear lifter motor to the positive (+) battery terminal, and the No. 4 terminal to the negative (-) battery terminal and then raise the cushion height to the uppermost position.
Note
After performing this procedure, initialize the seat ECU (position control ECU assembly).
-
w/ Ottoman:
-
Disconnect the connector of the ottoman motor.
-
*a Component without harness connected
(Ottoman Motor (Front Seat Adjuster Assembly))
Connect the No. 1 terminal of the ottoman motor to the positive (+) battery terminal, and the No. 4 terminal to the negative (-) battery terminal and then adjust the length of the cushion to the frontmost position.
Note
After performing this procedure, initialize the seat ECU (position control ECU assembly).
-
-
w/ Seat Heater System:
-
Detach the seat cushion heater clamp and disconnect the connector.
-
-
for Front Passenger Side:
-
Disconnect the connector of the occupant detection sensor.
-
Remove in this Direction Protective Tape Using a thin-bladed screwdriver wrapped with protective tape, detach the claw and disconnect the connector of the occupant detection sensor.
-
-
w/ Ottoman:
-
Detach the hook.
Fastening Tape - - -
Using a clip remover, detach the clip.
-
Detach the fastening tape and open the separate type front seat cushion cover.
-
Detach the hook.
-
Using a clip remover, detach the clip.
-
-
w/o Ottoman:
-
Detach the hook.
-
Using a clip remover, detach the clip.
-
-
Remove the separate type front seat cushion cover with pad.
-
-
REMOVE SEPARATE TYPE FRONT SEAT CUSHION COVER
-
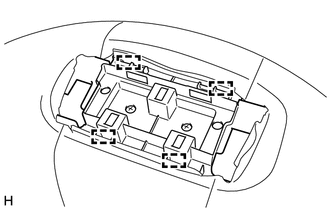
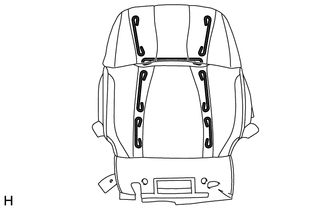
*a Band *b Strap Pull the band of the separate type front seat cushion cover out from the separate type front seat cushion pad.
-
Remove the 4 hog rings and pull out the strap from the hole of the separate type front seat cushion pad.
-

Remove the 8 hog rings and separate type front seat cushion cover.
-
-
REMOVE SEAT COVER WIRE
-
Remove the seat cover wire.
-
-
REMOVE SEAT RECLINING ADJUSTER INSIDE COVER LH
-
*a Tube Clamp *b Clamp Remove in this Direction w/ Seat Cushion Side Support:
-
Remove the tube from the clamp.
-
-
Pull in the removal direction shown in the illustration to detach the claw and clamp and remove the seat reclining adjuster inside cover LH.
-
-
REMOVE SEAT RECLINING ADJUSTER INSIDE COVER RH
Tech Tips
Use the same procedure described for the seat reclining adjuster inside cover LH.
-
REMOVE FRONT LOWER SEAT CUSHION SHIELD LH
-
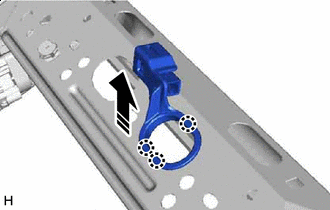
*a Hook *b Guide Remove in this Direction (1) Remove in this Direction (2) 
Remove in this Direction (3) Protective Tape Detach the hook.
-
Using a thin-bladed screwdriver with its tip wrapped with protective tape, detach the claw.
-
Slide in the removal direction (3) shown in the illustration to detach the guide and remove the front lower seat cushion shield LH.
-
-
REMOVE FRONT LOWER SEAT CUSHION SHIELD RH
-
*a Hook *b Guide Remove in this Direction (1) Remove in this Direction (2) Remove in this Direction (3) Protective Tape Detach the hook.
-
Using a thin-bladed screwdriver with its tip wrapped with protective tape, detach the claw.
-
Slide in the removal direction (3) shown in the illustration to detach the guide and remove the front lower seat cushion shield RH.
-
-
REMOVE OUTER SEAT SUPPORT LH
-
w/ Seat Cushion Side Support:
-
Remove the 2 screws and outer seat support LH.
-
-
w/o Seat Cushion Side Support:
-
Remove the 2 screws and outer seat support LH.
-
-
-
REMOVE INNER SEAT SUPPORT LH
-
w/ Seat Cushion Side Support:
-
Detach the tube clamp.
-
Remove the 2 screws and inner seat support LH.
-
-
w/o Seat Cushion Side Support:
-
Remove the 2 screws and inner seat support LH.
-
-
-
REMOVE FRONT SEAT ADJUSTER SUB-ASSEMBLY LH (w/ Seat Cushion Pelvic Support)
-
Using a thin-bladed screwdriver with its tip wrapped with protective tape, detach the claw and disconnect the joint.
Remove in this Direction Protective Tape -
Slide in the removal direction shown in the illustration to detach the hook and remove the front seat adjuster LH.
-
-
REMOVE FRONT SEAT CUSHION SPRING SUB-ASSEMBLY LH
-
*a Wire Harness Clamp *b Hook A *c Hook B Remove in this Direction (1) Remove in this Direction (2) Detach the wire harness clamp.
-
Pull up in the removal direction (1) shown in the illustration to detach hook A.
-
Slide in the removal direction (2) shown in the illustration to detach hook B and remove the front seat cushion spring sub-assembly LH.
-
-
REMOVE FRONT SEAT CUSHION WIRE HARNESS HOLDER LH
-
w/ Ottoman:
-
Disconnect the 2 connectors.
*A w/ Ottoman - -
-
-
w/o Ottoman:
-
Disconnect the connector.
-
-
Detach the wire harness clamp.
-
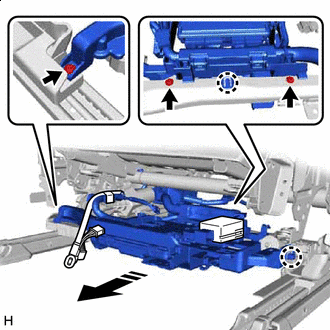
Removal in this Direction Remove the 3 screws and detach the claw.
-
Slide in the removal direction shown in the illustration to remove the front seat wire LH together with the front seat cushion wire harness holder LH.
-
-
REMOVE FRONT SEAT CUSHION WIRE HARNESS HOLDER RH (for Front Passenger Side)
-
w/ Climate Control Seat System:
-
Disconnect the 2 connectors.
*A w/ Climate Control Seat System *B w/o Ottoman *C w/ Ottoman - - -
Detach the wire harness clamp.
-
-
w/ Occupant Classification System:
-
Disconnect the 2 connectors.
-
Detach the wire harness clamp.
-
-
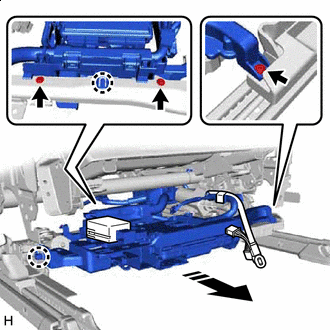
Removal in this Direction Remove the 3 screws and detach the claw.
-
Slide in the removal direction shown in the illustration to remove the front seat wire RH together with the front seat cushion wire harness holder RH.
-
-
REMOVE FRONT SEAT WIRE RH (for Front Passenger Side with Occupant Classification System)
-
Disconnect the 2 connector.
-
Detach the wire harness clamp.
-
Using a thin-bladed screwdriver with its tip wrapped with protective tape, detach the claw and remove the front seat wire RH.
-
-
REMOVE FRONT SEAT WIRE LH
-

*A w/ Seat Heater System Remove in this Direction Protective Tape w/o Seat Heater System:
-
Disconnect the 4 connectors.
-
-
w/ Seat Heater System:
-
Disconnect the 5 connectors.
-
-
Detach the wire harness clamp.
-
Using a thin-bladed screwdriver with its tip wrapped with protective tape, detach the claw and remove the connector.
-
Detach the claw and remove the front seat wire LH.
-
-
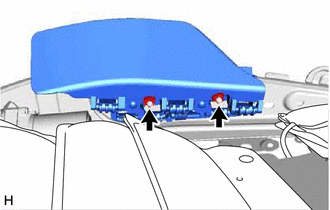
REMOVE POSITION CONTROL ECU ASSEMBLY
-
REMOVE SEAT HEATER CONTROL SUB-ASSEMBLY LH (w/ Seat Heater System)
-
Remove in this Direction Detach the claw and disconnect the seat heater control sub-assembly LH.
-
-
REMOVE OCCUPANT DETECTION ECU (for Front Passenger Side with Occupant Classification System)
-
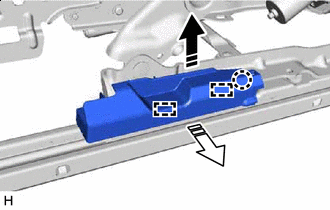
REMOVE SEAT CUSHION CLIMATE CONTROL BLOWER ASSEMBLY LH (w/ Climate Control Seat System)
-
*a Guide *b Clamp Remove in this Direction Using a thin-bladed screwdriver with its tip wrapped with protective tape, detach the claw and remove the connector.
-
Remove the 2 bolts.
-
Detach the guide.
-
Pull in the removal direction shown in the illustration to detach the clamp and remove the seat cushion climate control blower assembly LH.
-
-
REMOVE FRONT LOWER SEAT CUSHION SHIELD LH
-
Remove in this Direction (1) Remove in this Direction (2) Pull in the removal direction (1) shown in the illustration to detach the claw.
-
Pull in the removal direction (2) shown in the illustration to detach the guide and remove the front lower seat cushion shield LH.
-
-
REMOVE REAR INNER SEAT TRACK BRACKET COVER LH (w/ Front Passenger Side Folding Headrest)
-
*a Guide A *b Guide B Remove in this Direction Protective Tape Using a thin-bladed screwdriver with its tip wrapped with protective tape, remove guide A.
-
Slide in the removal direction shown in the illustration to detach the guide B.
-
Remove in this Direction Rotate in the removal direction shown in the illustration to remove the rear inner seat track bracket cover LH.
-
-
REMOVE REAR OUTER SEAT TRACK BRACKET COVER RH (w/ Front Passenger Side Folding Headrest)
Tech Tips
Use the same procedure described for the rear inner seat track bracket cover LH.
-
REMOVE FRONT INNER SEAT TRACK BRACKET COVER LH (w/ Front Passenger Side Folding Headrest)
-
*a Guide A *b Guide B Remove in this Direction Protective Tape Using a thin-bladed screwdriver with its tip wrapped with protective tape, remove guide A.
-
Slide in the removal direction shown in the illustration, detach guide B and remove the front inner seat track bracket cover LH.
-
-
REMOVE FRONT OUTER SEAT TRACK BRACKET COVER RH (w/ Front Passenger Side Folding Headrest)
Tech Tips
Use the same procedure described for the front inner seat track bracket cover LH.
-
REMOVE REAR UPPER SEAT TRACK COVER
-
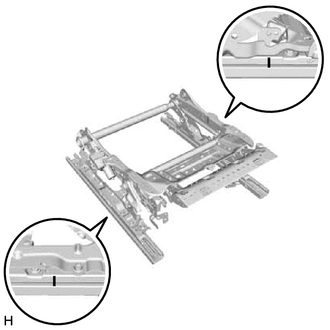
Place a matchmark on the front seat adjuster assembly LH.
-
Connect the No. 1 terminal of the slide motor to the positive (+) battery terminal, and the No. 4 terminal to the negative (-) battery terminal and then move the front seat adjuster assembly LH to the rearmost position.
Note
After performing this procedure, initialize the seat ECU (position control ECU assembly).
-
Remove in this Direction Protective Tape Using a thin-bladed screwdriver with its tip wrapped with protective tape, detach the claw and remove the rear upper seat track cover.
Tech Tips
Use the same procedure for the other locations.
-
-
REMOVE UPPER SEAT TRACK RAIL COVER
-
Connect the No. 4 terminal of the slide motor to the positive (+) battery terminal, and the No. 1 terminal to the negative (-) battery terminal and then move the front seat adjuster assembly LH to the frontmost position.
Note
After performing this procedure, initialize the seat ECU (position control ECU assembly).
-
Remove in this Direction Protective Tape Using a thin-bladed screwdriver with its tip wrapped with protective tape, detach the claw and remove the upper seat track rail cover.
Tech Tips
Use the same procedure for the other locations.
-