HOOD REASSEMBLY
-
INSTALL HOOD BUMPER CUSHION
Tech Tips
Use the same procedure for both hood bumper cushions.
-
Install a new hood bumper cushion.
-
-
INSTALL WASHER HOSE ASSEMBLY
-
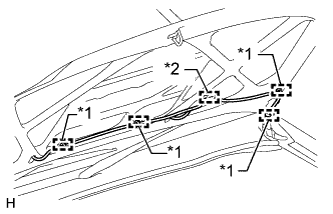
Text in Illustration *1 Clamp *2 Hanger Attach the 4 clamps to connect the washer hose to the hanger.
-
-
INSTALL WASHER NOZZLE SUB-ASSEMBLY
-
Connect a new washer nozzle to the washer hose.
-
Attach the 2 claws to install the washer nozzle.
-
-
INSTALL NO. 1 HOOD BULGE PROTECTOR (w/ Intercooler)
Tech Tips
When installing the No. 1 hood bulge protector, heat the hood bulge surface using a heat light.
Standard Item Temperature Hood Bulge 20 to 30°C (68 to 86°F) Note
Do not heat the hood bulge excessively.
-
Clean the hood bulge surface.
-
Using a heat light, heat the hood bulge surface.
-
Remove the double-sided tape from the hood bulge surface.
-
Wipe off any tape adhesive residue with cleaner.
-
-
Install a new No. 1 hood bulge protector to the hood bulge as shown in the illustration.
-
-
INSTALL HOOD BULGE (w/ Intercooler)
-
Install the hood bulge with the 10 nuts.
- Torque:
- 3.0 N*m { 31 kgf*cm, 27 in.*lbf }
-
-
INSTALL HOOD AIR INTAKE SEAL (w/ Intercooler)
-
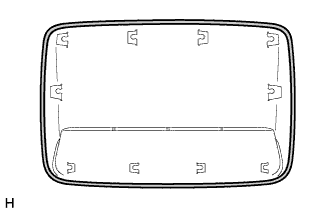
Install the hood air intake seal with the 18 clips.
-
-
INSTALL HOOD INSULATOR (w/ Hood Insulator)
-
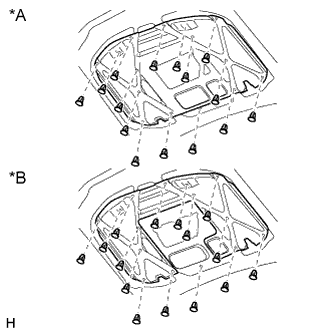
Text in Illustration *A w/o Intercooler *B w/ Intercooler Install the hood insulator with the 15 clips.
-
-
INSTALL HOOD TO RADIATOR SUPPORT SEAL
-
Attach the 6 clips to install the hood to radiator support seal.
-