FUEL INJECTION NOZZLE INSPECTION
-
INSPECT NOZZLE HOLDER AND NOZZLE SET
-
Pressure test:
-
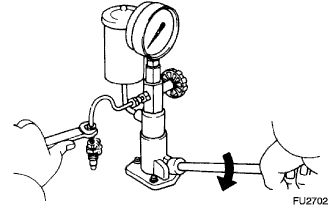
Install the nozzle holder to the injection nozzle hand tester and bleed air from the union nut.
Note
Do not place your finger to the nozzle injection hole.
-
Pump the tester handle a few times as fast as possible to discharge the carbon from the injection hole.
-
Pump the tester handle slowly and observe the pressure gauge.
-
Read the pressure gauge just as the injection pressure begins to drop.
Standard pressure 15,790 to 16,570 kPa (161 to 169 kgf/cm2, 2,290 to 2,403 psi) Tech Tips
-
Proper nozzle operation can be determined when a swishing sound is heard.
-
If the pressure is not within the standard, disassemble the nozzle holder and replace only the shim on the top of the pressure spring. Varying the adjusting shim thickness by 0.005 mm (0.0020 in.) changes the injection pressure by approximately 628 kPa (6.4 kgf/cm2, 91 psi).
Standard adjusting shim thickness Specified Condition 0.900 mm (0.0354 in.) 1.300 mm (0.0512 in.) 1.700 mm (0.0669 in.) 0.950 mm (0.0374 in.) 1.350 mm (0.0531 in.) 1.750 mm (0.0709 in.) 1.000 mm (0.0394 in.) 1.400 mm (0.0551 in.) 1.800 mm (0.0728 in.) 1.050 mm (0.0413 in.) 1.450 mm (0.0571 in.) 1.850 mm (0.0728 in.) 1.100 mm (0.0433 in.) 1.500 mm (0.0591 in.) 1.900 mm (0.0748 in.) 1.150 mm (0.0453 in.) 1.550 mm (0.0610 in.) 1.950 mm (0.0768 in.) 1.200 mm (0.0472 in.) 1.600 mm (0.0630 in.) - 1.250 mm (0.0492 in.) 1.650 mm (0.0650 in.) -
-
-
-
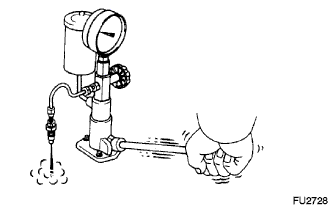
Leakage test:
-
While maintaining pressure at approximately 981 to 1,961 kPa (10 to 20 kgf/cm2, 142 to 284 psi) below injection pressure (adjust by tester handle), check that there is no dripping for 10 seconds from the injection hole or around the retaining nut.
If the nozzle drips within 10 seconds, replace or clean and overhaul the nozzle assembly.
-
-
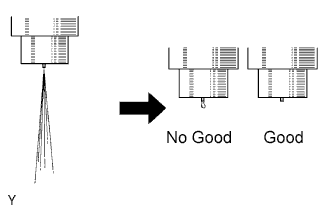
Spray pattern test:
-
The injection nozzle should shudder at a certain pumping speed between 30 and 60 times per minute.
-
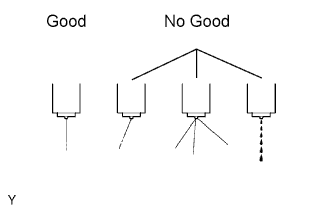
Check the spray pattern during shuddering.
If the spray pattern is not correct during shuddering, the nozzle must be replaced or cleaned.
-
-
-
CLEAN NOZZLE ASSEMBLY
-
Using a wooden stick and brass brush, wash the nozzle.
Note
Do not touch the nozzle matching surface with your fingers.
-
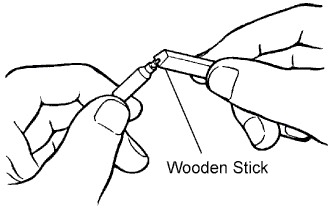
Using a wooden stick, remove the carbon adhering to the nozzle needle tip.
-
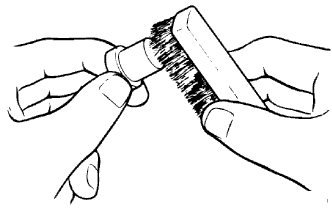
Using a brass brush, remove the carbon from the exterior of the nozzle body (except lapped surface).
-
-
INSPECT NOZZLE ASSEMBLY
-
Wash the nozzle in clean diesel fuel.
Note
Do not touch the nozzle matching surfaces with your fingers.
-

Perform the following test several times, rotating the needle slightly each time.
-
Tilt the nozzle body about 60° and pull the needle out about one third of its length.
-
Check that the needle falls down into the body vent smoothly by its own weight when released.
If the needle does not fall smoothly, replace the nozzle assembly.
-
-