ROOF HEADLINING INSTALLATION
CAUTION / NOTICE / HINT
Tech Tips
-
Use the same procedure for LHD and RHD vehicles.
-
The procedure listed below is for the LHD vehicles.
PROCEDURE
-
INSTALL ROOF HEADLINING
-
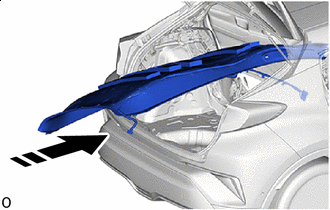

Install in this Direction Insert the roof headlining assembly into the cabin from the back door.
Note
-
Check that the corners of the roof headlining are not folded, twisted or otherwise deformed and that none of the mounted parts have fallen off.
-
Make sure that the roof headlining does not get caught on anything as it may become bent or damaged.
-
Do not damage the roof headlining or vehicle interior.
-
-
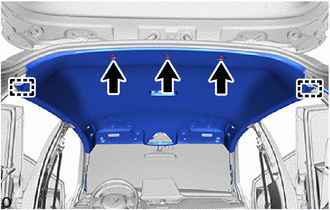
Engage the guides and set the roof headlining assembly.
-
Install the 3 clips.
-
for Roof Panel Side:
-
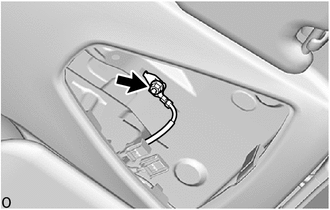
w/ Lane Departure Alert System:
-
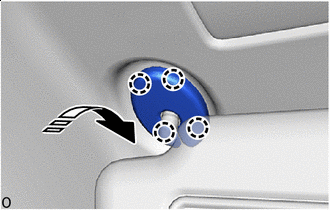
Connect the ground wire with the nut.
- Torque:
- 14 N*m { 143 kgf*cm, 10 ft.*lbf }
-
-
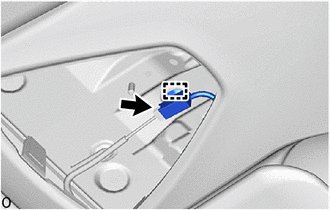
w/ Digital Audio Broadcasting Antenna:
-
Connect the connector.
-
Engage the clamp to connect the wire harness.
-
-
-
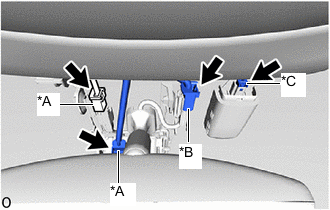
*A w/ Lane Departure Alert System *B w/ EC Mirror *C w/ Rain Sensor for Windshield Glass Side:
-
Connect each connector.
-
-

for Rear Pillar RH Side:
-
Connect the connector.
-
-
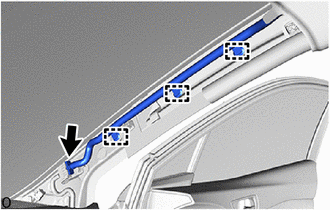
for Front Pillar RH Side:
-
Engage the wire harness clamps.
-
Connect the connector.
-
-
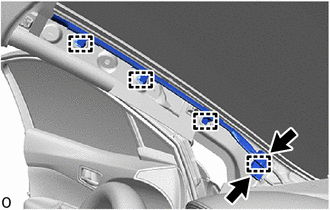
for Front Pillar LH Side:
-
Engage the wire harness clamps.
-
Connect the 2 connectors.
-
-
-
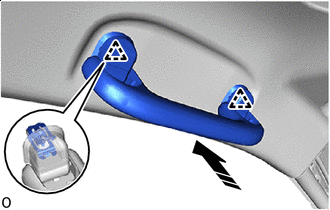
INSTALL ASSIST GRIP COVER
Tech Tips
Use the same procedures for the opposite side.
-
Install the 2 assist grip covers and 2 clips to the assist grip sub-assembly.
-
-
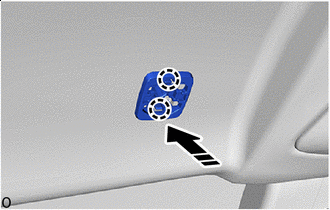
INSTALL ASSIST GRIP SUB-ASSEMBLY
Tech Tips
Use the same procedures for the opposite side.
-
Install in this Direction Engage the clips to install the assist grip sub-assembly as shown in the illustration.
-
-
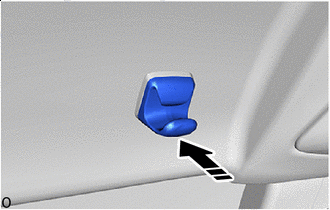
INSTALL VISOR HOLDER
Tech Tips
Use the same procedures for the opposite side.
-
Install in this Direction Engage the claws to install the base as shown in the illustration.
-
Install in this Direction Install the holder as shown in the illustration.
-
-
INSTALL VISOR ASSEMBLY LH (w/o Vanity Light)
-
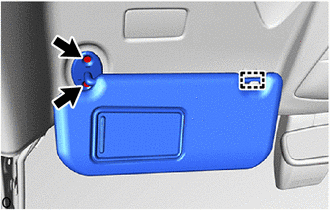
Engage the guide to install the visor assembly LH.
-
Using a T10H "TORX" driver, install the 2 screws.
-
-
INSTALL VISOR ASSEMBLY RH (w/o Vanity Light)
Tech Tips
Use the same procedure as for the LH side.
-
INSTALL VISOR ASSEMBLY LH (w/ Vanity Light)
-
INSTALL VISOR ASSEMBLY RH (w/ Vanity Light)
Tech Tips
Use the same procedure as for the LH side.
-
INSTALL VISOR BRACKET COVER
Tech Tips
Use the same procedures for the opposite side.
-
Install in this Direction Engage the claws to install the visor bracket cover as shown in the illustration.
-
-
INSTALL THEFT WARNING ULTRASONIC SENSOR (w/ Intrusion Sensor)
-
INSTALL NO. 1 ROOM LIGHT ASSEMBLY (w/ Map Light)
-
INSTALL MAP LIGHT ASSEMBLY (w/ Map Light)
-
INSTALL VANITY LIGHT ASSEMBLY (w/ Vanity Light)
-
INSTALL INNER REAR VIEW MIRROR STAY HOLDER COVER (w/ EC Mirror)
-
INSTALL NO. 1 FORWARD RECOGNITION COVER (w/ Lane Departure Alert System)
-
INSTALL NO. 2 FORWARD RECOGNITION COVER (w/ Lane Departure Alert System)
-
INSTALL RAIN SENSOR COVER (w/ Rain Sensor)
-
INSTALL ROOF SIDE INNER GARNISH ASSEMBLY LH
-
When reusing the roof side inner garnish assembly LH (w/ Curtain Shield Airbag):
-
Install 5 new clips to the roof side inner garnish assembly LH.
-
-
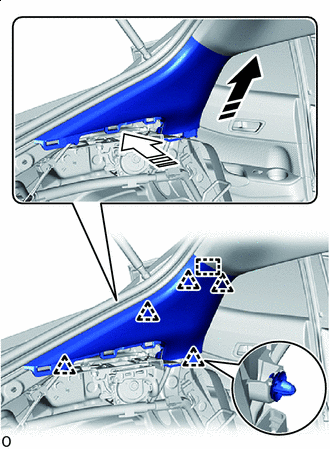
Install in this Direction (1) 
Install in this Direction (2) Engage the guide and clips to install the roof side inner garnish assembly LH as shown in the illustration.
-
-
INSTALL ROOF SIDE INNER GARNISH ASSEMBLY RH
Tech Tips
Use the same procedure as for the LH side.
-
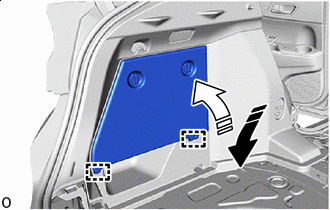
INSTALL DECK TRIM SIDE PANEL ASSEMBLY LH
-
Connect the rear seat 3 point type outer belt assembly LH.
-
Install in this Direction Engage the clips and claws to install the deck trim side panel assembly LH as shown in the illustration.
-
w/ Hook:
-
Install the luggage hold belt striker with the bolt.
-
-
w/o Hook:
-
Install the clip.
-
-
-
INSTALL DECK TRIM SIDE PANEL ASSEMBLY RH
Tech Tips
Use the same procedure as for the LH side.
-
INSTALL DECK TRIM SIDE COVER LH (w/ Cover)
-
Install in this Direction (1) Install in this Direction (2) Engage the guides to install the deck trim side cover LH as shown in the illustration.
-
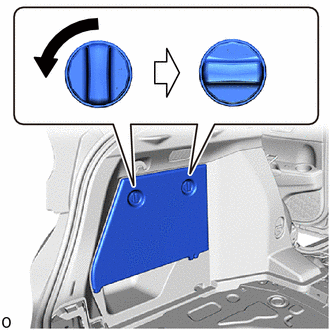
Turn the cover knob as shown in the illustration and lock it.
-
-
INSTALL DECK TRIM SIDE COVER RH (w/ Cover)
Tech Tips
Use the same procedure as for the LH side.
-
INSTALL NO. 1 LUGGAGE COMPARTMENT LIGHT ASSEMBLY (w/ Luggage Compartment Room Light)
-
INSTALL DECK TRIM REAR COVER
-
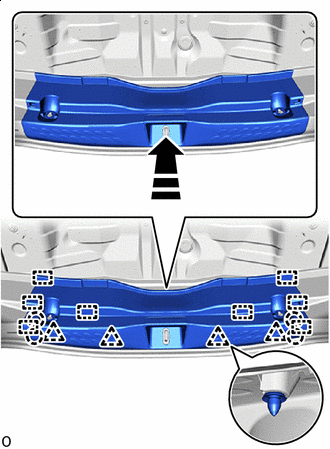
Install in this Direction Engage the guides, claws and clips to install the deck trim rear cover as shown in the illustration.
-
w/ Hook:
-
Install the 2 luggage hold belt strikers with 2 bolts.
-
-
w/o Hook:
-
Install the 2 clips.
-
-
-
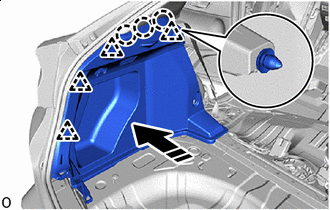
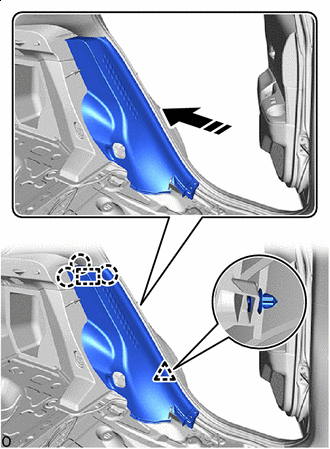
INSTALL CENTER PILLAR GARNISH ASSEMBLY LH
-
When reusing the center pillar garnish assembly LH (w/ Curtain Shield Airbag):
-
Install a new clip to the center pillar garnish assembly LH.
-
-
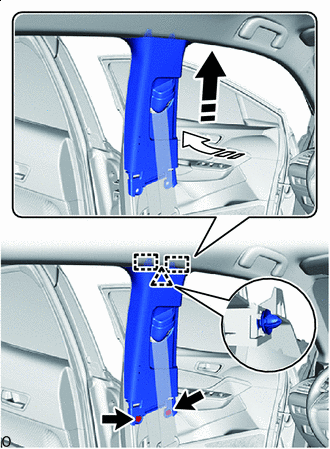
Install in this Direction (1) Install in this Direction (2) Engage the guides and clip to install the center pillar garnish assembly LH as shown in the illustration.
-
Install the 2 clips.
-
-
INSTALL CENTER PILLAR GARNISH ASSEMBLY RH
Tech Tips
Use the same procedure as for the LH side.
-
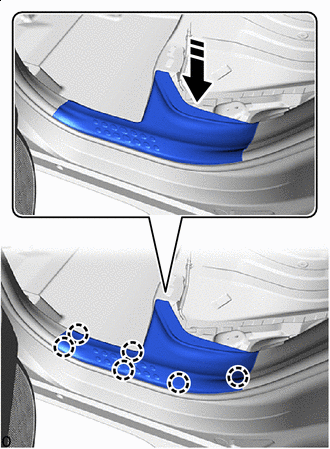
INSTALL CENTER PILLAR LOWER GARNISH LH
-
Install in this Direction Engage the clips and claws to install the center pillar lower garnish LH as shown in the illustration.
-
-
INSTALL CENTER PILLAR LOWER GARNISH RH
Tech Tips
Use the same procedure as for the LH side.
-
CONNECT FRONT SEAT OUTER BELT ASSEMBLY LH
-
CONNECT FRONT SEAT OUTER BELT ASSEMBLY RH
Tech Tips
Use the same procedure as for the LH side.
-
INSTALL LAP BELT OUTER ANCHOR COVER
-
INSTALL REAR SEAT SIDE GARNISH LH
-
Install in this Direction Engage the guide, claws and clip to install the rear seat side garnish LH as shown in the illustration.
-
-
INSTALL REAR SEAT SIDE GARNISH RH
Tech Tips
Use the same procedure as for the LH side.
-
INSTALL REAR SEATBACK HINGE SUB-ASSEMBLY LH
-
Install the rear seatback hinge sub-assembly LH with the bolt.
- Torque:
- 18.1 N*m { 185 kgf*cm, 13 ft.*lbf }
-
-
INSTALL REAR SEATBACK HINGE SUB-ASSEMBLY RH
Tech Tips
Use the same procedure as for the LH side.
-
INSTALL REAR DOOR OPENING TRIM WEATHERSTRIP LH
-
INSTALL REAR DOOR OPENING TRIM WEATHERSTRIP RH
Tech Tips
Use the same procedure as for the LH side.
-
INSTALL REAR DOOR SCUFF PLATE LH
-
Install in this Direction Engage the claws to install the rear door scuff plate LH as shown in the illustration.
-
-
INSTALL REAR DOOR SCUFF PLATE RH
Tech Tips
Use the same procedure as for the LH side.
-
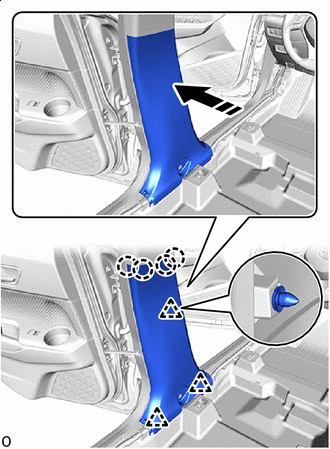
INSTALL FRONT PILLAR GARNISH LH
-
INSTALL FRONT PILLAR GARNISH RH
Tech Tips
Use the same procedure as for the LH side.
-
INSTALL FRONT DOOR OPENING TRIM WEATHERSTRIP LH
-
INSTALL FRONT DOOR OPENING TRIM WEATHERSTRIP RH
Tech Tips
Use the same procedure as for the LH side.
-
INSTALL COWL SIDE TRIM BOARD LH
-
INSTALL COWL SIDE TRIM BOARD RH
Tech Tips
Use the same procedure as for the LH side.
-
INSTALL FRONT DOOR SCUFF PLATE LH
-
INSTALL FRONT DOOR SCUFF PLATE RH
Tech Tips
Use the same procedure as for the LH side.
-
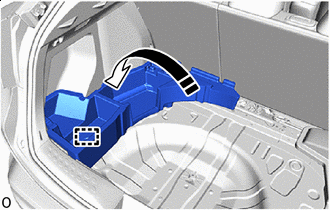
INSTALL DECK FLOOR BOX LH (w/ Deck Floor Box)
-
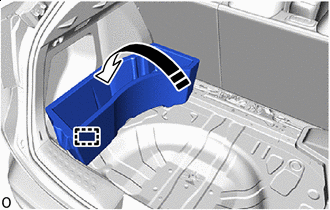
Install in this Direction for Type A:
-
Engage the guide to install the deck floor box LH as shown in the illustration.
-
-
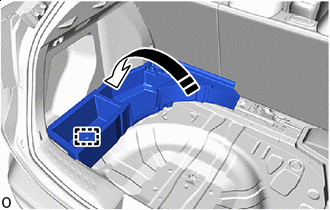
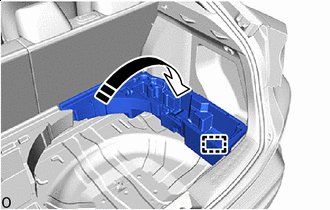
Install in this Direction for Type B:
-
Engage the guide to install the deck floor box LH as shown in the illustration.
-
-
Install in this Direction for Type C:
-
Engage the guide to install the deck floor box LH as shown in the illustration.
-
-
-
INSTALL DECK FLOOR BOX RH (w/ Deck Floor Box)
-
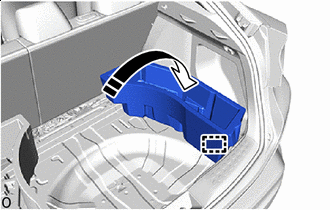
Install in this Direction for Type A:
-
Engage the guide to install the deck floor box RH as shown in the illustration.
-
-
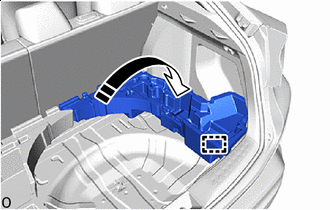
Install in this Direction for Type B:
-
Engage the guide to install the deck floor box RH as shown in the illustration.
-
-
Install in this Direction for Type C:
-
Engage the guide to install the deck floor box RH as shown in the illustration.
-
-
-
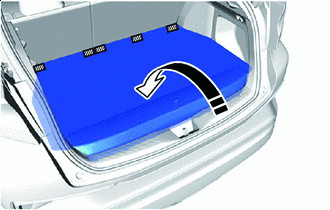
INSTALL SPARE WHEEL CUSHION (w/ Deck Board)
-
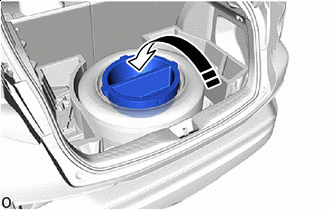
Install in this Direction for Type A:
-
Install the spare wheel cushion as shown in the illustration.
-
-
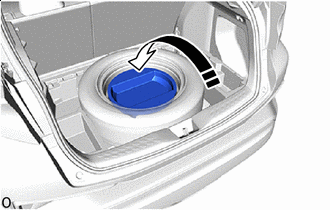
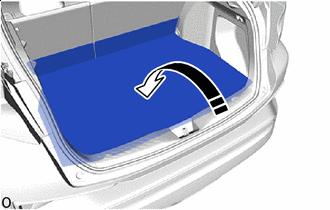
Install in this Direction for Type B:
-
Install the spare wheel cushion as shown in the illustration.
-
-
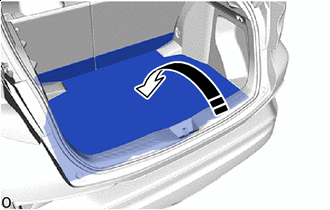
Install in this Direction for Type C:
-
Install the spare wheel cushion as shown in the illustration.
-
-
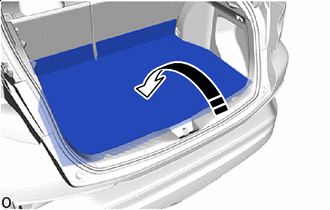
Install in this Direction for Type D:
-
Install the spare wheel cushion as shown in the illustration.
-
Install the clip.
-
-
-
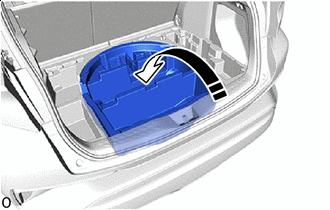
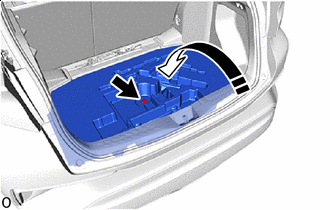
INSTALL DECK BOARD ASSEMBLY (w/ Deck Board)
-

Hook and Loop Fastener Install in this Direction for Type A:
-
Install the deck board assembly as shown in the illustration.
-
Engage the hook and loop fastener.
-
-
Install in this Direction for Type B:
-
Install the deck board assembly as shown in the illustration.
-
-
Install in this Direction for Type C:
-
Install the deck board assembly as shown in the illustration.
-
-
Install in this Direction for Type D:
-
Install the deck board assembly as shown in the illustration.
-
-
-
INSTALL TONNEAU COVER ASSEMBLY (w/ Tonneau Cover)
-
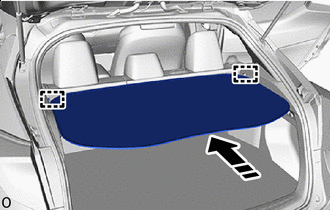
Install in this Direction Engage the guides to install the tonneau cover assembly as shown in the illustration.
-
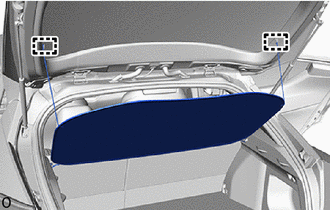
Engage the hooks.
-
-
INSTALL PACKAGE TRAY TRIM PANEL ASSEMBLY (w/ Package Tray Trim)
-
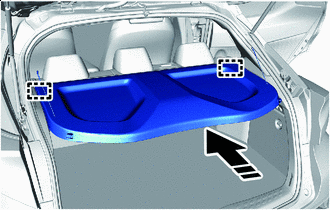
Install in this Direction Engage the guides to install the package tray trim panel assembly as shown in the illustration.
-
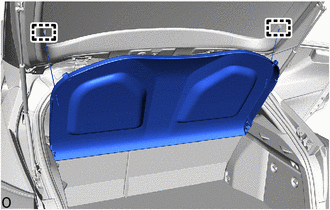
Engage the hooks.
-
-
INSTALL REAR SEAT ASSEMBLY
-
INSTALL FRONT SEAT ASSEMBLY LH
-
INSTALL FRONT SEAT ASSEMBLY RH
Tech Tips
Use the same procedure as for the LH side.