WINDSHIELD OUTSIDE MOULDING INSTALLATION
CAUTION / NOTICE / HINT
Note
Perform the following procedure only if the windshield outside sub moulding will be replaced with a new one without removing the windshield glass.
PROCEDURE
-
CLEAN WINDSHIELD GLASS
-
Using a scraper, remove the adhesive tape and adhesive sticking to the windshield glass.
Note
Be careful not to damage the windshield glass.
-
Clean the windshield outside sub moulding installation surfaces of the windshield glass with a non-residue solvent.
Note
Do not touch the windshield glass surface after cleaning it.
-
-
INSTALL WINDSHIELD OUTSIDE SUB MOULDING
-
Using a brush or a sponge, coat the application area of a new windshield outside sub moulding with Primer G.
Note
-
Do not apply too much primer.
-
Allow the primer to dry for 3 minutes or more.
-
Throw away any leftover primer.
Tech Tips
If an area other than that specified is coated by accident, wipe off the primer with a clean piece of cloth before it dries.
-
-
Apply adhesive to the windshield outside sub moulding.
Adhesive Toyota Genuine Windshield Glass Adhesive or equivalent
-
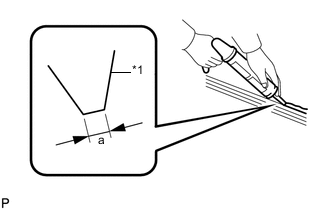
Text in Illustration *1 Cartridge Nozzle Cut off the tip of the cartridge nozzle as shown in the illustration.
Standard Dimension Area Dimension a 3.0 mm (0.118 in.) Tech Tips
After cutting off the tip, use all adhesive within the time described in the table below.
Usage Time Frame Temperature Usage Time Frame 35°C (95°F) 15 minutes 20°C (68°F) 1 hour and 40 minutes 5°C (41°F) 8 hours -
Load the sealer gun with the cartridge.
-
Apply adhesive to the windshield outside sub moulding as shown in the illustration.
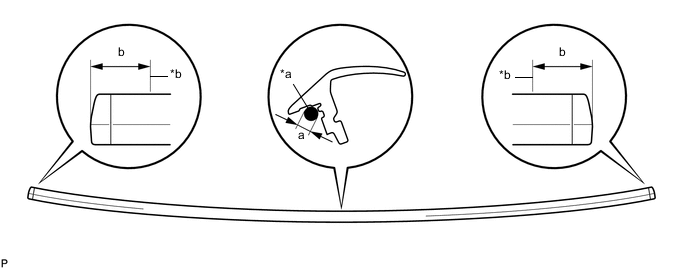
Text in Illustration *a Adhesive application location *b Adhesive application limit Standard Dimension Area Dimension a 3.0 mm (0.118 in.) b 13.0 mm (0.512 in.) Tech Tips
The adhesive will be easier to apply if the windshield outside sub moulding is secured to a workbench.
-
-
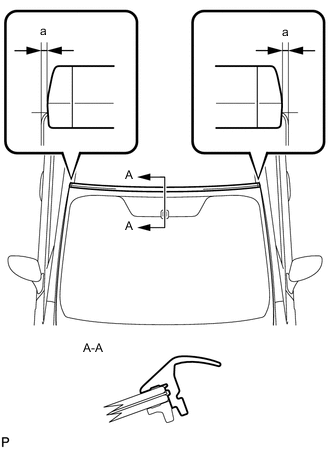
Install the windshield outside sub moulding onto the windshield glass as shown in the illustration.
Standard Dimension Area Dimension a 1.5 to 3.5 mm (0.0591 to 0.137 in.) Note
-
Center the windshield outside sub moulding so that the distance from each end to the edges of windshield glass is equal.
-
Make sure that the whole windshield outside sub molding is firmly secured.
-
-
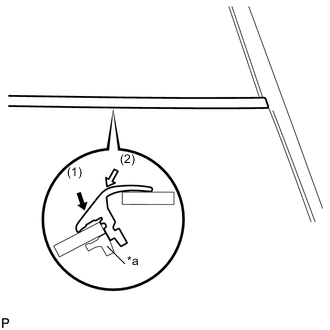
Text in Illustration *a Remaining portion of old windshield outside sub moulding Press on the windshield outside sub moulding installation surfaces in the order shown in the illustration.
Tech Tips
Remove any excessive adhesive that seeps out before it hardens.
-
Hold the windshield outside sub moulding using protective tape until the adhesive becomes hard.
Note
Do not drive the vehicle for the time described in the table below.
Minimum Time Temperature Usage Time Frame 35°C (95°F) 1 hour and 30 minutes 20°C (68°F) 5 hours 5°C (41°F) 24 hours -
After confirming that the adhesive has hardened, remove the tape.
-