НАСОС СИСТЕМЫ ОХЛАЖДЕНИЯ УСТАНОВКА
-
INSTALL ENGINE WATER PUMP ASSEMBLY
-
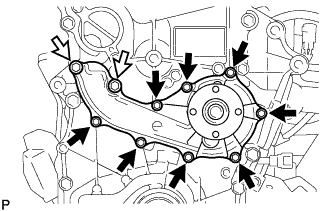
Install a new gasket and the engine water pump assembly with the 10 bolts.
- Torque:
- for Bolt A
- 25 N*m { 255 kgf*cm, 18 ft.*lbf }
- for Bolt B
- 8.9 N*m { 91 kgf*cm, 79 in.*lbf }
Text in Illustration 
Bolt A 
Bolt B
-
-
CONNECT VANE PUMP ASSEMBLY
-
Закрепите лопастной насос в сборе 2 болтами.
- Torque:
- 21 Н*м { 214 кгс*см, 15 фунт-сила-футов }
-
Подсоедините разъем контактного датчика давления жидкости.
-
-
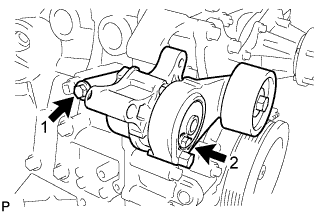
INSTALL V-RIBBED BELT TENSIONER ASSEMBLY
-
Временно установите натяжитель поликлинового ремня и закрепите его 2 болтами.
Tech Tips
-
Убедитесь, что натяжитель поликлинового ремня в сборе касается блока цилиндров.
-
Убедитесь, что отверстия под болты в натяжителе поликлинового ремня в сборе и в крышке цепного привода газораспределительного механизма совмещены.
-
-
Установите натяжитель поликлинового ремня в сборе и закрепите 2 болтами в порядке, показанном на рисунке.
- Torque:
- для болта 1
- 40 Н*м { 408 кгс*см, 30 фунт-сила-футов }
- для болта 2
- 23 Н*м { 235 кгс*см, 17 фунт-сила-футов }
-
-
INSTALL GENERATOR ASSEMBLY
-
Install the generator assembly with the 3 bolts.
- Torque:
- 43 N*m { 438 kgf*cm, 32 ft.*lbf }
-
Connect the wire harness clamp with the bolt.
-
Connect the wire harness to terminal B with the nut.
- Torque:
- 9.8 N*m { 100 kgf*cm, 87 in.*lbf }
-
Install the terminal cap.
-
Connect the generator connector.
-
-
INSTALL FAN PULLEY
-
Установите распорную втулку вентилятора и шкив вентилятора и закрепите их 4 гайками.
- Torque:
- 25 Н*м { 255 кгс*см, 18 фунт-сила-футов }
-
-
INSTALL FAN AND GENERATOR V BELT
-
INSTALL INTAKE AIR CONNECTOR
-
Предварительно установите соединитель впуска воздуха на корпус дроссельной заслонки в сборе.
-
Подсоедините вакуумный шланг к соединителю впуска воздуха.
-
Подсоедините шланг системы принудительной вентиляции картера № 2 к головке блока цилиндров и надвиньте хомут, чтобы закрепить его.
-
Закрепите патрубок подачи воздуха 2 болтами.
- Torque:
- 8,0 Н*м { 82 кгс*см, 71 фунт-сила-дюйм }
-
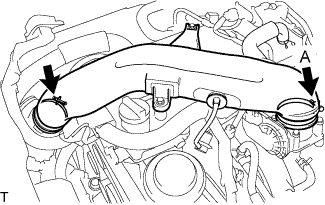
Затяните 2 шланговых хомута.
- Torque:
- для хомута A
- 5,0 Н*м { 51 кгс*см, 44 фунт-сила-дюйма }
-
-
CONNECT CABLE TO NEGATIVE BATTERY TERMINAL
Note
When disconnecting the cable, some systems need to be initialized after the cable is reconnected Click here.
-
ADD ENGINE COOLANT
-
Tighten the radiator drain cock plug by hand.
-
Tighten the cylinder block water drain cock plug.
- Torque:
- 13 N*m { 130 kgf*cm, 9 ft.*lbf }
-
Fill the radiator reservoir assembly with engine coolant to the top of the inlet.
Standard Capacity 11.2 liters (11.8 US qts, 9.9 Imp. qts) Note
Never use water as a substitute for engine coolant.
Tech Tips
TOYOTA vehicles are filled with TOYOTA SLLC at the factory. In order to avoid damage to the engine cooling system and other technical problems, only use TOYOTA SLLC or similar high quality ethylene glycol based non-silicate, non-amine, non-nitrite, non-borate coolant with long-life hybrid organic acid technology (coolant with long-life hybrid organic acid technology is a combination of low phosphates and organic acids).
-
Remove the 2-way that is located near the throttle body assembly.
-
When air is bleed and the engine coolant drains out, install the 2-way.
-
Add coolant through the radiator reservoir assembly filler opening until the coolant reaches the B line and install the radiator reservoir cap sub-assembly. [*1]
-
Warm up the engine until the thermostat opens. While the thermostat is open, circulate the coolant for several minutes. [*2]
CAUTION:
-
Wear protective gloves.
-
Be careful as the radiator hoses are hot.
-
Keep your hands away from the radiator fans.
Note
-
Immediately after starting the engine, if the radiator reservoir assembly does not have any engine coolant, perform the following: 1) stop the engine, 2) wait until the engine coolant has cooled down, and 3) add engine coolant.
-
Do not start the engine when there is no engine coolant in the radiator reservoir assembly.
-
Make sure that the needle does not show an abnormally high temperature.
-
If there is not enough engine coolant, the engine may overheat.
Tech Tips
-
Press the No. 2 and No. 3 radiator hoses several times by hand, and then check the level of the engine coolant.
-
The thermostat open timing can be confirmed by pressing the No. 3 radiator hose by hand, and checking when the engine coolant starts to flow inside the hose.
-
-
Stop the engine, and wait until the engine coolant cools down to ambient temperature. [*3]
-
Check the engine coolant level in the radiator reservoir assembly. [*4]
Tech Tips
-
If the engine coolant level is below the LOW line, repeat steps *1 through *4.
-
If the engine coolant level is above the FULL line, drain engine coolant until the engine coolant level is between the FULL and LOW line.
-
-
-
INSPECT FOR COOLANT LEAK
CAUTION:
Не снимайте пробку расширительного бачка радиатора, пока двигатель и радиатор не остынут. Выброс горячей охлаждающей жидкости и пара под давлением может стать причиной серьезных ожогов.
-
Снимите пробку расширительного бачка радиатора.
-
Заполните расширительный бачок радиатора охлаждающей жидкостью, а затем подсоедините приспособление для опрессовки системы охлаждения и проверки пробки радиатора.
-
Прогрейте двигатель.
-
С помощью приспособления для опрессовки системы охлаждения и проверки пробки радиатора увеличьте давление в радиаторе до 137 кПа (1,4 кгс/см2, 20 фунтов на кв. дюйм) и убедитесь, что давление не падает.
Если давление снижается, проверьте на наличие утечек шланги, радиатор в сборе и насос системы охлаждения двигателя в сборе.
Если нет следов или признаков утечки внешней охлаждающей жидкости, проверьте сердцевину отопителя, блок цилиндров и головку блока цилиндров.
-
Установите пробку расширительного бачка радиатора.
-