ROOF HEADLINING(for 5 Door) REMOVAL
PROCEDURE
REMOVE PACKAGE TRAY TRIM PANEL ASSEMBLY (w/ Package Tray Trim)
Remove the package tray trim panel assembly.
REMOVE REAR FLOOR MAT ASSEMBLY
Remove the rear floor mat assembly.
REMOVE FRONT SEAT ASSEMBLY LH
REMOVE FRONT SEAT ASSEMBLY RH
Tip:Use the same procedure as for the LH side.
REMOVE REAR SEAT ASSEMBLY (for Separate Seat Type)
REMOVE REAR SEAT ASSEMBLY (for Bench Seat Type)
REMOVE COWL SIDE TRIM SUB-ASSEMBLY LH
REMOVE FRONT DOOR OPENING TRIM WEATHERSTRIP LH
Remove the front door opening trim weatherstrip LH.
Remove any residual weatherstrip sealant from the vehicle body using cleaner.
Note:Remove the sealant completely. Any residual sealant may transfer to other areas of the vehicle when removing/installing the interior parts.
REMOVE FRONT PILLAR GARNISH LH
-
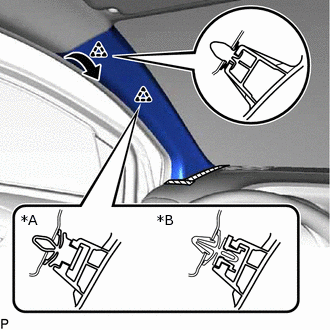
*A
w/o Curtain Shield Airbag
*B
w/ Curtain Shield Airbag

Protective Tape
Apply protective tape around the front pillar garnish LH as shown in the illustration.
Pull the upper part of the front pillar garnish LH as shown in the illustration to disengage the 2 clips.
-
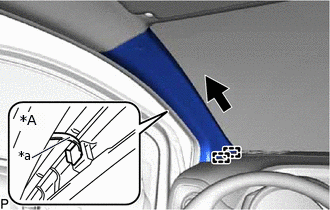
*A
w/ Curtain Shield Airbag
*a
Cut
w/ Curtain Shield Airbag:
Cut off the clip.
Pull the front pillar garnish LH as shown in the illustration to disengage the 2 guides and remove the front pillar garnish LH.
w/ Curtain Shield Airbag:
Remove the 2 clips from the front pillar garnish LH.
Remove the clip from the vehicle body.
-
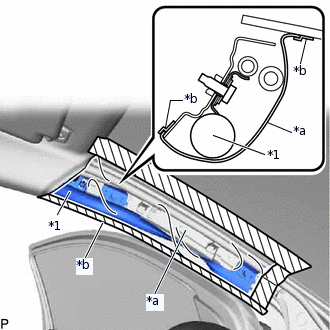
*1
Curtain Shield Airbag Assembly LH
*a
Protective Cover
*b
Adhesive Tape
Protect the curtain shield airbag assembly LH.
Cover the curtain shield airbag assembly LH with a piece of cloth or nylon and secure the edges of the cover with tape as shown in the illustration.
Note:Cover the curtain shield airbag assembly LH with a protective cover as soon as the front pillar garnish LH is removed.
-
REMOVE REAR DOOR OPENING TRIM WEATHERSTRIP LH
Remove the rear door opening trim weatherstrip LH.
Remove any residual weatherstrip sealant from the vehicle body using cleaner.
Note:Remove the sealant completely. Any residual sealant may transfer to other areas of the vehicle when removing/installing the interior parts.
REMOVE COWL SIDE TRIM BOARD RH
REMOVE FRONT DOOR OPENING TRIM WEATHERSTRIP RH
Tip:Use the same procedure as for the LH side.
REMOVE FRONT PILLAR GARNISH RH
Tip:Use the same procedure as for the LH side.
REMOVE REAR DOOR OPENING TRIM WEATHERSTRIP RH
Tip:Use the same procedure as for the LH side.
DISCONNECT FRONT SEAT OUTER BELT ASSEMBLY LH
DISCONNECT NO. 1 REAR SEAT OUTER BELT ASSEMBLY LH
REMOVE REAR SEAT SIDE GARNISH LH
-
Using a clip remover, remove the clip.
Disengage the 2 claws (A).
Disengage the 3 claws (B) and clip to remove the rear seat side garnish LH.
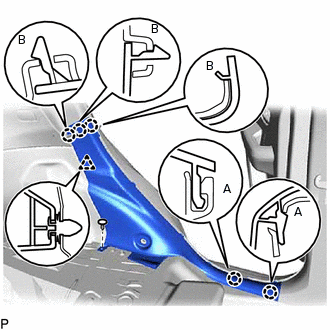
-
REMOVE LOWER CENTER PILLAR GARNISH LH
-
Disengage the 5 claws and 2 clips to remove the lower center pillar garnish LH.
-
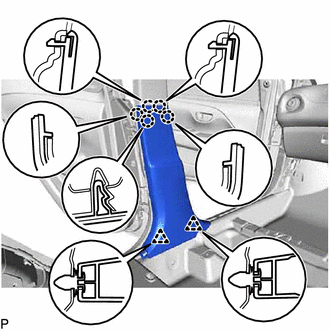
REMOVE UPPER CENTER PILLAR GARNISH LH
-
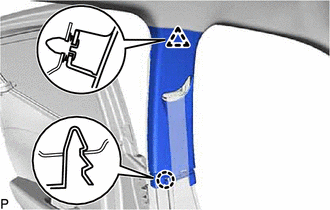
Disengage the claw and clip.
Pass the floor anchor of the front seat outer belt assembly LH through the upper center pillar garnish LH and remove the upper center pillar garnish LH.
w/ Curtain Shield Airbag:
Remove the clip from the upper center pillar garnish LH.
-
REMOVE INNER ROOF SIDE GARNISH COVER LH (w/o Luggage Compartment Room Light)
-
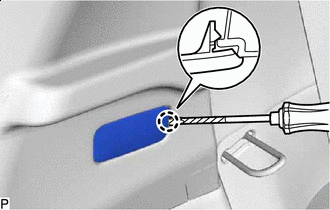
Protective Tape
Using a screwdriver with its tip wrapped with protective tape, disengage the claw.
Disconnect the connector to remove the inner roof side garnish cover LH.
-
REMOVE NO. 1 LUGGAGE COMPARTMENT LIGHT ASSEMBLY (w/ Luggage Compartment Room Light)
REMOVE INNER ROOF SIDE GARNISH LH
-

Using a moulding remover, disengage the 3 claws as shown in the illustration.
-
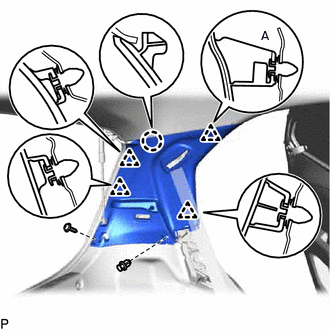
Remove the screw and clip.
Disengage the 4 clips and claw.
Pass the floor anchor of the No. 1 rear seat outer belt assembly LH through the inner roof side garnish LH and remove the inner roof side garnish LH.
w/ Curtain Shield Airbag:
Remove the clip (A) from the inner roof side garnish LH.
-
DISCONNECT FRONT SEAT OUTER BELT ASSEMBLY RH
Tip:Use the same procedure as for the LH side.
DISCONNECT NO. 1 REAR SEAT OUTER BELT ASSEMBLY RH
Tip:Use the same procedure as for the LH side.
REMOVE REAR SEAT SIDE GARNISH RH
Tip:Use the same procedure as for the LH side.
REMOVE LOWER CENTER PILLAR GARNISH RH
Tip:Use the same procedure as for the LH side.
REMOVE UPPER CENTER PILLAR GARNISH RH
Tip:Use the same procedure as for the LH side.
REMOVE INNER ROOF SIDE GARNISH RH
Tip:Use the same procedure as for the LH side.
REMOVE LOWER INSTRUMENT PANEL
REMOVE MAP LIGHT ASSEMBLY (for Normal Roof)
REMOVE MAP LIGHT ASSEMBLY (for Canvas Top)
REMOVE ROOF HEADLINING ASSEMBLY HOLE PLUG (for Canvas Top)
Tip:Use the same procedure for the RH side and LH side.
-
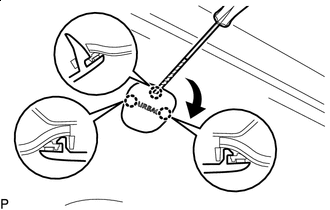
Protective Tape
Using a screwdriver with its tip wrapped with protective tape, disengage the 3 claws as shown in the illustration.
-
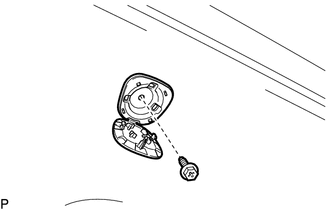
Remove the bolt and roof headlining assembly hole plug.
-
REMOVE VISOR ASSEMBLY LH
-
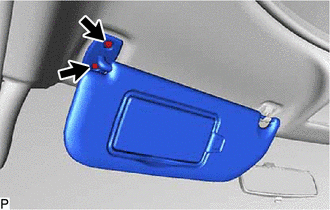
Remove the 2 screws and visor assembly LH.
-
REMOVE VISOR ASSEMBLY RH
Tip:Use the same procedure as for the LH side.
REMOVE VISOR HOLDER LH
-
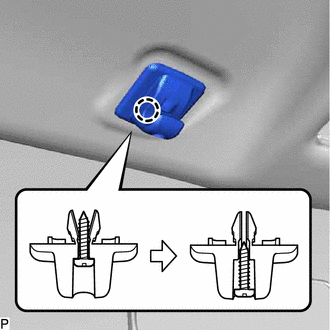
Loosen the screw as shown in the illustration.
Disengage the claw to remove the visor holder LH.
-
REMOVE VISOR HOLDER RH
Tip:Use the same procedure as for the LH side.
REMOVE ROOF HEADLINING ASSEMBLY (for Normal Roof)
Using a clip remover, remove the 2 clips.
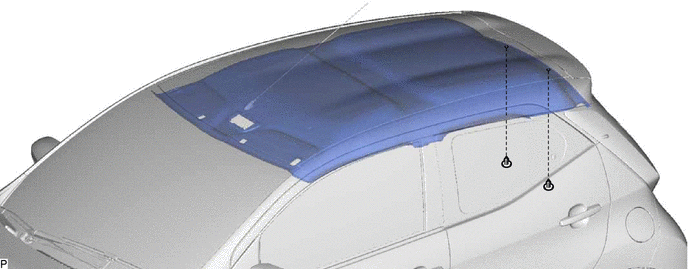
Using a knife, cut the roof headlining assembly as shown by the cut lines in the illustration.
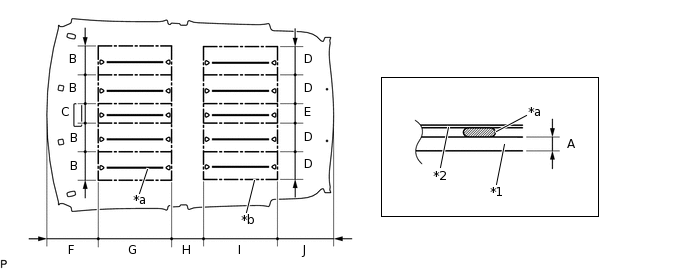
*1
Roof Headlining Assembly
*2
Roof Panel
*a
Adhesive
*b
Cut Line
Note:In order to avoid damaging the roof panel, do not cut the roof headlining assembly to a depth of more than 6 mm (0.236 in.).
Table 1. Specification Area
Measurement
A
6 mm (0.236 in.)
B
170 mm (6.69 in.)
C
110 mm (4.33 in.)
D
160 mm (6.30 in.)
E
120 mm (4.72 in.)
F
303 mm (11.9 in.)
G
430 mm (1.41 ft.)
H
184 mm (7.24 in.)
I
435 mm (1.43 ft.)
J
327 mm (1.07 ft.)
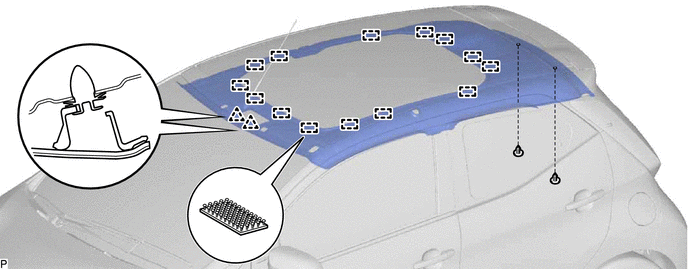
Insert a finger between the roof headlining assembly and roof panel and gently pull down and remove each piece of the roof headlining assembly and adhesive, one by one.
Note:In order to avoid damaging the roof panel, do not pull the roof headlining assembly downward with excessive force.
Remove the roof headlining assembly from the vehicle.
REMOVE ROOF HEADLINING ASSEMBLY (for Canvas Top)
Using a clip remover, remove the 2 clips.
Disengage the 2 clips and 14 fasteners.
-
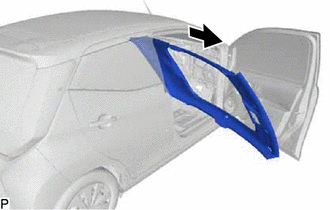
Remove the roof headlining assembly from the vehicle through the front passenger door as shown in the illustration.
Note:Do not damage the roof headlining assembly or vehicle interior.