BACK DOOR REASSEMBLY
PROCEDURE
-
INSTALL BACK DOOR DAMPER STAY LOWER BRACKET LH (w/o Power Back Door)
-
INSTALL BACK DOOR DAMPER STAY LOWER BRACKET RH (w/o Power Back Door)
Tech Tips
Use the same procedure as for the LH side.
-
INSTALL BACK DOOR STAY ASSEMBLY LH (w/o Power Back Door)
-
INSTALL BACK DOOR STAY ASSEMBLY RH (w/o Power Back Door)
Tech Tips
Use the same procedure as for the LH side.
-
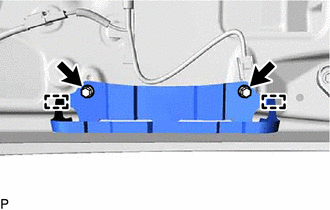
INSTALL POWER BACK DOOR UNIT SET ASSEMBLY LH (w/ Power Back Door)
Note
Do not apply any horizontal load to the power back door unit set assembly in order to prevent the piston rod from deforming.
-
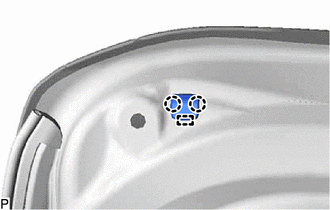
Clean the bolt hole on the vehicle body.
-

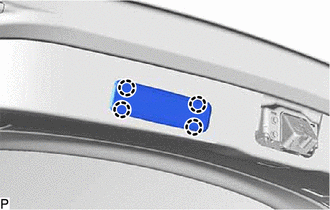
Install the 2 bolts (A).
Note
Install the power back door unit set assembly while supporting the back door by hand.
- Torque:
- 8.0 N*m { 82 kgf*cm, 71 in.*lbf }
-
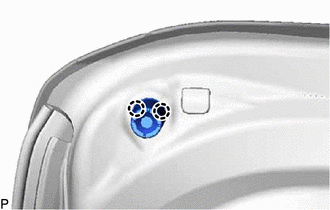
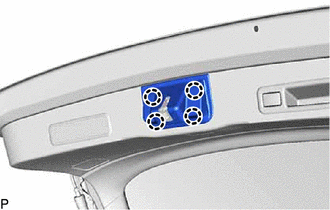
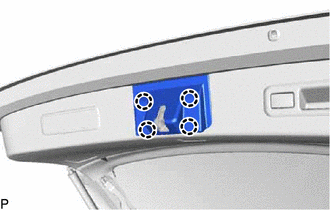
Install the power back door unit set assembly with 2 new bolts (B).
Note
Install the power back door unit set assembly while supporting the back door by hand.
- Torque:
- 8.0 N*m { 82 kgf*cm, 71 in.*lbf }
-
-
INSTALL POWER BACK DOOR UNIT SET ASSEMBLY RH (w/ Power Back Door)
Tech Tips
Use the same procedure as for the LH side.
-
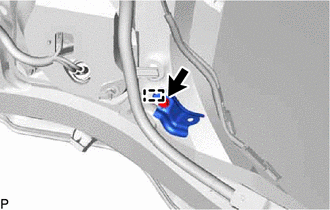
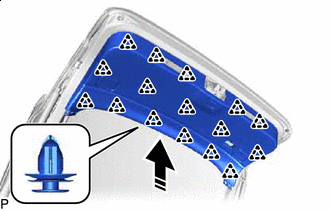
INSTALL BACK DOOR DUST PROOF SEAL
-
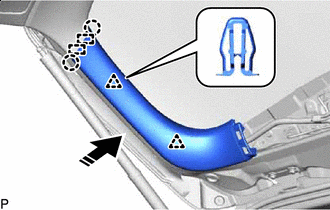
Engage the guide and 2 claws to install the back door dust proof seal.
Tech Tips
Use the same procedure for the RH side and LH side.
-
-
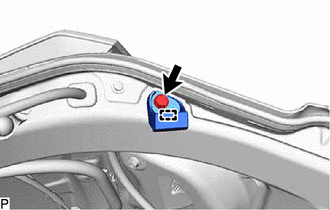
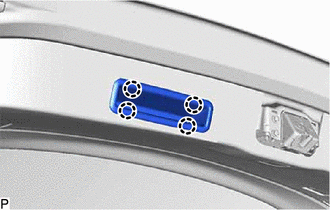
INSTALL BACK DOOR LOWER STOPPER CUSHION
-
Engage the 2 claws to install a new back door lower stopper cushion.
Tech Tips
Use the same procedure for the RH side and LH side.
-
-
INSTALL REAR TELEVISION CAMERA ASSEMBLY
-
INSTALL REAR LIGHT ASSEMBLY LH
-
INSTALL REAR LIGHT ASSEMBLY RH
Tech Tips
Use the same procedure as for the LH side.
-
INSTALL POWER BACK DOOR WARNING BUZZER (w/ Power Back Door)
-
INSTALL MULTIPLEX NETWORK DOOR ECU (w/ Power Back Door)
-
INSTALL LICENSE PLATE LIGHT ASSEMBLY LH
-
INSTALL LICENSE PLATE LIGHT ASSEMBLY RH
Tech Tips
Use the same procedure as for the LH side.
-
INSTALL BACK DOOR OPENER SWITCH ASSEMBLY
-
INSTALL BACK DOOR OUTSIDE GARNISH SUB-ASSEMBLY
-
INSTALL REAR WIPER MOTOR AND BRACKET ASSEMBLY
-
INSTALL REAR SPOILER SIDE PROTECTOR SUB-ASSEMBLY LH
-
INSTALL REAR SPOILER SIDE PROTECTOR SUB-ASSEMBLY RH
Tech Tips
Use the same procedure as for the LH side.
-
INSTALL POWER BACK DOOR SENSOR ASSEMBLY LH (w/o Rear No. 2 Seat)
w/ Power Back Door:
-
INSTALL POWER BACK DOOR SENSOR ASSEMBLY LH (w/ Rear No. 2 Seat)
-
INSTALL POWER BACK DOOR SENSOR ASSEMBLY RH (w/ Power Back Door)
Tech Tips
Use the same procedure as for the LH side.
-
INSTALL BACK DOOR LOWER STOPPER
Tech Tips
Use the same procedure for the RH side and LH side.
-
Engage the guide and install the back door lower stopper with the bolt.
-
-
INSTALL BACK DOOR STAY REINFORCEMENT LH (w/ Rear No. 2 Seat)
-
Engage the guide to install the back door stay reinforcement LH with the bolt.
-
-
INSTALL BACK DOOR STAY REINFORCEMENT RH (w/ Rear No. 2 Seat)
Tech Tips
Use the same procedure as for the LH side.
-
INSTALL BACK DOOR LOWER STAY REINFORCEMENT LH
-
Engage the 2 guides and install the back door lower stay reinforcement LH with the 2 bolts.
- Torque:
- 5.5 N*m { 56 kgf*cm, 49 in.*lbf }
-
-
INSTALL BACK DOOR LOWER STAY REINFORCEMENT RH
Tech Tips
Use the same procedure as for the LH side.
-
INSTALL BACK DOOR LOCK ASSEMBLY (w/o Power Back Door)
-
INSTALL BACK DOOR LOCK ASSEMBLY (w/ Power Back Door)
-
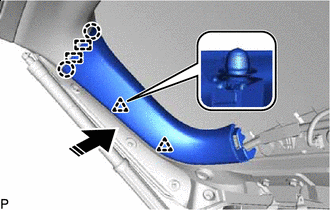
INSTALL BACK DOOR TRIM PANEL ASSEMBLY (w/o Rear No. 2 Seat)
-

Install in this Direction Engage the 16 clips to install the back door trim panel assembly as shown in the illustration.
-
-
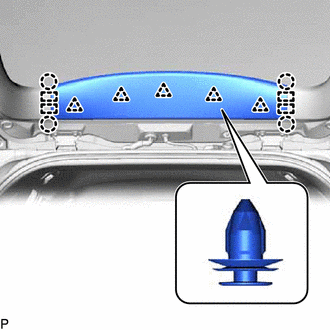
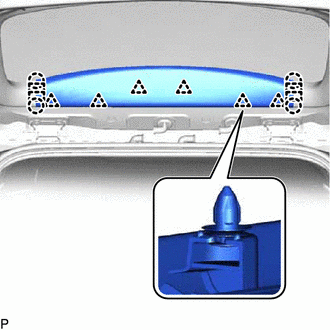
INSTALL BACK DOOR TRIM PANEL ASSEMBLY (w/ Rear No. 2 Seat)
-

Install in this Direction Engage the 17 clips to install the back door trim panel assembly as shown in the illustration.
-
-
INSTALL NO. 1 LUGGAGE COMPARTMENT LIGHT ASSEMBLY
-
INSTALL BACK DOOR FINISH COVER LH (w/o Power Back Door)
-
Engage the 4 claws to install the back door finish cover LH.
-
-
INSTALL BACK DOOR FINISH COVER RH (w/o Power Back Door)
Tech Tips
Use the same procedure as for the LH side.
-
INSTALL DOOR PULL HANDLE (w/ Power Back Door)
-
Connect the connector.
-
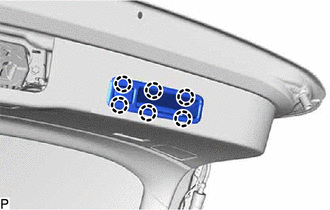
Engage the 6 claws to install the door pull handle.
-
-
INSTALL BACK DOOR TRIM BASE (w/ Power Back Door)
-
Engage the 4 claws to install the back door trim base.
-
-
INSTALL BACK DOOR LOCK COVER (w/o Rear No. 2 Seat)
-
Engage the 4 claws to install the back door lock cover.
-
-
INSTALL BACK DOOR LOCK COVER (w/ Rear No. 2 Seat)
-
Engage the 4 claws to install the back door lock cover.
-
-
INSTALL BACK DOOR TRIM COVER LH (w/o Rear No. 2 Seat)
-
Install in this Direction Engage the 2 guides, 2 claws and 2 clips to install the back door trim cover LH as shown in the illustration.
-
-
INSTALL BACK DOOR TRIM COVER LH (w/ Rear No. 2 Seat)
-
Install in this Direction Engage the 2 guides, 2 claws and 2 clips to install the back door trim cover LH as shown in the illustration.
-
-
INSTALL BACK DOOR TRIM COVER RH
Tech Tips
Use the same procedure as for the LH side.
-
INSTALL BACK WINDOW UPPER PANEL TRIM (w/o Rear No. 2 Seat)
-
Engage the 4 guides, 5 clips and 4 claws to install the back window upper panel trim.
-
-
INSTALL BACK WINDOW UPPER PANEL TRIM (w/ Rear No. 2 Seat)
-
Disengage the 4 guides, 6 clips and 4 claws to install the back window upper panel trim.
-
-
INSPECT POWER BACK DOOR SYSTEM (w/ Power Back Door)
-
INSPECT BACK DOOR CLOSER SYSTEM (w/ Power Back Door)
-
PERFORM INITIALIZATION
-
w/ Parking Assist Monitor System:
-
w/ Parallel Parking Assist Function:
-
w/o Parallel Parking Assist Function
-
-
w/ Panoramic View Monitor System:
-
-
ADJUST REAR TELEVISION CAMERA ASSEMBLY
-
w/ Parking Assist Monitor System:
-
w/ Parallel Parking Assist Function:
-
w/o Parallel Parking Assist Function
-
-
w/ Panoramic View Monitor System:
-