ROOF DRIP SIDE FINISH MOULDING REMOVAL
CAUTION / NOTICE / HINT
Use the same procedure for the RH side and LH side.
The following procedure is for the LH side.
PROCEDURE
REMOVE ROOF DRIP SIDE FINISH MOULDING (for Normal Roof)
Tip:When removing the roof drip side finish moulding, heat the vehicle body and roof drip side finish moulding using a heat light.
Table 1. Heating Temperature Item
Temperature
Vehicle Body
40 to 60°C (104 to 140°F)
Roof Drip Side Finish Moulding
20 to 30°C (68 to 86°F)
Note:Do not heat the vehicle body or roof drip side finish moulding excessively.
Using a heat light, heat the roof drip side finish moulding.
-
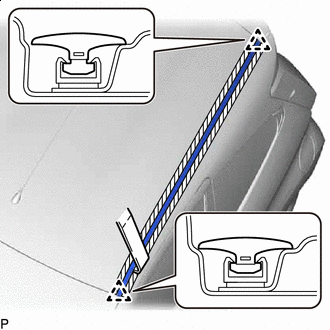

Protective Tape
Apply protective tape around the roof drip side finish moulding.
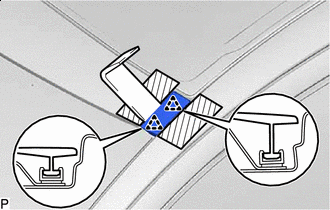
Using a moulding remover, disengage the 2 No. 1 roof drip side finish moulding clips and remove the roof drip side finish moulding.
Note:Do not remove the No. 1 roof drip side finish moulding clip.
If the No. 1 roof drip side finish moulding clip is damaged or falls out, replace it with a new one.
REMOVE ROOF DRIP SIDE FINISH MOULDING (for Canvas Top)
Tip:When removing the roof drip side finish moulding, heat the vehicle body and roof drip side finish moulding using a heat light.
Table 2. Heating Temperature Item
Temperature
Vehicle Body
40 to 60°C (104 to 140°F)
Roof Drip Side Finish Moulding
20 to 30°C (68 to 86°F)
Note:Do not heat the vehicle body or roof drip side finish moulding excessively.
Using a heat light, heat the roof drip side finish moulding.
-
Protective Tape
Apply protective tape around the roof drip side finish moulding.
Using a moulding remover, disengage the 2 No. 1 roof drip side finish moulding clips and remove the roof drip side finish moulding.
Note:Do not remove the No. 1 roof drip side finish moulding clip.
If the No. 1 roof drip side finish moulding clip is damaged or falls out, replace it with a new one.
REMOVE REAR ROOF DRIP SIDE FINISH MOULDING (for Canvas Top)
Tip:When removing the rear roof drip side finish moulding, heat the vehicle body and rear roof drip side finish moulding using a heat light.
Table 3. Heating Temperature Item
Temperature
Vehicle Body
40 to 60°C (104 to 140°F)
Rear Roof Drip Side Finish Moulding
20 to 30°C (68 to 86°F)
Note:Do not heat the vehicle body or rear roof drip side finish moulding excessively.
Using a heat light, heat the rear roof drip side finish moulding.
-
Protective Tape
Apply protective tape around the rear roof drip side finish moulding.
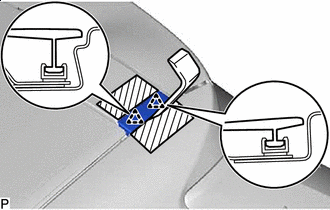
Using a moulding remover, disengage the 2 No. 1 roof drip side finish moulding clips and remove the rear roof drip side finish moulding.
Note:Do not remove the No. 1 roof drip side finish moulding clip.
If the No. 1 roof drip side finish moulding clip is damaged or falls out, replace it with a new one.