REAR COMBINATION LIGHT ASSEMBLY INSTALLATION
CAUTION / NOTICE / HINT
Use the same procedure for the RH side and LH side.
The following procedure is for the LH side.
PROCEDURE
INSTALL OUTER QUARTER GARNISH SUB-ASSEMBLY (for 5 Door)
Tip:When installing the outer quarter garnish sub-assembly, heat the vehicle body and outer quarter garnish sub-assembly using a heat light.
Table 1. Heating Temperature Item
Temperature
Vehicle Body
40 to 60°C (104 to 140°F)
Outer Quarter Garnish Sub-assembly
20 to 30°C (68 to 86°F)
Note:Do not heat the vehicle body or outer quarter garnish sub-assembly excessively.
Clean the vehicle body surface.
Using a heat light, heat the vehicle body surface.
Remove any double-sided tape from the vehicle body.
Wipe off any tape adhesive residue with cleaner.
Temporarily install a new outer quarter garnish sub-assembly.
Using a heat light, heat the vehicle body and outer quarter garnish sub-assembly.
Remove the release paper from the new outer quarter garnish sub-assembly.
Tip:After removing the release paper, keep the exposed adhesive free from foreign matter.
Attach the double-sided tape to temporarily install the outer quarter garnish sub-assembly.
Tip:Press the outer quarter garnish sub-assembly firmly to temporarily install it.
Engage the 2 clips to install the outer quarter garnish sub-assembly.
INSTALL REAR COMBINATION LIGHT SOCKET AND WIRE SUB-ASSEMBLY
Engage the grommet.
Connect the connector to install the rear combination light socket and wire sub-assembly.
INSTALL INNER ROOF SIDE GARNISH (for 5 Door)
INSTALL INNER ROOF SIDE GARNISH (for 3 Door)
INSTALL ROOF SIDE GARNISH END COVER (for 3 Door)
INSTALL INNER ROOF SIDE GARNISH COVER (for LH Side)
w/o Luggage Compartment Room Light:Click here
INSTALL NO. 1 LUGGAGE COMPARTMENT LIGHT ASSEMBLY (for LH Side)
w/ Luggage Compartment Room Light:Click here
INSTALL REAR SEAT SIDE GARNISH (for 5 Door)
INSTALL FRONT QUARTER TRIM PANEL ASSEMBLY (for 3 Door)
CONNECT NO. 1 REAR SEAT OUTER BELT ASSEMBLY (for 5 Door)
CONNECT NO. 1 REAR SEAT OUTER BELT ASSEMBLY (for 3 Door)
CONNECT FRONT SEAT OUTER BELT ASSEMBLY (for 3 Door)
INSTALL REAR DOOR OPENING TRIM WEATHERSTRIP (for 5 Door)
for LH Side:Click here
for RH Side:Click here
INSTALL FRONT DOOR OPENING TRIM WEATHERSTRIP (for 3 Door)
for LH Side:Click here
for RH Side:Click here
INSTALL COWL SIDE TRIM SUB-ASSEMBLY (for 3 Door)
INSTALL REAR SEAT ASSEMBLY (for Bench Seat Type)
INSTALL REAR SEAT ASSEMBLY (for Separate Seat Type)
INSTALL REAR FLOOR MAT ASSEMBLY
INSTALL PACKAGE TRAY TRIM PANEL ASSEMBLY (w/ Package Tray Trim)
INSTALL BACK-UP LIGHT BULB (for Front Passenger Side)
Install the back-up light bulb to the rear combination light socket and wire sub-assembly.
INSTALL NO. 1 REAR FOG LIGHT BULB (for Driver Side)
Install the No. 1 rear fog light bulb to the rear combination light socket and wire sub-assembly.
INSTALL REAR TURN SIGNAL LIGHT BULB
Install the rear turn signal light bulb to the rear combination light socket and wire sub-assembly.
INSTALL STOP LIGHT BULB
Install the stop light bulb to the rear combination light socket and wire sub-assembly.
INSTALL REAR COMBINATION LIGHT ASSEMBLY
for Front Passenger Side:
-

Turn the rear combination light socket and wire sub-assembly with the back-up light bulb as shown in the illustration to connect them as a unit.
-
for Driver Side:
-
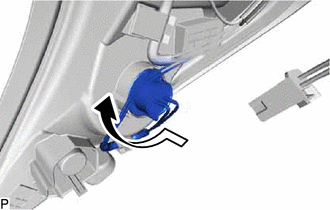
Turn the rear combination light socket and wire sub-assembly with the No. 1 rear fog light bulb as shown in the illustration to connect them as a unit.
-
-
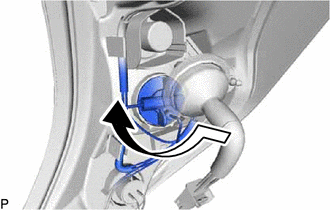
Turn the rear combination light socket and wire sub-assembly with the rear turn signal light bulb as shown in the illustration to connect them as a unit.
-
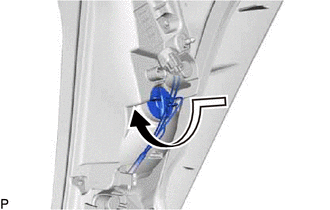
Turn the rear combination light socket and wire sub-assembly with the stop light bulb as shown in the illustration to connect them as a unit.
Connect the connector.
Engage the 4 clamps.
-
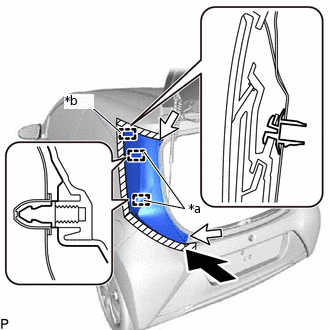
*a
Pin
*b
Guide
Engage the guide and 2 pins to connect the rear combination light assembly as shown in the illustration.
Install the rear combination light assembly with the 2 screws.
Remove the protective tape.