MOTOR WATER JACKET COVER ASSEMBLY REMOVAL
PROCEDURE
REMOVE NO. 1 ENGINE UNDER COVER
DRAIN COOLANT (for Inverter Coolant)
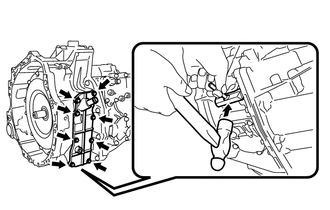
REMOVE NO. 2 MOTOR WATER JACKET COVER ASSEMBLY
-
Remove the 5 bolts.
Insert the blade of an oil pan seal cutter between the transaxle housing. Cut through the applied sealer and remove the No. 2 motor water jacket cover assembly.
Note:Be careful not to damage the contact surfaces of the transaxle housing where the No. 2 motor water jacket cover assembly is installed.
-
REMOVE HYBRID VEHICLE TRANSAXLE ASSEMBLY
REMOVE FRONT ENGINE MOUNTING BRACKET
REMOVE NO. 1 TRANSMISSION CONTROL CABLE BRACKET
REMOVE OIL COOLER TUBE CLAMP
REMOVE NO. 2 AUTOMATIC TRANSMISSION CASE COVER
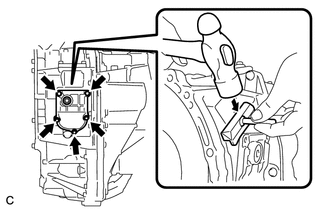
REMOVE NO. 1 MOTOR WATER JACKET COVER ASSEMBLY
-
Remove the 8 bolts.
Insert the blade of an oil pan seal cutter between the transaxle housing. Cut through the applied sealer and remove the No. 1 motor water jacket cover assembly.
Note:Be careful not to damage the contact surfaces of the transaxle housing where the No. 1 motor water jacket cover assembly is installed.
-
REMOVE NO. 3 MOTOR WATER JACKET COVER ASSEMBLY
-
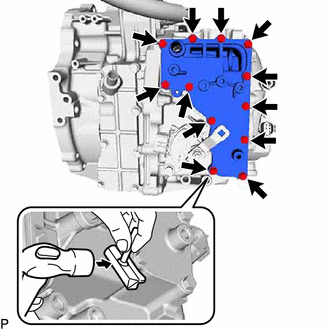
Remove the 12 bolts.
Insert the blade of an oil pan seal cutter between the transaxle housing. Cut through the applied sealer and remove the No. 3 motor water jacket cover assembly.
Note:Be careful not to damage the contact surfaces of the transaxle housing where the No. 3 motor water jacket cover assembly is installed.
-