GENERAL MAINTENANCE INSIDE VEHICLE
-
Performing the following maintenance checks on the vehicle is the owner's responsibility. The owner may perform the maintenance or take the vehicle to a service center. Check the parts of the vehicle described below on a daily basis. In most cases, special tools are not required. It is recommended that the owner perform these checks. The procedures for general maintenance are as follows.
-
GENERAL NOTES
-
Maintenance requirements vary depending on the country.
-
Check the maintenance schedule in the owner's manual supplement.
-
Determine the appropriate time to service the vehicle using either distance driven or time (months) elapsed, whichever reaches the specification first.
-
Maintain similar intervals between periodic maintenance unless noted.
-
Failing to check each vehicle part could lead to poor engine performance and increased exhaust emissions.
-
-
LIGHTS
-
Check that the headlights, stop lights, taillights, turn signal lights and other lights illuminate or blink properly. Also, check that they have enough brightness.
-
Check that the headlights are aimed properly.
-
-
WARNING LIGHTS AND BUZZERS
-
Check that all the warning lights and buzzers are working.
-
-
HORNS
-
Check that the horn is working.
-
-
WINDSHIELD GLASS
-
Check for scratches, pits or abrasions.
-
-
WINDSHIELD WIPER AND WASHER
-
Check that the washers are aimed properly. Also, check that the washer fluid hits the windshield in the center of the operating range of each wiper.
-
Check if the wipers streak or not. Replace the wipers if necessary.
-
-
WINDSHIELD DEFROSTER
-
When the heater or air conditioner is on the defroster setting, check that air comes out of the defroster outlet.
-
-
REAR VIEW MIRROR
-
Check that the rear view mirror is securely mounted.
-
-
SUN VISORS
-
Check that the sun visors move freely and are securely mounted.
-
-
STEERING WHEEL
-
Check that the steering wheel has the proper amount of free play. Also check for steering difficulty and unusual noises.
-
-
SEATS
-
Check that the seat adjusters, seatback recliner and other seat controls operate smoothly.
-
Check that all the latches lock securely in all positions.
-
Check that the locks hold securely in all positions.
-
Check that the headrests move up and down smoothly and that the locks hold securely in all latched positions.
-
for Power Seat:
-
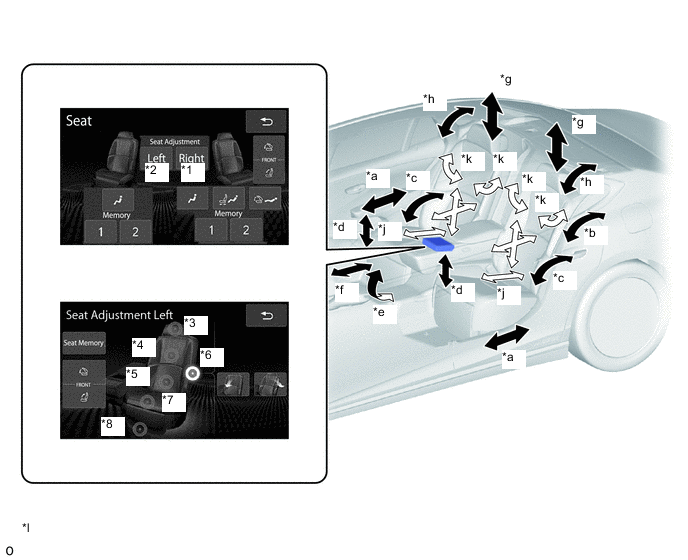
Check that the each function of the front power seat operates noumally by using the front power seat switch or multi-display.
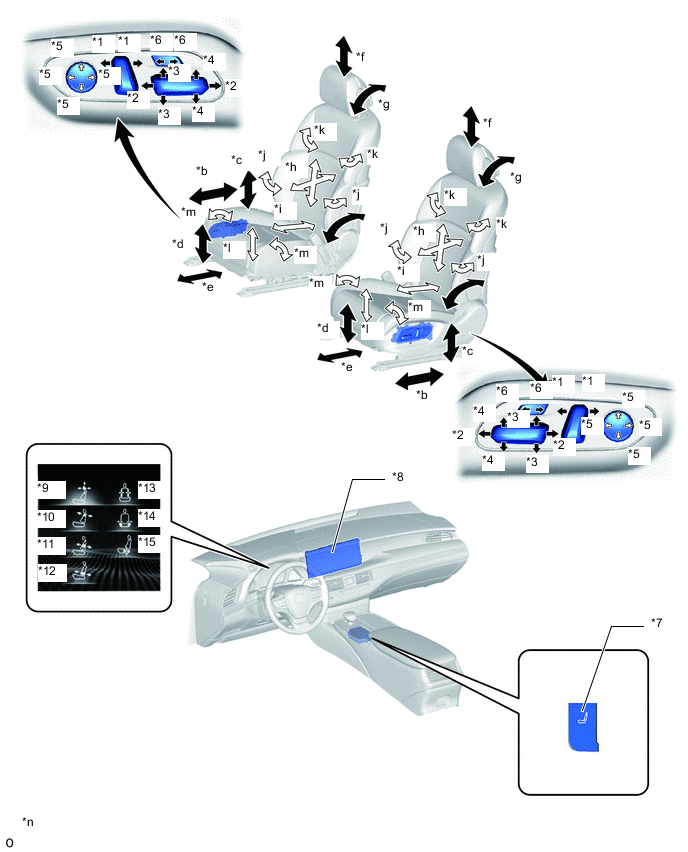
*1 Reclining Switch *2 Slide Switch *3 Rear Lifter Switch *4 Front Vertical Switch *5 Lumbar Switch *6 Cushion Switch *7 Seat Switch *8 Multi-display *9 Headrest Switch *10 Shoulder Switch *11 Lumbar Switch *12 Lower Back Switch *13 Back Side Switch *14 Cushion Side Switch *15 Hip Switch - - *a Seat Reclining *b Seat Slide *c Rear Lifter *d Front Vertical *e Cushion Length *f Headrest Up/Down *g Headrest Front/Rear *h Lumbar Support *i Lower Back *j Back Side *k Shoulder *l Hip *m Cushion Side - - 
Motor Operation 
Pneumatic Operation *n Example - - -
Check that each function of the power seat operates normally by using the rear power seat switch (rear multi operation panel).
*1 Front Passenger Seat Full Front/Return Switch *2 Mode Restoring Switch (for Business) *3 Mode Restoring Switch (for Entertainment) *4 Mode Restoring Switch (for Relaxation) *5 Memory Restoring Switch (w/ Ottoman) *6 Memory Restoring Switch (w/o Ottoman) *7 Hand-operated Adjustment Selector Switch (w/ Ottoman) *8 Hand-operated Adjustment Selector Switch (w/o Ottoman) *9 Headrest Switch *10 Shoulder Support Switch *11 Lumbar Support/Back Low Switch *12 Reclining Switch *13 Front Vertical Switch *14 Ottoman Switch *a Slide Function *b Reclining Function (Independent Operation) *c Reclining Function (Slide Interlocking Movement) *d Front Vertical Function *e Ottoman Develop Function *f Ottoman Expansion and Contraction Function *g Headrest Adjustment Function (Front/Rear) *h Headrest Adjustment Function (Up/Down) *i Lumbar Support Adjustment Function *j Back Low Adjustment Function *k Shoulder Support Function - - Motor Drive Component Pneumatic Support Drive Component *l Illustration with a masterpiece - -
-
-
-
SEAT BELTS
-
Check that the seat belt components, such as the buckles, retractors and anchors, operate properly and smoothly.
-
Check that the belt webbing is not cut, frayed, worn or damaged.
-
-
ACCELERATOR PEDAL
-
Check that the pedal operates smoothly. In other words, check that the pedal does not have uneven pedal resistance or become stuck in certain positions.
-
-
BRAKE PEDAL
-
Check that the pedal operates smoothly.
-
Check that the pedal has the proper reserve distance and free play.
-
Start the engine and check the brake booster function.
-
Start the engine and check the brake system indicator.
-
-
BRAKES
-
In a safe place, check that the vehicle remains straight when applying the brakes.
-
-
PARKING BRAKE
-
Start the engine and move the shift lever to D. Then depress the brake pedal and pull the electric parking brake switch assembly to the lock side for 1 second. Check the parking brake indicator light (red) condition.
-
Release the brake pedal and check that the vehicle does not move.
-
Depress the brake pedal and push the electric parking brake switch assembly to the release side for 1 second. Check the parking brake indicator light (red) condition.
-
Release the brake pedal and check that the vehicle moves.
-
-
AUTOMATIC TRANSMISSION "PARK" MECHANISM
-
Check the operation of the P position switch.
-
Check that park (P) can be disengaged by operating the shift lever.
-
With park (P) selected, release all brakes in an area that has a slight grade and check that the vehicle is stable.
-
-
FLOOR MATS
-
Check that the correct floor mats are used, and that they are properly installed.
-