REAR SEAT OUTER BELT ASSEMBLY INSTALLATION
-
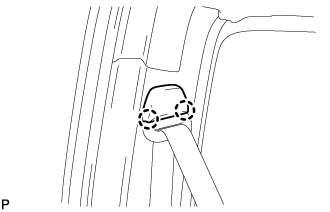
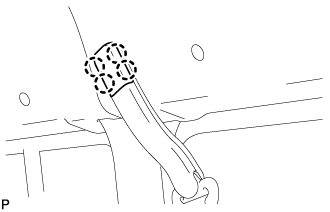
INSTALL REAR NO. 4 SEAT BELT ASSEMBLY OUTER
-
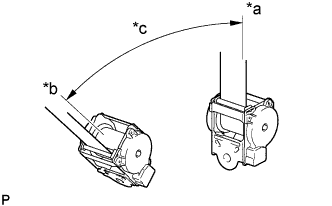
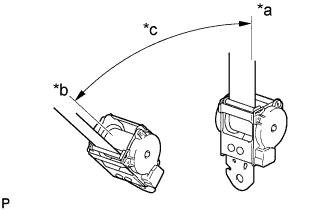
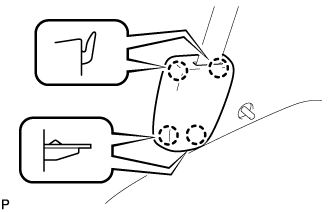
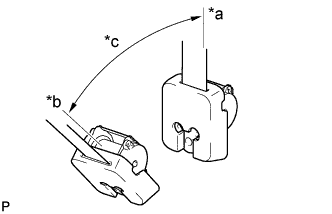
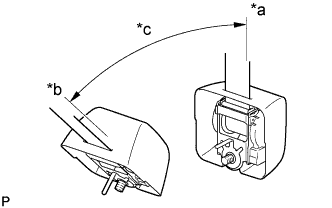
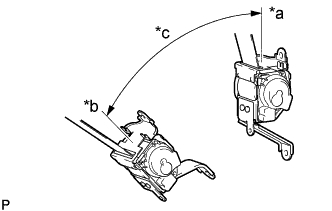
Text in Illustration *a Unlocked *b Locked *c 45° Check the degree of tilt when the ELR begins to lock.
-
Check that the belt does not lock at less than 15 degrees of tilt in any direction but locks at over 45 degrees of tilt when gently moving the installed retractor.
Note
Do not disassemble the retractor.
If operation is not as specified, replace the rear No. 4 seat belt assembly outer.
-
-
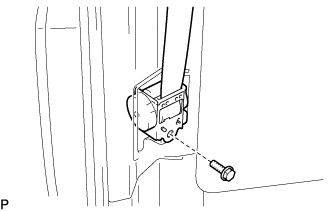
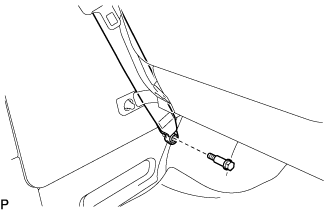
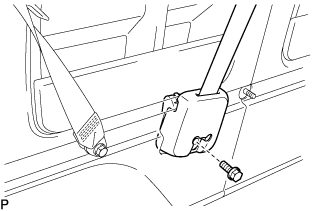
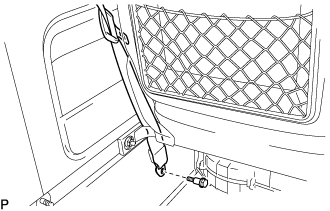
Install the rear No. 4 seat belt assembly outer with the bolt.
- Torque:
- 42 N*m { 428 kgf*cm, 31 ft.*lbf }
-
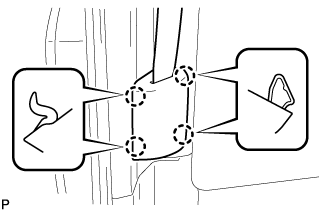
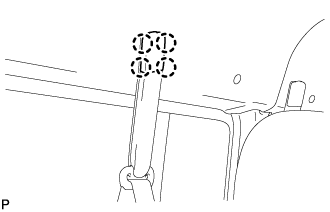
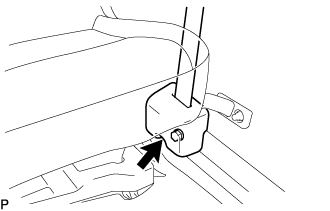
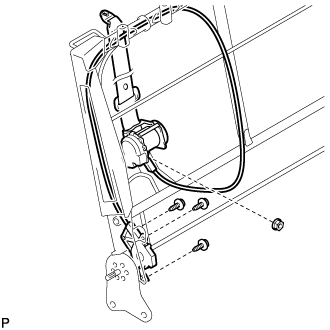
Attach the 4 claws to install the retractor cover of the rear No. 4 seat belt assembly outer.
-
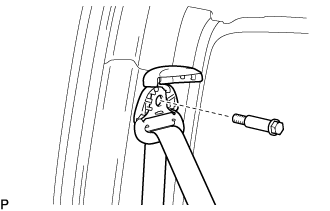
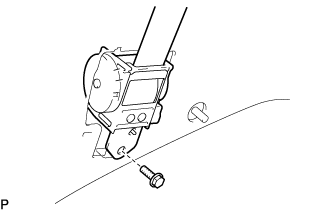
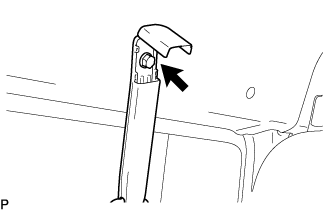
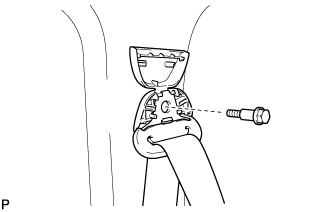
Connect the shoulder side of the rear No. 4 seat belt assembly outer with the bolt.
- Torque:
- 42 N*m { 428 kgf*cm, 31 ft.*lbf }
-
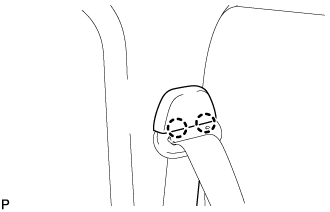
Attach the 2 claws to close the shoulder side cover of the rear No. 4 seat belt assembly outer.
-
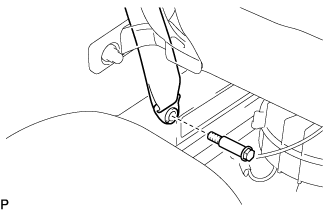
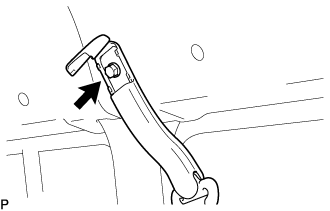
Connect the floor side of the rear No. 4 seat belt assembly outer with the bolt.
- Torque:
- 42 N*m { 428 kgf*cm, 31 ft.*lbf }
-
Check if the ELR locks.
Note
This check should be performed with the rear No. 4 seat belt assembly outer installed.
-
With the rear No. 4 seat belt assembly outer installed, check that the belt locks when it is pulled out quickly.
If operation is not as specified, replace the rear No. 4 seat belt assembly outer.
-
-
-
INSTALL REAR NO. 3 SEAT BELT ASSEMBLY OUTER
-
Text in Illustration *a Unlocked *b Locked *c 45° Check the degree of tilt when the ELR begins to lock.
-
Check that the belt does not lock at less than 15 degrees of tilt in any direction but locks at over 45 degrees of tilt when gently moving the installed retractor.
Note
Do not disassemble the retractor.
If operation is not as specified, replace the rear No. 3 seat belt assembly outer.
-
-
Install the rear No. 3 seat belt assembly outer with the bolt.
- Torque:
- 42 N*m { 428 kgf*cm, 31 ft.*lbf }
-
Attach the 4 claws to install the retractor cover of the rear No. 3 seat belt assembly outer.
-
Tighten the bolt to connect the shoulder side of the rear No. 3 seat belt assembly outer.
- Torque:
- 42 N*m { 428 kgf*cm, 31 ft.*lbf }
-
Attach the 4 claws to close the shoulder side cover of the rear No. 3 seat belt assembly outer.
-
Connect the floor side of the rear No. 3 seat belt assembly outer with the bolt.
- Torque:
- 42 N*m { 428 kgf*cm, 31 ft.*lbf }
-
Check if the ELR locks.
Note
This check should be performed with the rear No. 3 seat belt assembly outer installed.
-
With the rear No. 3 seat belt assembly outer installed, check that the belt locks when it is pulled out quickly.
If operation is not as specified, replace the rear No. 3 seat belt assembly outer.
-
-
-
INSTALL REAR NO. 2 SEAT BELT ASSEMBLY OUTER
-
Text in Illustration *a Unlocked *b Locked *c 45° Check the degree of tilt when the ELR begins to lock.
-
Check that the belt does not lock at less than 15 degrees of tilt in any direction but locks at over 45 degrees of tilt when gently moving the installed retractor.
Note
Do not disassemble the retractor.
If operation is not as specified, replace the rear No. 2 seat belt assembly outer.
-
-
Install the rear No. 2 seat belt assembly outer with the bolt.
- Torque:
- 42 N*m { 428 kgf*cm, 31 ft.*lbf }
-
Connect the shoulder side of the rear No. 2 seat belt assembly outer with the bolt.
- Torque:
- 42 N*m { 428 kgf*cm, 31 ft.*lbf }
-
Attach the 2 claws to close the shoulder side cover of the rear No. 2 seat belt assembly outer.
-
Connect the floor side of the rear No. 2 seat belt assembly outer with the bolt.
- Torque:
- 42 N*m { 428 kgf*cm, 31 ft.*lbf }
-
Check if the ELR locks.
Note
This check should be performed with the rear No. 2 seat belt assembly outer installed.
-
With the rear No. 2 seat belt assembly outer installed, check that the belt locks when it is pulled out quickly.
If operation is not as specified, replace the rear No. 2 seat belt assembly outer.
-
-
-
INSTALL REAR SEAT BELT ASSEMBLY OUTER
-
Text in Illustration *a Unlocked *b Locked *c 45° Check the degree of tilt when the ELR begins to lock.
-
Check that the belt does not lock at less than 15 degrees of tilt in any direction but locks at over 45 degrees of tilt when gently moving the installed retractor.
Note
Do not disassemble the retractor.
If operation is not as specified, replace the rear seat belt assembly outer.
-
-
Tighten the bolt to install the rear seat belt assembly outer.
- Torque:
- 42 N*m { 428 kgf*cm, 31 ft.*lbf }
-
Tighten the bolt to connect the shoulder side of the rear seat belt assembly outer.
- Torque:
- 42 N*m { 428 kgf*cm, 31 ft.*lbf }
-
Attach the 4 claws to close the shoulder side cover of the rear seat belt assembly outer.
-

Connect the floor side of the rear seat belt assembly outer with the bolt.
- Torque:
- 42 N*m { 428 kgf*cm, 31 ft.*lbf }
-
for Rear No. 1 Seat Bench Seat Type:
-
Text in Illustration *a Unlocked *b Locked *c 45° Check the degree of tilt when the ELR begins to lock.
Check that the belt does not lock at less than 15 degrees of tilt in any direction but locks at over 45 degrees of tilt when gently moving the installed retractor.
Note
Do not disassemble the retractor.
If operation is not as specified, replace the rear seat belt assembly outer.
-
w/ Cover:
-
Install the side trim cover to the rear seat belt assembly outer.
-
Install the bolt to the floor side of the rear seat belt assembly outer.
-
-

Temporarily install the rear seat belt assembly outer with the 2 bolts.
-
Tighten the lower side bolt first, and then tighten the upper side bolt to install the rear seat belt assembly outer.
- Torque:
- for Upper Bolt
- 8.5 N*m { 87 kgf*cm, 75 in.*lbf }
- for Lower Bolt
- 42 N*m { 428 kgf*cm, 31 ft.*lbf }
-
Attach the 2 claws to install the retractor cover of the rear seat belt assembly outer.
-
Tighten the bolt.
- Torque:
- 8.5 N*m { 87 kgf*cm, 75 in.*lbf }
-
Tighten the bolt to connect the shoulder side of the rear seat belt assembly outer.
- Torque:
- 42 N*m { 428 kgf*cm, 31 ft.*lbf }
-
Attach the 2 claws to close the shoulder side cover of the rear seat belt assembly outer.
-
Tighten the bolt to connect the floor side of the rear seat belt assembly outer.
- Torque:
- 42 N*m { 428 kgf*cm, 31 ft.*lbf }
-
w/ Cover:
Attach the 3 guides and 3 claws to install the side trim cover.
-
-
Check if the ELR locks.
Note
This check should be performed with the rear seat belt assembly outer installed.
-
With the rear seat belt assembly outer installed, check that the belt locks when it is pulled out quickly.
If operation is not as specified, replace the rear seat belt assembly outer.
-
-
-
INSTALL REAR SEAT 3 POINT TYPE BELT ASSEMBLY (for Rear No. 4 Seat Assembly)
-
Install the rear seat 3 point type belt assembly with the nut.
- Torque:
- 42 N*m { 428 kgf*cm, 31 ft.*lbf }
-
Install the 3 screws.
-
-
INSTALL REAR SEAT SHOULDER BELT HOLE COVER (for Rear No. 4 Seat Assembly)
-
Install the rear seat shoulder belt hole cover with the 2 screws.
-
-
INSTALL REAR SEAT CUSHION SHIELD INNER NO. 1 (for Rear No. 4 Seat Assembly)
-
Install the rear seat cushion shield inner No. 1 with the 3 screws.
-
-
INSTALL NO. 4 SEATBACK COVER SUB-ASSEMBLY WITH PAD (for Rear No. 4 Seat Assembly)
-
INSTALL REAR SEATBACK LOCK BEZEL LOWER (for Rear No. 4 Seat Assembly)
-
INSTALL REAR SEATBACK LOCK BEZEL UPPER (for Rear No. 4 Seat Assembly)
-
INSTALL REAR SEAT HEADREST SUPPORT (for Rear No. 4 Seat Assembly)
-
INSTALL REAR SEAT CUSHION (for Rear No. 4 Seat Assembly)
-
INSTALL REAR SEAT HEADREST ASSEMBLY (for Rear No. 4 Seat Assembly)
-
INSTALL NO. 4 SEAT CUSHION COVER SUB-ASSEMBLY WITH PAD (for Rear No. 4 Seat Assembly)
-
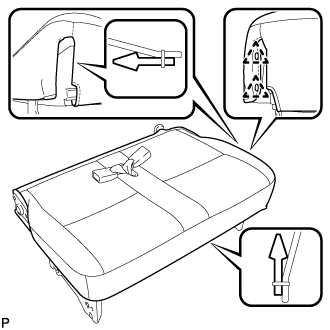
Install the No.4 seat cushion cover sub-assembly with pad with the hook and 2 clips.
-
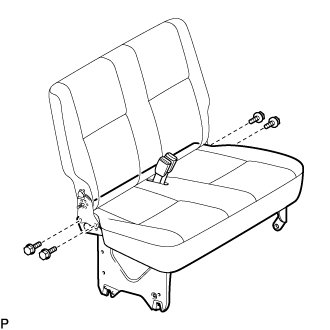
Install the No.4 seat cushion assembly with the 4 bolts.
- Torque:
- 42 N*m { 428 kgf*cm, 31 ft.*lbf }
-
-
CONNECT REAR SEAT 3 POINT TYPE BELT ASSEMBLY (for Rear No. 4 Seat Assembly)
-
Connect the rear seat 3-point type belt assembly with the bolt.
- Torque:
- 42 N*m { 428 kgf*cm, 31 ft.*lbf }
-
-
INSTALL LAP BELT OUTER ANCHOR COVER (for Rear No. 4 Seat Assembly)
-
INSTALL RECLINING ADJUSTER COVER RH (for Rear No. 4 Seat Assembly)
-
INSTALL RECLINING ADJUSTER COVER LH (for Rear No. 4 Seat Assembly)
-
INSTALL RECLINING ADJUSTER RELEASE HANDLE (for Rear No. 4 Seat Assembly)
-
INSTALL NO. 4 SEAT LEG BRACKET REAR (for Rear No. 4 Seat Assembly)
-
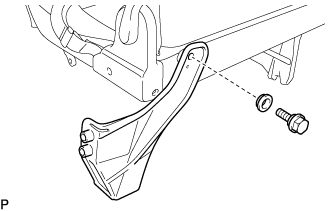
Install the No.4 seat leg bracket rear with the bolt and spacer.
- Torque:
- 29 N*m { 296 kgf*cm, 21 ft.*lbf }
-
-
INSTALL REAR SEAT 3 POINT TYPE BELT ASSEMBLY (for Rear No. 2 Seat Assembly)
-
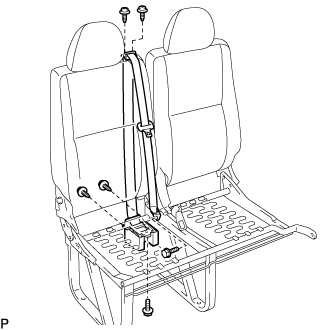
Install the rear seat 3 point type belt assembly with the 2 bolts.
- Torque:
- 42 N*m { 428 kgf*cm, 31 ft.*lbf }
-
Install the 4 screws.
-
-
INSTALL REAR SEAT 3 POINT TYPE BELT ASSEMBLY (for Rear No. 3 Seat Assembly)
-
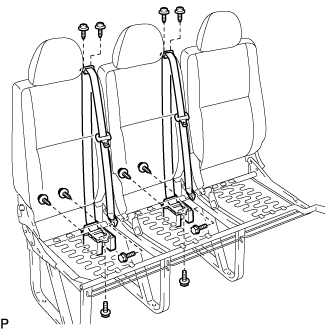
Install the 2 rear seat 3 point type belt assemblies with the 4 bolts.
- Torque:
- 42 N*m { 428 kgf*cm, 31 ft.*lbf }
-
Install the 8 screws.
-
-
INSTALL NO. 2 SEAT CUSHION COVER SUB-ASSEMBLY WITH PAD (for Rear No. 2 Seat Assembly)
-
INSTALL NO. 3 SEAT CUSHION COVER SUB-ASSEMBLY WITH PAD (for Rear No. 3 Seat Assembly)
-
INSTALL RECLINING ADJUSTER COVER LH (for Rear No. 2 Seat Assembly)
-
INSTALL RECLINING ADJUSTER COVER LH (for Rear No. 3 Seat Assembly)
-
INSTALL RECLINING ADJUSTER RELEASE HANDLE NO. 2 LH (for Rear No. 2 Seat Assembly)
-
INSTALL RECLINING ADJUSTER RELEASE HANDLE NO. 3 LH (for Rear No. 3 Seat Assembly)
-
INSTALL REAR SEAT BELT ASSEMBLY INNER (for Rear No. 2 Seat Assembly)
-
Install the rear seat belt assembly inner with the bolt.
- Torque:
- 42 N*m { 428 kgf*cm, 31 ft.*lbf }
-
-
INSTALL REAR SEAT BELT ASSEMBLY INNER (for Rear No. 3 Seat Assembly)
Tech Tips
Follow the same procedure as for the rear No.2 seat assembly.
-
INSTALL RECLINING ADJUSTER COVER RH (for Rear No. 2 Seat Assembly)
-
INSTALL RECLINING ADJUSTER COVER RH (for Rear No. 3 Seat Assembly)
-
INSTALL RECLINING ADJUSTER RELEASE HANDLE NO. 2 RH (for Rear No. 2 Seat Assembly)
-
INSTALL RECLINING ADJUSTER RELEASE HANDLE NO. 3 RH (for Rear No. 3 Seat Assembly)
-
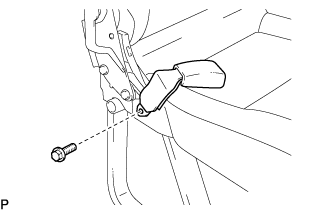
INSTALL REAR SEAT BELT ASSEMBLY OUTER (for Rear No. 1 Seat Assembly Swiveling Seat Type)
-
Install the rear seat belt assembly outer with the bolt.
- Torque:
- 42 N*m { 428 kgf*cm, 31 ft.*lbf }
-
-
INSTALL REAR SEAT TURN TABLE COVER (for Rear No. 1 Seat Assembly Swiveling Seat Type)
-
INSTALL SEAT TRACK ADJUSTING HANDLE KNOB (for Rear No. 1 Seat Assembly Swiveling Seat Type)
-
INSTALL RECLINING ADJUSTER COVER RH (for Rear No. 1 Seat Assembly Swiveling Seat Type)
-
INSTALL RECLINING ADJUSTER COVER LH (for Rear No. 1 Seat Assembly Swiveling Seat Type)
-
INSTALL RECLINING ADJUSTER RELEASE HANDLE NO. 1 (for Rear No. 1 Seat Assembly Swiveling Seat Type)
-
INSTALL REAR NO. 4 SEAT ASSEMBLY
-
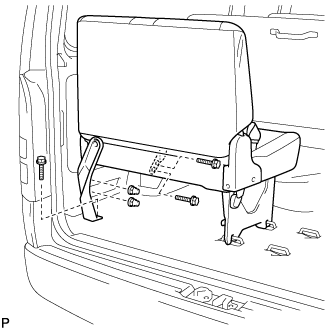
Secure the rear No.4 seat assembly with the 2 locks
-
Install the rear No.4 seat assembly with the 3 bolts and 2 nuts.
- Torque:
- 39 N*m { 398 kgf*cm, 29 ft.*lbf }
Note
After installing the rear No.4 seat assembly, fold down the seatback onto the seat cushion, lift the side of the rear No.4 seat assembly, and drop it to engage the locks securely.
-
-
INSTALL REAR NO. 3 SEAT ASSEMBLY
-
for Bench Type Seatback:
-
for Separate Type Seatback:
-
-
INSTALL REAR NO. 2 SEAT ASSEMBLY
-
w/o Headrest:
-
w/ Headrest:
-
-
INSTALL REAR NO. 1 SEAT ASSEMBLY
-
w/o Headrest:
-
w/ Headrest:
-