AUTOMATIC TRANSMISSION FLUID(for V35A-FTS) ADJUSTMENT

CAUTION / NOTICE / HINT
CAUTION:
-
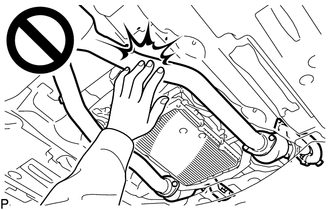
Be careful not to burn yourself when the automatic transmission fluid temperature is high.
-
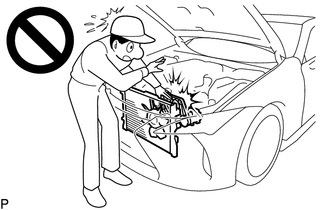
To prevent injury due to contact with an operating V-ribbed belt or cooling fan, keep your hands and clothing away from the V-ribbed belt and cooling fans when working in the engine compartment with the engine running or the engine switch on (IG).
-
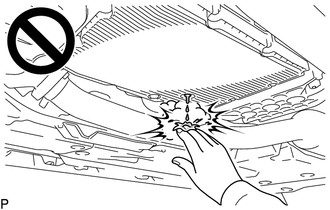
To prevent burns, do not touch the engine, exhaust pipe or other high temperature components while the engine is hot.
PROCEDURE
-
AIR SUSPENSION CONTROL PROHIBITED (w/ Air Suspension)
-
REMOVE TRANSMISSION UNDER COVER
-
BEFORE FILLING TRANSMISSION
-
The AGA0E automatic transmission assembly requires Toyota Genuine ATF WS.
-
If the entire automatic transmission assembly, automatic transmission oil pan sub-assembly, drain plug, transmission valve body assembly and/or torque converter assembly have/has been replaced, proceed to the Fill Transmission procedure.
-
If the flange yoke type T oil seal has been replaced and/or an automatic transmission fluid leak has been replaced, proceed to the Adjust Fluid Temperature procedure.
-
-
FILL TRANSMISSION PAN WITH FLUID
-
Lift the vehicle.
Note
The automatic transmission fluid level cannot be measured accurately if the vehicle is not level. Make sure it is held level.
-
Remove the refill plug and gasket from the automatic transmission assembly.
-
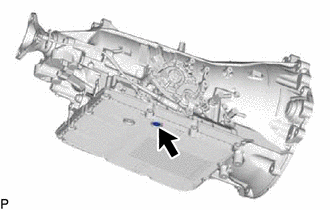
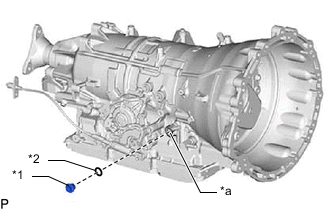
Using a 6 mm hexagon socket wrench, remove the overflow plug from the automatic transmission assembly.
Note
The overflow plug and drain plug are located nearby one another. Make sure not to remove the incorrect plug.
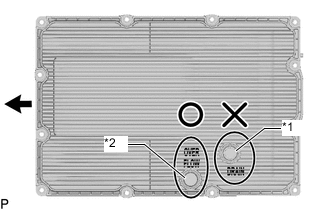
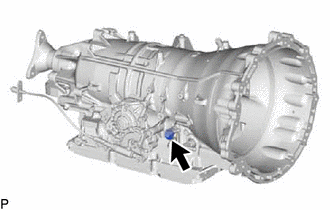
*1 Drain Plug *2 Overflow Plug 
Front of Vehicle -
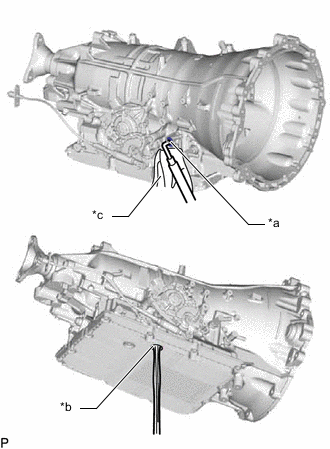
*a Refill Hole *b Overflow Hole *c Cloth Add automatic transmission fluid to the refill hole until it flows out of the overflow hole.
Note
-
Use Toyota Genuine ATF WS.
-
Be sure to add automatic transmission fluid slowly. If automatic transmission fluid is added quickly, the automatic transmission fluid may hit internal parts and bounce back, resulting in automatic transmission fluid coming out of the refill hole.
Tech Tips
When pouring automatic transmission fluid into the refill hole, cover the area surrounding the refill hole with a cloth.
If automatic transmission fluid adheres to the automatic transmission oil pan sub-assembly, it may be mistaken for an automatic transmission fluid leak.
-
-
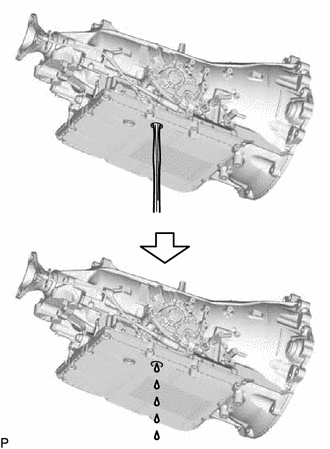
Wait until the automatic transmission fluid flow slows and only drips come out.
-
Using a 6 mm hexagon socket wrench, temporarily install the overflow plug to the automatic transmission assembly.
Tech Tips
Reuse the old O-ring as the overflow plug will be removed again.
-
-
FILL TRANSMISSION
-
Fill the automatic transmission assembly with the correct amount of automatic transmission fluid as listed in the table below.
Standard Capacity Performed Repair Fill Amount Removal and installation of the automatic transmission oil pan sub-assembly and drain plug 0.7 liters (0.7 US qts, 0.6 Imp. qts) Removal and installation of the transmission valve body assembly 1.1 liters (1.2 US qts, 1.0 Imp. qts) Removal and installation of the torque converter assembly 3.8 liters (4.0 US qts, 3.3 Imp. qts) Tech Tips
-
When pouring automatic transmission fluid into the refill hole, cover the area surrounding the refill hole with a cloth.
If automatic transmission fluid adheres to the automatic transmission oil pan sub-assembly, it may be mistaken for an automatic transmission fluid leak.
-
If the specified amount of automatic transmission fluid cannot be added, perform the following:
-
Temporarily install the gasket and refill plug to the automatic transmission assembly.
Tech Tips
Gasket replacement and tightening of the refill plug are performed after the automatic transmission fluid level is adjusted.
-
Lower the vehicle.
-
Depress and hold the brake pedal.
-
Start the engine.
Note
To reduce load, make sure that all electrical systems, such as the air conditioning, electric fan and audio system, are off.
-
Slowly move the shift position from P to M in the order of P → R → N → D → M, and then move the shift position back to P.
Tech Tips
Keep the shift position in each position for approximately 3 seconds.
-
Allow the engine to idle for 30 seconds to warm it up.
-
Turn the engine switch off.
-
Remove the refill plug and gasket from the automatic transmission assembly.
-
Fill the automatic transmission assembly with the correct amount of automatic transmission fluid as listed in the table above.
Note
-
Use Toyota Genuine ATF WS.
-
Be sure to add automatic transmission fluid slowly. If automatic transmission fluid is added quickly, the automatic transmission fluid may hit internal parts and bounce back, resulting in automatic transmission fluid coming out of the refill hole.
Tech Tips
When pouring automatic transmission fluid into the refill hole, cover the area surrounding the refill hole with a cloth.
If automatic transmission fluid adheres to the automatic transmission oil pan sub-assembly, it may be mistaken for an automatic transmission fluid leak.
-
-
Temporarily install the gasket and refill plug to the automatic transmission assembly.
Tech Tips
Gasket replacement and tightening of the refill plug are performed after the automatic transmission fluid level is adjusted.
-
-
-
ADJUST FLUID TEMPERATURE
Note
-
Always adjust the automatic transmission fluid level when the fluid temperature is appropriate for checking the fluid level.
-
Use the shift position indicator light in the vehicle combination meter or the GTS to check whether the fluid temperature is appropriate for checking the fluid level. Even when using the GTS, it is necessary to switch to fluid temperature detection mode for optimum fluid temperature control.
-
Switch to fluid temperature detection mode (When using GTS)
-
Connect the GTS to the DLC3 with the engine switch off.
-
Turn the engine switch on (IG) and turn the GTS on.
Note
To reduce load, make sure that all electrical systems, such as the air conditioning, electric fan and audio system, are off.
-
Enter the following menus: Powertrain / Transmission / Active Test / Activate the TC Terminal.
-
Select the Active Test menu: Connect the TC and TE1 / ON.
-
Select the Data List item: A/T Oil Temperature No. 1.
Powertrain > Transmission > Active TestActive Test Display Activate the TC Terminal Data List Display A/T Oil Temperature No.1 -
Before beginning work, be sure to check that the automatic transmission fluid temperature is below the lower limit of the permissible temperature range for adjusting fluid levels.
The Permissible Temperature Range for Adjusting Automatic Transmission Fluid 35 to 38°C (95 to 100°F) Note
If the automatic transmission fluid temperature is higher than permissible temperature range for adjusting fluid levels, suspend work immediately. Lower the temperature to the lower limit of the permissible temperature range or less by moving the vehicle to a cooler location, etc.
-
Depress and hold the brake pedal.
-
Start the engine.
Note
To reduce load, make sure that all electrical systems, such as the air conditioning, electric fan and audio system, are off.
-
Slowly move the shift position from P to M in the order of P → R → N → D → M to circulate the automatic transmission fluid through each part of transmission, and then move the shift position back to P.
Tech Tips
Keep the shift position in each position for approximately 3 seconds.
-
From the shift position in D, move the shift lever between N and D within 1.5 seconds for 6 seconds or more continuously to switch to fluid temperature detection mode.
Note
Hold the shift lever in N for 1 second or more and hold the shift lever in D for 0.1 seconds or more before moving the shift lever.
Tech Tips
When switched to fluid temperature detection mode, the combination meter D shift position indicator display illuminates for 2 seconds and then turns off, no matter what position the shift position is in.
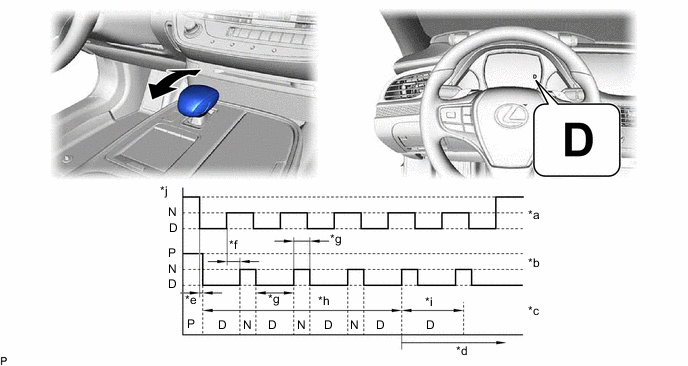
*a Shift Lever Position *b Shift Position *c Shift Indicator Display *d Temperature Adjustment Mode *e 0.1 seconds *f 1 second *g Within 1.5 seconds *h 6 seconds or more *i 2 seconds *j Home -
Return the shift position to P and turn off the Active Test "Activate the TC Terminal" on the GTS. (Disconnect the TC terminal)
Note
Make sure that the TC terminal is disconnected. If the TC terminal is connected, the automatic transmission fluid level cannot be precisely adjusted due to fluctuations in engine speed.
Tech Tips
Even after the TC terminal is disconnected, fluid temperature detection mode is active until the engine switch off.
-
-
Switch to fluid temperature detection mode (When TC terminal connected)
-
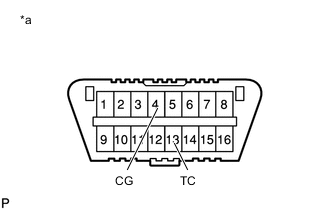
*a Front view of DLC3 Using SST, connect terminals 13 (TC) and 4 (CG) of the DLC3 with the engine switch off.
- SST
- 09843-18040
-
Depress and hold the brake pedal.
-
Start the engine.
Note
To reduce load, make sure that all electrical systems, such as the air conditioning and audio system are off.
-
Slowly move the shift position from P to M in the order of P → R → N → D → M to circulate the automatic transmission fluid through each part of the transmission, and then move the shift position back to P.
Tech Tips
Keep the shift position in each position for approximately 3 seconds.
-
From the shift position in D, move the shift lever between N and D within 1.5 seconds for 6 seconds or more continuously to switch to fluid temperature detection mode.
Note
Hold the shift lever in N for 1 second or more and hold the shift lever in D for 0.1 seconds or more before moving the shift lever.
Tech Tips
When switched to fluid temperature detection mode, the combination meter D shift position indicator display illuminates for 2 seconds and then turns off, no matter what position the shift position is in.
*a Shift Lever Position *b Shift Position *c Shift Indicator Display *d Temperature Adjustment Mode *e 0.1 seconds *f 1 second *g Within 1.5 seconds *h 6 seconds or more *i 2 seconds *j Home -
Return the shift position to P, and release the TC (13) - CG (4) connection. (Disconnect the TC terminal)
Note
Make sure that the TC terminal disconnected. If the TC terminal is connected, the automatic transmission fluid level cannot be precisely adjusted due to fluctuations in engine speed.
Tech Tips
Even after the TC terminal is disconnected, fluid temperature detection mode is active until the engine switch off.
-
-
Adjust the automatic transmission fluid temperature to the appropriate temperature for the automatic transmission fluid level adjusting procedure.
-
Check the automatic transmission fluid temperature by the shift position indicator.
Tech Tips
-
In fluid temperature detection mode, the combination meter D shift position indicator display illuminates, turns off, or blinks depending on the automatic transmission fluid temperature.
-
The automatic transmission fluid adding procedure should be performed when the combination meter D shift position indicator display is illuminated.
-
-
Adjust the automatic transmission fluid temperature.
Tech Tips
Adjust the automatic transmission fluid level when the combination meter D shift position indicator display is illuminated.
-
If the combination meter D shift position indicator display is not illuminated, idle the engine to warm it up until the combination meter D shift position indicator display illuminates.
-
If the combination meter D shift position indicator display is illuminated, immediately begin to adjust the automatic transmission fluid level.
-
If the combination meter D shift position indicator display is blinking, stop the engine to cool the automatic transmission fluid. Once the automatic transmission fluid temperature drops to the appropriate level, perform the automatic transmission fluid level adjustment procedure again.
D Shift Indicator Below Automatic Transmission Fluid Level Adjustment Temperature Automatic Transmission Fluid Level Adjustment Temperature Above Automatic Transmission Fluid Level Adjustment Temperature Automatic Transmission Fluid Temperature
(GTS Display Temperature)
35°C or less
(95°F or less)
35 to 38°C
(95 to 100°F)
38°C or more
(100°F or more)
D Shift Indicator OFF ON Blinks -
-
-
Using a 6 mm hexagon socket wrench, remove the overflow plug from the automatic transmission assembly, and check the fluid level when the fluid temperature is appropriate for checking the fluid level.
CAUTION:
Be careful as the automatic transmission fluid that comes out is hot.
Note
The overflow plug and drain plug are located nearby one another. Make sure not to remove the incorrect plug.
*1 Drain Plug *2 Overflow Plug Front of Vehicle -
Check that the condition of the automatic transmission fluid coming out of the overflow hole.
Note
-
Check the automatic transmission fluid level with the engine running. Therefore, make sure not to touch the high temperature parts such as the exhaust pipe, etc.
-
If only a small amount of automatic transmission fluid (approximately 5.0 cc (0.3 cu.in.)) comes out of the overflow hole, it is possible that only the automatic transmission fluid remaining in the overflow tube has come out. This is not considered to be overflow and the automatic transmission fluid must be refilled.
Tech Tips
Overflow refers to when automatic transmission fluid is discharged from the overflow tube.
-
When automatic transmission fluid comes out. (Go to "When automatic transmission fluid comes out")
-
When automatic transmission fluid does not come out. (Go to "When automatic transmission fluid does not come out")
-
-
When automatic transmission fluid comes out:
-
If the amount of automatic transmission fluid that flows out is large, wait until the automatic transmission fluid flow slows and only drops come out.
Tech Tips
The automatic transmission fluid flow will not stop completely because the automatic transmission fluid continues to expand as its temperature increases.
-
-
When automatic transmission fluid does not come out:
-
Remove the refill plug and gasket from the automatic transmission assembly.
-
*a Refill Hole *b Overflow Hole *c Cloth Add automatic transmission fluid to the refill hole until it flows out of the overflow hole.
Note
-
Use Toyota Genuine ATF WS.
-
Be sure to add automatic transmission fluid slowly. If automatic transmission fluid is added quickly, the automatic transmission fluid may hit internal parts and bounce back, resulting in automatic transmission fluid coming out of the refill hole.
Tech Tips
When pouring automatic transmission fluid into the refill hole, cover the area surrounding the refill hole with a cloth.
If automatic transmission fluid adheres to the automatic transmission oil pan sub-assembly, it may be mistaken for an automatic transmission fluid leak.
-
-
Wait until the automatic transmission fluid flow slows and only drips come out.
Tech Tips
The automatic transmission fluid flow will not stop completely because the automatic transmission fluid continues to expand as its temperature increases.
-
-
Remove the O-ring from the overflow plug.
-
Install a new O-ring to the overflow plug.
-
Using a 6 mm hexagon socket wrench, install the overflow plug to the automatic transmission assembly.
- Torque:
- 40 N*m { 408 kgf*cm, 30 ft.*lbf }
-
*1 Refill Plug *2 Gasket *a Refill Hole Coat a new gasket with automatic transmission fluid.
-
Install the gasket and refill plug to ATF.
- Torque:
- 40 N*m { 408 kgf*cm, 30 ft.*lbf }
-
Lower the vehicle.
-
Turn the engine switch off and disconnect the GTS. (When using GTS)
-
Turn the engine switch off. (When TC terminal connected)
-
-
AFTER FILLING AUTOMATIC TRANSMISSION
-
Lift the vehicle.
-
Clean each part and check for automatic transmission fluid leaks.
-
Lower the vehicle.
-
Operation complete.
-
-
ATF THERMAL DEGRADATION ESTIMATE RESET
Note
Approximately 50% or more of the ATF has been replaced during a repair of the transmission or a similar operation.
-
INSTALL TRANSMISSION UNDER COVER