REAR DRIVE SHAFT ASSEMBLY REASSEMBLY
CAUTION / NOTICE / HINT
Tech Tips
-
Use the same procedure for both the RH and LH sides.
-
The procedure described below is for the LH side.
PROCEDURE
-
INSTALL EBJ BOOT
-
Wrap the shaft splines with vinyl tape.
Note
Wrap the shaft splines with vinyl tape to protect the boot from scratches.
-
Install the EDJ boot in the specified position, and fill of the specified grease.
Standard grease capacity 50 to 60g (1.76 to 2.12 oz.)
-
-
INSTALL EDJ BOOT
-
Place the EDJ boot at the center of the shaft.
-
Text in Illustration *1 EDJ Cage *a Cutout Portion Insert the EDJ cage onto the shaft.
Tech Tips
Insert the EDJ cage with the cutout portion facing the shaft end, since the EDJ cage has an orientation.
-
-
INSTALL EDJ INNER RACE
-
Install the EDJ inner race on the shaft and fix the rear drive the shaft snap ring in place using pliers.
Tech Tips
Confirm that the rear drive the shaft snap ring is completely fitted into the shaft groove.
-
-
INSTALL EDJ CAGE
-
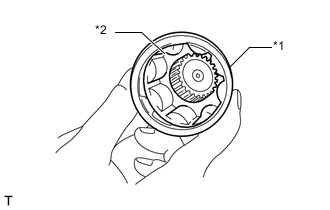
Text in Illustration *1 EDJ Cage *2 EDJ Inner Race Install the EDJ cage to EDJ inner race fixed upon the shaft.
Tech Tips
Fit the cage with the protruding section aligned with the track on the EDJ inner race, and turn by a half pitch.
-
Fill of the specified grease into the inner side of the EDJ outer race.
Standard grease capacity 80 to 90 g (2.82 to 3.17 oz) -
Apply a thin coat of the specified grease to the cage pocket and 8 ball bearings.
-
Insert the 8 ball bearings into the cage pocket.
-
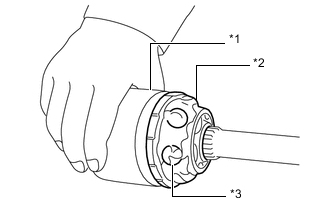
Text in Illustration *1 Outer Race *2 Grease *3 Balls (8 Pieces) Align the outer race track and ball positions, and place the shaft, EDJ inner race, cage and ball bearings in the original positions, and then fix the outer race in place.
-

Install the circlip B in the groove on the EDJ outer race.
Tech Tips
-
Assure that the balls, cage and EDJ inner race are completely fitted in the outer race of EDJ.
-
Use care not to place the matched position of rear drive shaft snap ring in the ball groove of outer race.
-
Pull the shaft lightly and assure that the circlip is completely fitted in the groove.
-
-
NKG814 apply an even coat of the specified grease to the entire inner surface of the boot. Also apply grease to the shaft.
Standard grease capacity 20 to 30 g (0.71 to 1.06 oz) -
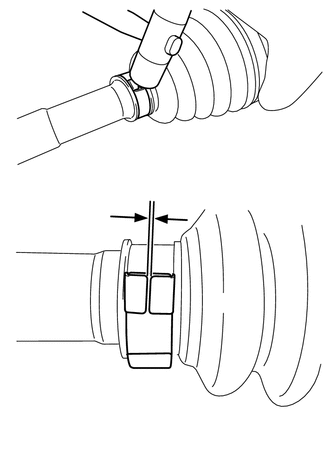
Install the EDJ boot taking care not to twist it.
Tech Tips
-
The inside of the large end of EDJ boot and the boot groove shall be cleaned so as to be free from grease and other substances.
-
When installing the EDJ boot, position the outer race of EDJ at center of the stroke.
-
-
-
INSTALL REAR NO. 2 DRIVE SHAFT OUTBOARD JOINT BOOT CLAMP
-
Apply NKG814 grease to the interior surface of the new rear No. 2 drive shaft outboard joint boot clamp.
-
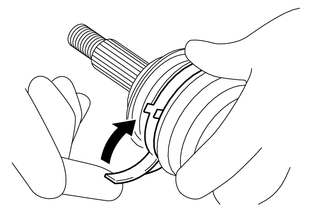
Mount the rear No. 2 drive shaft outboard joint boot clamp to the EDJ boot, and temporarily bend the lever.
CAUTION:
Make sure that protective gloves are worn during work in order to prevent injury to hands, etc.
Note
-
When temporarily bending the lever, make sure that the band and lever are not twisted.
-
In order to prevent breakage of the rear No. 2 drive shaft outboard joint boot clamp, do not repeatedly bend the lever.
-
-
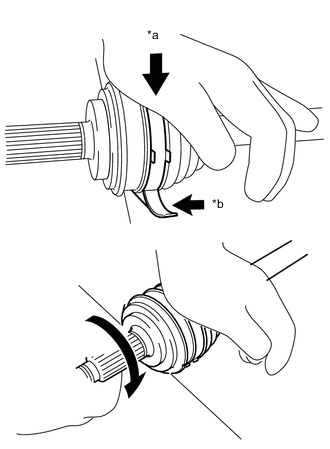
Text in Illustration *a Weight *b Ground While pushing the joint towards the work surface, press down using one hand, and fold the lever while turning the drive shaft forward.
Note
-
Do not damage the deflector.
-
Do not raise the joint off the work surface.
-
-
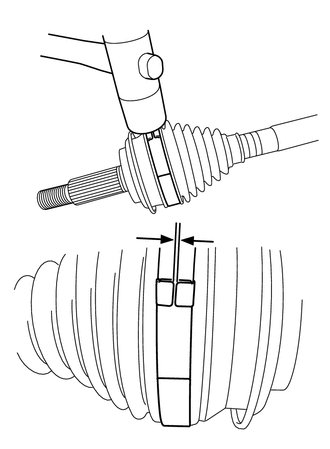
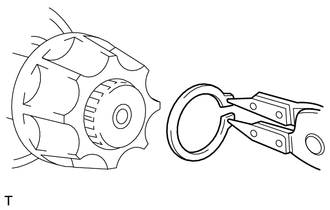
Using a plastic hammer, tap the buckle to affix.
Note
-
Do not hit the buckle with the plastic hammer excessively hard
-
Install the clamp so that the lever does not rise.
-
Make sure that the gap between the two buckles is parallel.
-
-
-
INSTALL REAR DRIVE SHAFT OUTBOARD JOINT BOOT CLAMP
-
Install a new rear drive shaft outboard joint boot clamp to the EDJ boot and temporarily bend the lever.
CAUTION:
Make sure that protective gloves are worn during work in order to prevent injury to hands, etc.
Note
-
When temporarily bending the lever, make sure that the band and lever are not twisted.
-
In order to prevent breakage of the rear drive shaft outboard joint boot clamp, do not repeatedly bend the lever.
-
-
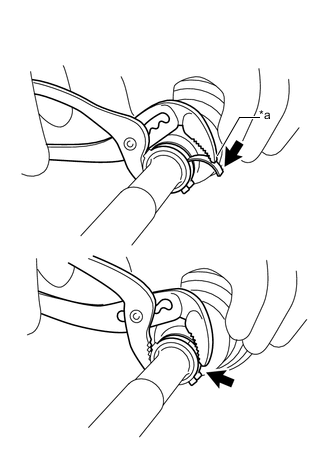
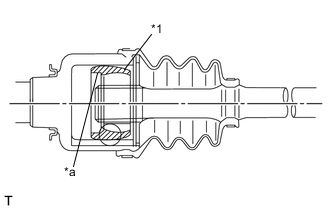
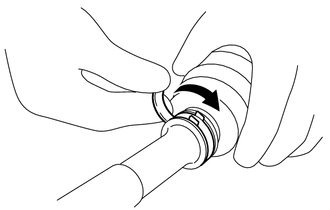
Text in Illustration *a The End is Near the Center of the Lever. Use water pump pliers to tighten the rear drive shaft outboard joint boot clamp, and temporarily fasten.
-
Use a plastic hammer to tap the buckle to affix.
Note
-
Do not hit the buckle with the plastic hammer excessively hard.
-
Affix the lever so that it does not rise.
-
Make sure that the gap between the two buckles is parallel.
-
-
-
INSTALL REAR NO. 2 DRIVE SHAFT INBOARD JOINT BOOT CLAMP
Tech Tips
Work on the rear No. 2 drive shaft inboard joint boot clamp in the same way as the rear No. 2 drive shaft outboard joint boot clamp.
-
INSTALL REAR DRIVE SHAFT INBOARD JOINT BOOT CLAMP
Tech Tips
Work on the rear drive shaft inboard joint boot clamp in the same way as the rear drive shaft outboard joint boot clamp.