VACUUM PUMP(for 1GD-FTV, 2GD-FTV) REMOVAL
CAUTION / NOTICE / HINT
Tech Tips
The vacuum pump assembly is listed as one of the 200000 km (124000 mile) maintenance parts. Make sure to disassemble and inspect it every 200000 km (124000 miles) and replace parts as necessary.
PROCEDURE
-
REMOVE CYLINDER HEAD COVER SUB-ASSEMBLY
-
for 1GD-FTV:
-
for 2GD-FTV:
-
-
REMOVE NO. 3 CAMSHAFT BEARING CAP
-
DISCONNECT UNION TO CONNECTOR TUBE HOSE
-
Slide the clip and disconnect the union to connector tube hose from the vacuum pump assembly.
-
-
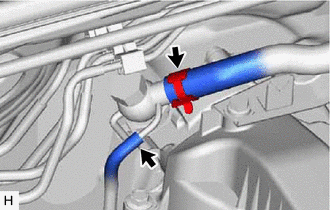
DISCONNECT NO. 1 VACUUM TRANSMITTING HOSE
-
Disconnect the No. 1 vacuum transmitting hose from the vacuum pump assembly.
-
-
REMOVE VACUUM PUMP ASSEMBLY
-
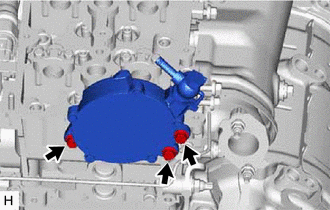
Remove the 3 bolts from the vacuum pump.
-
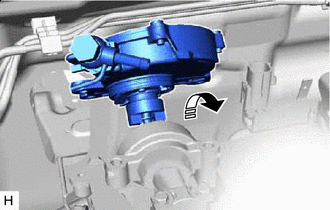

Remove in this Direction Tilt and pull the vacuum pump upwards toward the rear while avoiding the dash panel to remove the vacuum pump.
Note
Do not damage the camshaft and vacuum pump shaft.
-
Remove the No. 2 O-ring and No. 3 O-ring from the vacuum pump assembly.
-
-
REMOVE CAMSHAFT OIL SEAL RETAINER
-
Remove the camshaft oil seal retainer from the vacuum pump assembly.
-
-
REMOVE VACUUM PUMP UNION
-
Fix the vacuum pump in a vise between aluminum plates.
Note
Place aluminum plates on the vise to prevent damage to the pump.
-
Remove the union bolt, vacuum pump union and 2 gaskets.
-