HIGH MOUNTED STOP LIGHT ASSEMBLY REMOVAL
PROCEDURE
REMOVE BACK DOOR UPPER TRIM PANEL ASSEMBLY (for Wagon)
REMOVE BACK DOOR UPPER TRIM PANEL ASSEMBLY (for Hatchback)
w/o Back Door Side Garnish:Click here
REMOVE BACK DOOR UPPER TRIM PANEL ASSEMBLY (for Hatchback)
w/ Back Door Side Garnish:Click here
REMOVE REAR SEAT ASSEMBLY (for Sedan)
REMOVE REAR DOOR SCUFF PLATE LH (for Sedan)
REMOVE REAR DOOR SCUFF PLATE RH (for Sedan)
Tip:Use the same procedure as for the LH side.
DISCONNECT REAR DOOR OPENING TRIM WEATHERSTRIP LH (for Sedan)
Disconnect the rear door opening trim weatherstrip LH.
DISCONNECT REAR DOOR OPENING TRIM WEATHERSTRIP RH (for Sedan)
Tip:Use the same procedure as for the LH side.
REMOVE REAR SEAT BACK HINGE SUB-ASSEMBLY (for Sedan LH Side)
REMOVE REAR SEAT BACK HINGE SUB-ASSEMBLY (for Sedan RH Side)
Tip:Use the same procedure as for the LH side.
REMOVE REAR SEAT SIDE GARNISH LH (for Sedan)
REMOVE REAR SEAT SIDE GARNISH RH (for Sedan)
Tip:Use the same procedure as for the LH side.
REMOVE ROOF SIDE INNER GARNISH ASSEMBLY LH (for Sedan)
REMOVE ROOF SIDE INNER GARNISH ASSEMBLY RH (for Sedan)
Tip:Use the same procedure as for the LH side.
REMOVE PACKAGE TRAY TRIM BELT HOLE COVER (for Sedan)
REMOVE PACKAGE TRAY TRIM PANEL ASSEMBLY (for Sedan)
REMOVE CENTER STOP LIGHT ASSEMBLY (for Hatchback, Wagon)
-

Disconnect the connector.
Remove the 2 screws and center stop light assembly.
-
REMOVE CENTER STOP LIGHT ASSEMBLY (for Sedan)
-
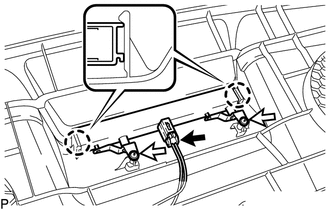
Disconnect the connector.
Remove the 2 screws.
Disengage the 2 claws to remove the center stop light assembly with the 2 center stop light brackets.
-
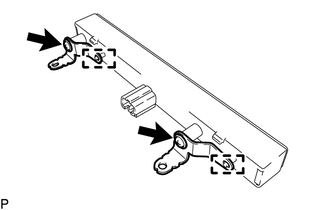
Remove the 2 screws.
Disengage the 2 guides to remove the 2 center stop light brackets from the center stop light assembly.
-