REAR CENTER SEAT OUTER BELT ASSEMBLY(w/ Rear No. 2 Seat) INSPECTION
PROCEDURE
-
INSPECT REAR CENTER SEAT OUTER BELT ASSEMBLY
-
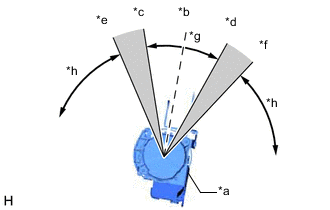
*a Retractor *b Standard Position *c 12° *d 28° *e 27° *f 43° *g Unlock *h Lock After installing the rear center seat outer belt assembly, check the ELR function.
Note
Do not disassemble the retractor.
-
Move the seatback of the rear No. 1 seat assembly RH to the upright position.
Check that the seatbelt can be pulled from the retractor when the angle of the seatback of the rear No. 1 seat assembly RH is between 12° forward and 28° rearward of the standard position.
Check that the seatbelt locks when the angle of the seatback of the rear No. 1 seat assembly RH is 27° or more forward or 43° or more rearward of the standard position.
Tech Tips
-
The upright position of the seatback is the position it stops when the seatback is moved from the folded position. This is the standard position for performing the inspection.
-
The ELR function is unstable and cannot be inspected when the seatback is between positions *c and *e, and *d and *f shown in the illustration.
If the result is not as specified, replace the rear center seat outer belt assembly.
-
-
-