FUEL TANK REMOVAL
PROCEDURE
REMOVE FRONT FLOOR COVER
-
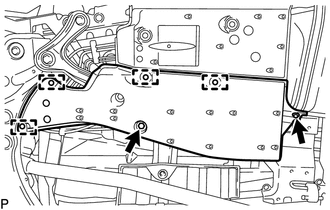
Remove the bolt and nut.
Detach the 4 clips and remove the front floor cover.
-
REMOVE NO. 1 FUEL TANK PROTECTOR
-
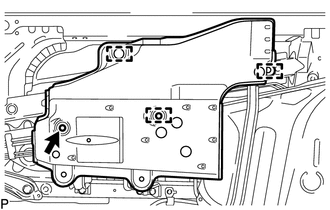
Detach the 3 clips and remove the nut and No. 1 fuel tank protector.
-
REMOVE NO. 1 FLOOR UNDER COVER
-
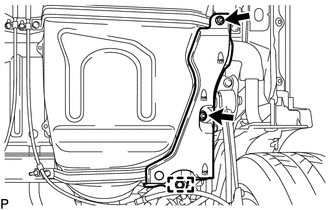
Detach the clip and remove the 2 nuts and No. 1 floor under cover.
-
DISCONNECT NO. 2 PARKING BRAKE CABLE ASSEMBLY
-
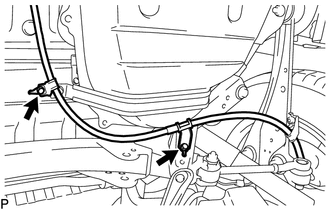
Remove the 2 bolts and disconnect the No. 2 parking brake cable assembly.
-
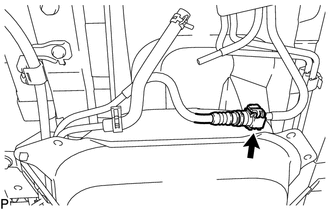
DISCONNECT FUEL TANK RETURN TUBE
-
Slide the clamp and disconnect the fuel tank return tube from the fuel pipe.
-
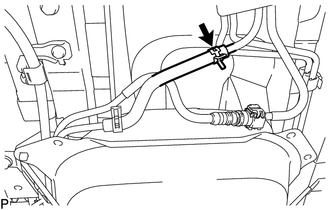
DISCONNECT FUEL TANK MAIN TUBE SUB-ASSEMBLY
-
Disconnect the fuel tank main tube sub-assembly from the fuel pipe.
-
DISCONNECT FUEL TANK TO FILLER PIPE HOSE
-
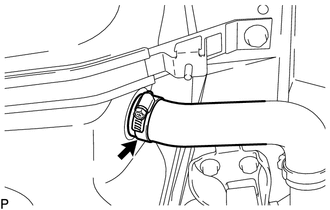
Disconnect the fuel tank to filler pipe hose from the fuel tank assembly.
-
DISCONNECT FUEL TANK BREATHER HOSE
-
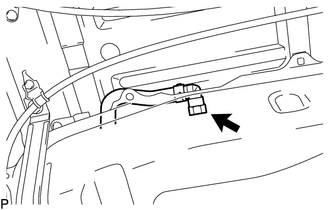
Disconnect the fuel tank breather hose from the fuel tank assembly.
-
REMOVE FUEL TANK ASSEMBLY
Set an engine lifter underneath the fuel tank assembly.
Disconnect the wire harness from the 2 fuel tube grommets.
-
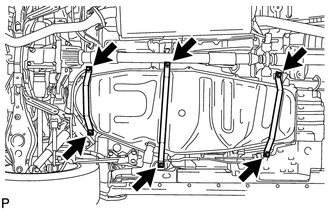
Remove the 2 bolts and No. 1 fuel tank band sub-assembly.
Remove the 2 bolts and No. 1 fuel tank band sub-assembly LH.
Remove the 2 bolts and No. 2 fuel tank band sub-assembly.
Slightly lower the engine lifter.
Note:Be careful not to cut the wire harness.
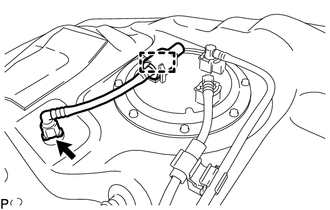
Disconnect the fuel sender gauge connector and remove the fuel tank assembly.
Note:Before this procedure, check the connector for dirt, mud or other contamination.
Do not use any tools in this procedure.
REMOVE FUEL EMISSION HOSE
-
Detach the clamp and remove the fuel emission hose.
-
DISCONNECT FUEL TANK MAIN TUBE SUB-ASSEMBLY
-
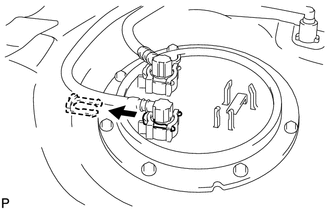
Remove the tube joint clip and pull out the fuel tank main tube sub-assembly.
Note:Before removing a tube joint clip, check for foreign matter around the tube joint clip. Clean if necessary.
Do not use any tools in this procedure.
Do not forcefully bend or twist the fuel tank main tube sub-assembly.
Put the fuel tank main tube sub-assembly in a plastic bag to prevent damage and contamination.
If the fuel tank vent tube assembly and fuel tank main tube sub-assembly are stuck together, pinch the fuel tank main tube sub-assembly and turn it carefully to disconnect it.
Be careful not the damage any tube joint clip. If a tube joint clip is damaged, replace it.
-
DISCONNECT FUEL TANK RETURN TUBE
-
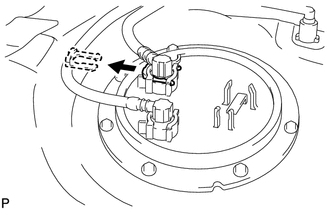
Remove the tube joint clip and pull out the fuel tank return tube.
Note:Before removing a tube joint clip, check for foreign matter around the tube joint clip. Clean if necessary.
Do not use any tools in this procedure.
Do not forcefully bend or twist the fuel tank return tube.
Put the fuel tank return tube in a plastic bag to prevent damage and contamination.
If the fuel tank vent tube assembly and fuel tank return tube are stuck together, pinch the fuel tank return tube and turn it carefully to disconnect it.
Be careful not the damage any tube joint clip. If a tube joint clip is damaged, replace it.
-
REMOVE FUEL TANK VENT TUBE SET PLATE
-
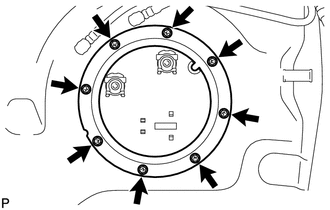
Remove the 8 bolts and fuel tank vent tube set plate.
-
REMOVE FUEL TANK VENT TUBE ASSEMBLY
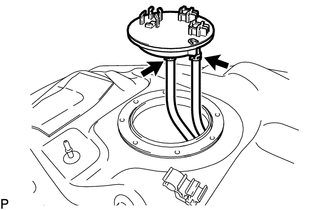
Slide the 2 clamps, disconnect the 2 fuel hoses and remove the fuel tank vent tube assembly.
Note:Do not damage the fuel tank vent tube assembly.
Remove the gasket from the fuel tank vent tube assembly.
REMOVE FUEL TANK MAIN TUBE SUB-ASSEMBLY
-
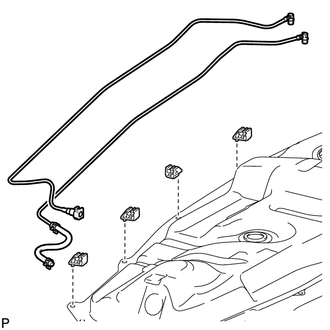
Remove the fuel tank main tube sub-assembly from the No. 5 fuel tube clamp and 3 fuel tube grommets.
-
REMOVE FUEL TANK RETURN TUBE
Remove the fuel return tube from the No. 5 fuel tube clamp and 3 fuel tube grommets.
REMOVE NO. 5 FUEL TUBE CLAMP
Remove the No. 5 fuel tube clamp from the fuel tank assembly.
REMOVE FUEL TUBE GROMMET
Remove the 3 fuel tube grommets from the fuel tank assembly.
REMOVE FUEL SENDER GAUGE ASSEMBLY