ROOF HEADLINING(for Wagon) REMOVAL
PROCEDURE
REMOVE DECK BOARD SUB-ASSEMBLY (w/ Deck Board)
Remove the deck board sub-assembly.
REMOVE DECK BOARD ASSEMBLY (w/ Deck Board)
Remove the deck board assembly.
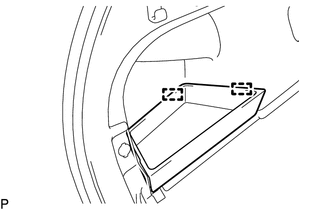
REMOVE FRONT DECK FLOOR BOX (w/ Deck Board)
Remove the front deck floor box.
REMOVE REAR FLOOR MAT ASSEMBLY
Remove the rear floor mat assembly.
REMOVE NO. 3 DECK BOARD SUB-ASSEMBLY (w/ Deck Board)
Remove the No. 3 deck board sub-assembly.
REMOVE DECK FLOOR BOX LH (w/o Woofer)
-
Disengage the 2 guides to remove the deck floor box LH.
-
REMOVE NO. 2 DECK BOARD SUB-ASSEMBLY (w/ Deck Board)
Remove the No. 2 deck board sub-assembly.
REMOVE DECK FLOOR BOX RH
-
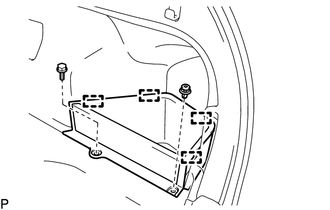
Remove the bolt and clip.
Disengage the 4 guides to remove the deck floor box RH.
-
REMOVE TONNEAU COVER ASSEMBLY
Remove the tonneau cover assembly.
REMOVE ROOM PARTITION NET ASSEMBLY (w/ Partition Net)
Remove the room partition net assembly.
REMOVE REAR DECK TRIM COVER
-
Remove the 2 bolts.
Disengage the 2 guides to remove the 2 luggage hold belt striker assemblies.
-
Disengage the 4 clips and 2 guides to remove the rear deck trim cover.
-
REMOVE REAR SEAT ASSEMBLY
REMOVE FRONT DOOR SCUFF PLATE LH
REMOVE COWL SIDE TRIM BOARD LH
REMOVE FRONT DOOR OPENING TRIM WEATHERSTRIP LH
REMOVE FRONT PILLAR GARNISH LH
REMOVE REAR DOOR SCUFF PLATE LH
REMOVE REAR DOOR OPENING TRIM WEATHERSTRIP LH
REMOVE LAP BELT OUTER ANCHOR COVER (for LH Side)
DISCONNECT FRONT SEAT OUTER BELT ASSEMBLY LH
REMOVE CENTER PILLAR LOWER GARNISH LH
REMOVE CENTER PILLAR GARNISH ASSEMBLY LH
REMOVE FRONT DOOR SCUFF PLATE RH
Tip:Use the same procedure as for the LH side.
REMOVE COWL SIDE TRIM BOARD RH
Tip:Use the same procedure as for the LH side.
REMOVE FRONT DOOR OPENING TRIM WEATHERSTRIP RH
Tip:Use the same procedure as for the LH side.
REMOVE FRONT PILLAR GARNISH RH
Tip:Use the same procedure as for the LH side.
REMOVE REAR DOOR SCUFF PLATE RH
Tip:Use the same procedure as for the LH side.
REMOVE REAR DOOR OPENING TRIM WEATHERSTRIP RH
Tip:Use the same procedure as for the LH side.
REMOVE LAP BELT OUTER ANCHOR COVER (for RH Side)
Tip:Use the same procedure as for the LH side.
DISCONNECT FRONT SEAT OUTER BELT ASSEMBLY RH
Tip:Use the same procedure as for the LH side.
REMOVE CENTER PILLAR LOWER GARNISH RH
Tip:Use the same procedure as for the LH side.
REMOVE CENTER PILLAR GARNISH ASSEMBLY RH
Tip:Use the same procedure as for the LH side.
REMOVE REAR SEATBACK HINGE SUB-ASSEMBLY LH
-
Loosen the bolt.
Disengage the guide to remove the rear seatback hinge sub-assembly LH.
-
REMOVE REAR SEAT SIDE GARNISH LH
REMOVE NO. 2 DECK SIDE TRIM HOOK (for LH Side)
-
Remove the screw.
Disengage the pin to remove the No. 2 deck side trim hook.
-
REMOVE RECLINING REMOTE CONTROL BEZEL LH
-
Using a moulding remover, disengage the 3 claws and remove the reclining remote control bezel LH.
-
REMOVE DECK TRIM SIDE PANEL ASSEMBLY LH
-

Remove the bolt.
Disengage the guide to remove the luggage hold belt striker assembly.
-
w/ Deck Board:
Remove the clip.
Disengage the 2 clips to remove the deck side trim box LH.
Remove the 2 bolts.
*A
w/o Deck Board
*B
w/ Deck Board
Disengage the 7 claws and 4 clips.
Disconnect each connector.
Disengage the clamp to remove the deck trim side panel assembly LH.
-
REMOVE ROOF SIDE INNER GARNISH ASSEMBLY LH
Remove the 2 screws.
Disengage the 2 claws and 4 clips to remove the roof side inner garnish assembly LH.
Remove the clip (A) from the roof side inner garnish assembly LH.
REMOVE REAR SEATBACK HINGE SUB-ASSEMBLY RH
Tip:Use the same procedure as for the LH side.
REMOVE REAR SEAT SIDE GARNISH RH
Tip:Use the same procedure as for the LH side.
REMOVE NO. 2 DECK SIDE TRIM HOOK (for RH Side)
Tip:Use the same procedure as for the LH side.
REMOVE RECLINING REMOTE CONTROL BEZEL RH
Tip:Use the same procedure as for the LH side.
REMOVE DECK TRIM SIDE PANEL ASSEMBLY RH
Tip:Use the same procedure as for the LH side.
REMOVE ROOF SIDE INNER GARNISH ASSEMBLY RH
Tip:Use the same procedure as for the LH side.
REMOVE UPPER INSTRUMENT PANEL
REMOVE INNER REAR VIEW MIRROR STAY HOLDER COVER (w/ EC Mirror)
REMOVE RAIN SENSOR COVER (w/ Rain Sensor)
REMOVE MAP LIGHT ASSEMBLY
REMOVE NO. 1 ROOM LIGHT ASSEMBLY (for Slide Switch Type)
REMOVE ASSIST GRIP ASSEMBLY
REMOVE REAR ASSIST GRIP ASSEMBLY LH
REMOVE REAR ASSIST GRIP ASSEMBLY RH
Tip:Use the same procedure as for the LH side.
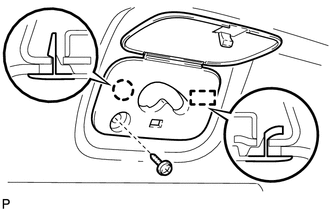
REMOVE VISOR ASSEMBLY LH
REMOVE VISOR ASSEMBLY RH
Tip:Use the same procedure as for the LH side.
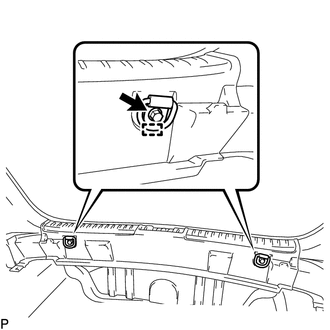
REMOVE REAR ROOM PARTITION NET HOOK LH
Tip:Use the same procedure for the front side and rear side.
Open the cover.
-
Remove the screw.
Disengage the claw and guide to remove the rear room partition net hook LH.
REMOVE REAR ROOM PARTITION NET HOOK RH
Tip:Use the same procedure as for the LH side.
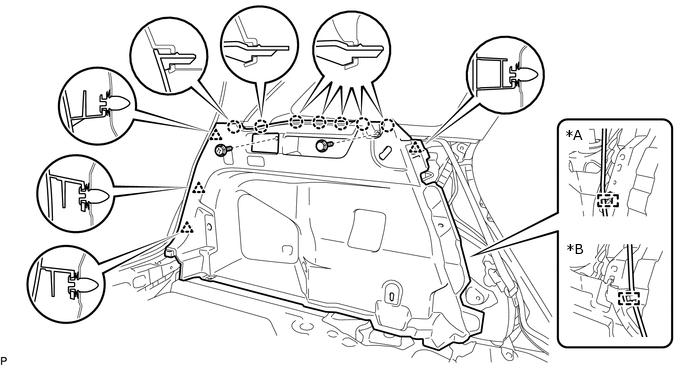
REMOVE ROOF HEADLINING ASSEMBLY (for Standard Roof)
w/ EC Mirror:
Disconnect the connector.
w/ Rain Sensor:
Disconnect the connector.
-
for LHD Front Pillar LH Side:
Disconnect the connector.
Using a clip remover, disengage the 6 clamps.
-
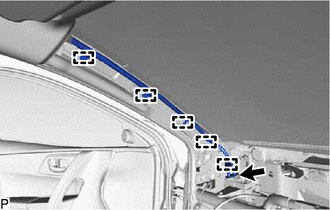
for RHD Front Pillar LH Side:
Disconnect the connector.
Using a clip remover, disengage the 5 clamps.
-
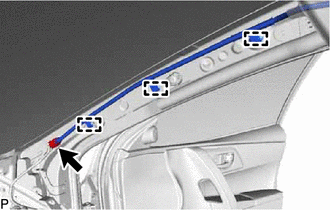
for Front Pillar RH Side:
Disconnect the connector.
Using a clip remover, disengage the 3 clamps.
-
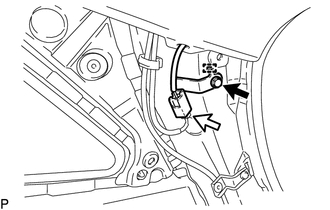
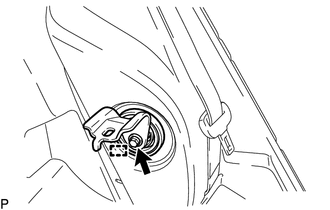
for Rear Pillar RH Side:
Remove the bolt.
Disengage the guide to disconnect the connector bracket.
Disconnect the connector.
-
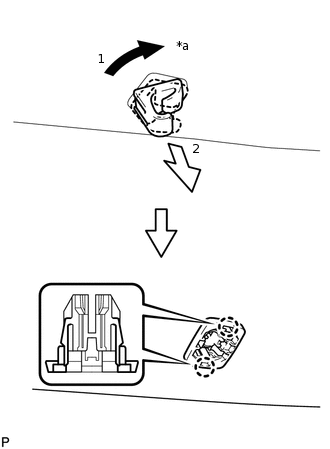
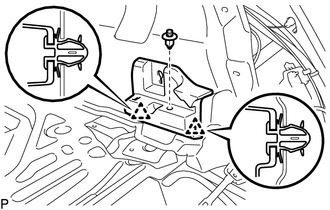
*a
45°
Turn the visor holder approximately 45° and pull it out as indicated by the arrows, in the order shown in the illustration.
Tip:Use the same procedure for the RH side and LH side.
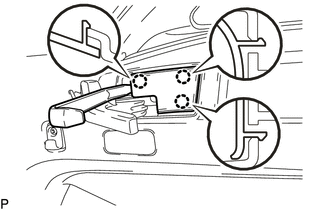
Disengage the 2 claws to remove the visor holder.
Tip:Use the same procedure for the RH side and LH side.
w/o Vanity Light:
Using a clip remover, remove the 5 clips.
w/ Vanity Light:
Using a clip remover, remove the 5 clips.
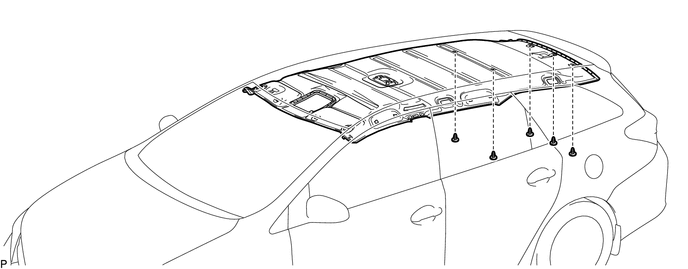
-
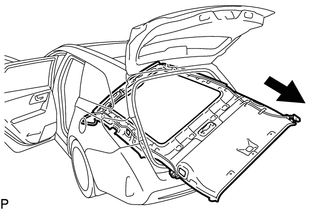
Remove the roof headlining assembly from the vehicle through the back door as shown in the illustration.
Note:Do not damage the roof headlining assembly or vehicle interior.
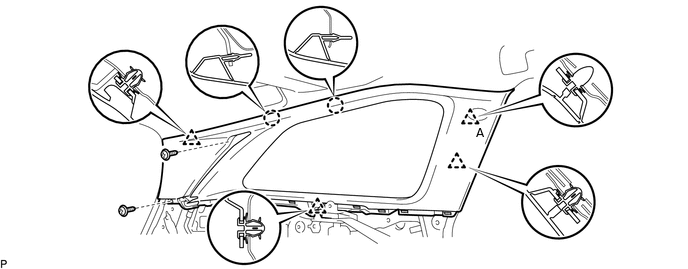
REMOVE ROOF HEADLINING ASSEMBLY (for Glass Roof)
w/ EC Mirror:
Disconnect the connector.
w/ Rain Sensor:
Disconnect the connector.
-
for LHD Front Pillar LH Side:
Disconnect the connector.
Using a clip remover, disengage the 6 clamps.
-
for RHD Front Pillar LH Side:
Disconnect the connector.
Using a clip remover, disengage the 5 clamps.
-
for Front Pillar RH Side:
Disconnect the connector.
Using a clip remover, disengage the 3 clamps.
-

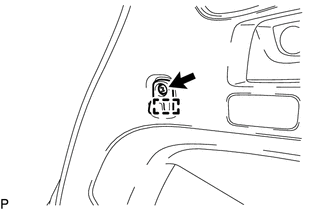
for Rear Pillar LH Side:
Disconnect the connector.
-
for Rear Pillar RH Side:
Remove the bolt.
Disengage the guide to disconnect the connector bracket.
Disconnect the connector.
-
*a
45°
Turn the visor holder approximately 45° and pull it out as indicated by the arrows, in the order shown in the illustration.
Tip:Use the same procedure for the RH side and LH side.
Disengage the 2 claws to remove the visor holder.
Tip:Use the same procedure for the RH side and LH side.
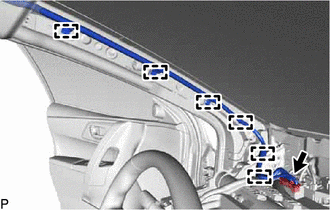
Using a clip remover, remove the 3 clips.
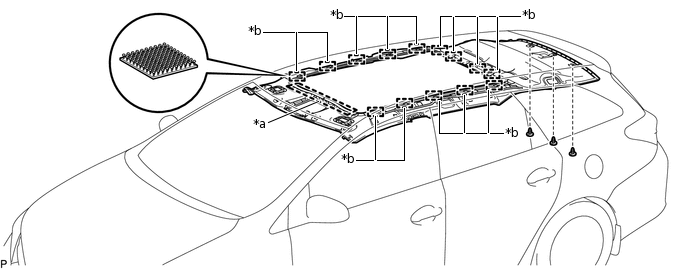
*a
Guide
*b
Fastener
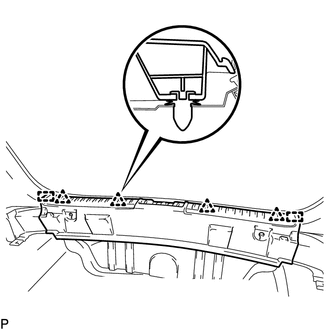
Disengage the 14 fasteners.
Tip:Disengage the fasteners from the rear side of the roof headlining assembly.
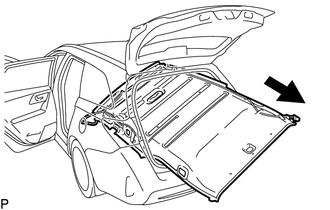
Pull the roof headlining assembly toward the rear of the vehicle to disengage the guide.
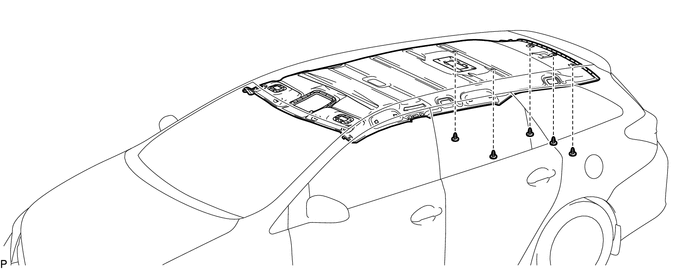
-
Remove the roof headlining assembly from the vehicle through the back door as shown in the illustration.
Note:Do not damage the roof headlining assembly or vehicle interior.