BRAKE MASTER CYLINDER(for LHD) INSTALLATION
PROCEDURE
INSTALL BRAKE MASTER CYLINDER SUB-ASSEMBLY
Note:The master cylinder and piston are designed so that the piston can easily fall out. Prevent this by making sure the tip of the master cylinder points downward when handling the master cylinder.
Make sure foreign matter does not adhere to the piston of the master cylinder. If foreign matter adheres, clean it off with a cloth. Then apply lithium soap base glycol grease to the entire outer circumference contact surface area of the piston.
Install a new O-ring to the master cylinder.
-

Install the master cylinder to the booster with the 2 nuts.
12.5 N*m
127 kgf*cm
9 ft.*lbf
-
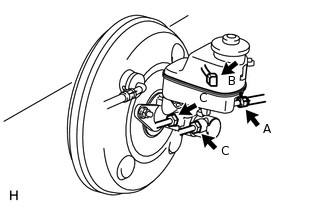
Using a union nut wrench, connect the 2 brake lines labeled C to the master cylinder.
15.2 N*m
155 kgf*cm
11 ft.*lbf
Note:Use the formula to calculate special torque values for situations where a union nut wrench is combined with a torque wrench (Click hereClick here).
Connect the brake fluid level warning switch connector labeled B to the brake master cylinder.
for Manual Transaxle:
Connect the clutch reservoir tube labeled A to the brake master cylinder.
INSTALL AIR CLEANER CASE SUB-ASSEMBLY
for 2AD-FHV:
for 2AD-FTV:
for 2AR-FE:
for 3ZR-FE:
for 3ZR-FAE:
for 2WW:
BLEED BRAKE SYSTEM
BLEED CLUTCH LINE (for Manual Transaxle)
for 2AD-FTV:
for 2AR-FE:
for 3ZR-FE:
for 3ZR-FAE:
for 2WW: