BLACK OUT TAPE(for Front Door) REMOVAL
CAUTION / NOTICE / HINT
The necessary procedures (adjustment, calibration, initialization, or registration) that must be performed after parts are removed and installed, or replaced during black out tape removal/installation are shown below.
| Replaced Part or Performed Procedure | Necessary Procedure | Effect/Inoperative Function When Necessary Procedures are not Performed | Link |
|---|---|---|---|
| Disconnect cable from negative battery terminal | Perform steering sensor zero point calibration | Lane departure alert system (w/ Steering Control) | |
| Pre-collision system | |||
| Memorize steering angle neutral point | Parking assist monitor system | ||
|
Initialize power window control system |
|
Tech Tips
-
Use the same procedure for the RH side and LH side.
-
The following procedure is for the LH side.
PROCEDURE
-
PRECAUTION
Note
After turning the ignition switch off, waiting time may be required before disconnecting the cable from the negative (-) battery terminal. Therefore, make sure to read the disconnecting the cable from the negative (-) battery terminal notices before proceeding with work.
-
DISCONNECT CABLE FROM NEGATIVE BATTERY TERMINAL
for 2AR-FE:
for A25A-FKS:
for 2GR-FKS:
-
REMOVE FRONT DOOR LOWER FRAME BRACKET GARNISH
-
REMOVE FRONT DOOR ARMREST COVER SUB-ASSEMBLY
-
REMOVE MULTIPLEX NETWORK MASTER SWITCH ASSEMBLY WITH FRONT DOOR UPPER ARMREST BASE PANEL (for Driver Side)
-
REMOVE POWER WINDOW REGULATOR SWITCH ASSEMBLY WITH FRONT DOOR UPPER ARMREST BASE PANEL (for Front Passenger Side)
-
REMOVE FRONT ARMREST ASSEMBLY
-
REMOVE COURTESY LIGHT ASSEMBLY
-
REMOVE FRONT DOOR TRIM BOARD SUB-ASSEMBLY
-
REMOVE FRONT DOOR INNER GLASS WEATHERSTRIP WITH FRONT DOOR VENT SEAL
-
REMOVE FRONT DOOR SERVICE HOLE COVER
-
REMOVE FRONT DOOR GLASS SUB-ASSEMBLY
-
REMOVE FRONT DOOR PANEL PROTECTOR
-
REMOVE FRONT DOOR GLASS RUN
-
DISCONNECT FRONT DOOR WEATHERSTRIP
-
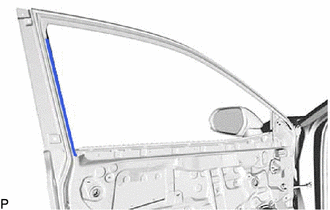
REMOVE DOOR FRAME GARNISH
-
REMOVE FRONT DOOR NO. 2 STRIPE
Tech Tips
When removing the front door No. 2 stripe, heat the vehicle body and front door No. 2 stripe using a heat light.
Heating Temperature Item Temperature Front Door No. 2 Stripe and Vehicle Body 40 to 60°C (104 to 140°F) CAUTION:
-
Do not touch the heat light and heated parts, touching the heat light may result in burns.
-
Touching heated parts for a long time may result in burns.
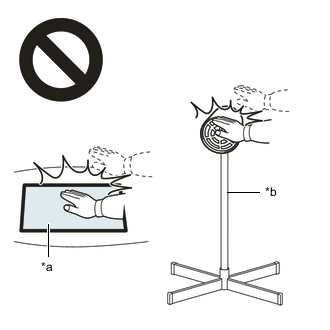
*a Heated Part *b Heat Light Note
Do not heat the vehicle body excessively.
-
Using a heat light, heat the front door No. 2 stripe and vehicle body.
-
Pull back on one of the ends of the front door No. 2 stripe to remove it.
Tech Tips
When pulling on the front door No. 2 stripe, pull it parallel to the vehicle body.
-
-
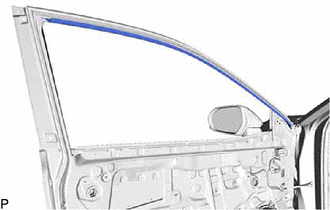
REMOVE FRONT DOOR NO. 3 STRIPE
Tech Tips
When removing the front door No. 3 stripe, heat the vehicle body and front door No. 3 stripe using a heat light.
Heating Temperature Item Temperature Front Door No. 3 Stripe and Vehicle Body 40 to 60°C (104 to 140°F) CAUTION:
-
Do not touch the heat light and heated parts, touching the heat light may result in burns.
-
Touching heated parts for a long time may result in burns.
*a Heated Part *b Heat Light Note
Do not heat the vehicle body excessively.
-
Using a heat light, heat the front door No. 3 stripe and vehicle body.
-
Pull back on one of the ends of the front door No. 3 stripe to remove it.
Tech Tips
When pulling on the front door No. 3 stripe, pull it parallel to the vehicle body.
-