FUEL LID OPENER MOTOR ASSEMBLY INSTALLATION
CAUTION / NOTICE / HINT
A bolt without a torque specification is shown in the standard bolt chart (Click here).
PROCEDURE
INSTALL FUEL FILLER OPENING LID LOCK RETAINER
-

Install the lock retainer and turn it clockwise.
-
INSTALL FUEL LID LOCK ASSEMBLY
Check that the guide of the panel are inserted into the holes in the fuel lid lock assembly.
-
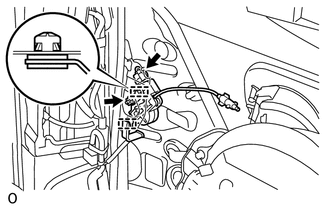
Attach the clamp to install the fuel lid lock assembly with the nut.
5.5 N*m
56 kgf*cm
49 in.*lbf
Connect the connector and attach the harness clamp.
-
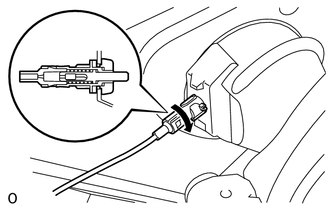
Install the cable and turn it clockwise as shown in the illustration.
INSTALL NO. 1 SPEAKER WITH BOX ASSEMBLY (for 14 Speakers)
INSTALL STEREO COMPONENT AMPLIFIER ASSEMBLY WITH BRACKET (for 14 Speakers)
INSTALL DECK TRIM SIDE PANEL ASSEMBLY LH
INSTALL ASSIST GRIP SUB-ASSEMBLY (w/ Rear No. 2 Seat)
INSTALL ASSIST GRIP PLUG (w/ Rear No. 2 Seat)
INSTALL FRONT DECK SIDE TRIM COVER (w/ Tonneau Cover)
INSTALL NO. 1 TONNEAU COVER HOLDER CAP (w/o Tonneau Cover)
INSTALL NO. 1 LUGGAGE COMPARTMENT TRIM HOOK
INSTALL REAR NO. 1 SEAT OUTER LAP BELT ANCHOR COVER
INSTALL REAR FLOOR CARPET ASSEMBLY (w/o Rear No. 2 Seat)
INSTALL REAR FLOOR MAT REAR SUPPORT PLATE (w/o Rear No. 2 Seat)
INSTALL NO. 1 DECK BOARD SUB-ASSEMBLY (w/o Rear No. 2 Seat)
INSTALL FRONT LUGGAGE COMPARTMENT TRIM COVER (w/o Rear No. 2 Seat)
INSTALL TONNEAU COVER ASSEMBLY (w/ Tonneau Cover)
INSTALL REAR DOOR OPENING TRIM WEATHERSTRIP LH
INSTALL REAR DOOR SCUFF PLATE LH
INSTALL QUARTER SCUFF PLATE LH (w/ Rear No. 2 Seat)
INSTALL REAR NO. 1 FLOOR STEP COVER (w/ Rear No. 2 Seat)
INSTALL REAR NO. 1 SEAT ASSEMBLY
for 60/40 Split Slide Walk-in Seat Type LH Side:
Install the rear No. 1 seat assembly (Click here).
for 60/40 Split Slide Walk-in Seat Type RH Side:
Install the rear No. 1 seat assembly (Click here).
INSTALL REAR NO. 2 SEAT ASSEMBLY (w/ Rear No. 2 Seat)
Install the rear No. 2 seat assembly (Click here).
CONNECT CABLE TO NEGATIVE BATTERY TERMINAL
Note:When disconnecting the cable, some systems need to be initialized after the cable is reconnected (Click hereClick hereClick hereClick here).