BATTERY BLOWER REMOVAL
PROCEDURE
-
REMOVE NO. 1 LUGGAGE COMPARTMENT TRIM COVER
-
REMOVE LUGGAGE COMPARTMENT TRIM BOX
-
REMOVE FRONT LUGGAGE COMPARTMENT TRIM COVER
-
REMOVE REAR LUGGAGE COMPARTMENT TRIM COVER
-
REMOVE REAR SEAT ASSEMBLY RH
-
REMOVE REAR SEAT SUB FLOOR PANEL
-
REMOVE NO. 1 ROOM PARTITION COVER
-
REMOVE NO. 1 LUGGAGE COMPARTMENT LAMP ASSEMBLY
-
REMOVE FRONT UPPER LUGGAGE COMPARTMENT TRIM COVER
-
REMOVE ROPE HOOK ASSEMBLY (for RH Side)
-
REMOVE LUGGAGE COMPARTMENT TRIM COVER RH (for RH Side)
-
REMOVE FRONT DOOR SCUFF PLATE RH
-
REMOVE FRONT QUARTER TRIM PANEL ASSEMBLY RH
-
REMOVE NO. 1 HYBRID BATTERY INTAKE DUCT
-
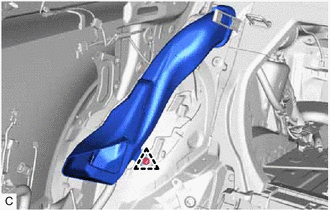
Remove the clip and No. 1 hybrid battery intake duct.
-
-
REMOVE NO. 2 HYBRID BATTERY INTAKE DUCT
-
SEPARATE NO. 3 HYBRID BATTERY INTAKE DUCT
-
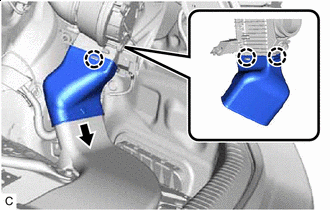

Slide Disengage the 3 claws.
-
Slide the No. 3 hybrid battery intake duct as shown in the illustration to separate the No. 3 hybrid battery intake duct from the battery cooling blower assembly.
-
-
REMOVE BATTERY COOLING BLOWER ASSEMBLY
-
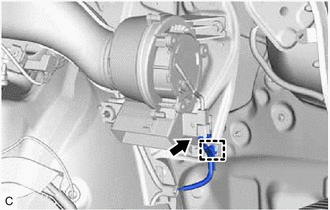
Disconnect the battery cooling blower assembly connector and disengage the clamp.
-
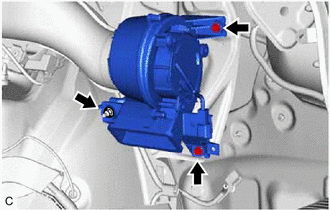
Remove the 2 bolts, nut and battery cooling blower assembly.
Note
-
Be careful not to touch the fan part of the battery cooling blower assembly.
-
Do not lift the battery cooling blower assembly using the wire harness.
-
-