NAVIGATION ECU INSTALLATION
PROCEDURE
-
PRECAUTION
Note
After replacing the navigation ECU, if the "New software is not compatible with the system. Contact your dealer." on-screen message is displayed on the multi-display, update the software of the radio receiver assembly.
Tech Tips
-
Use the same procedure for RHD and LHD vehicles.
-
The procedure listed below is for LHD vehicles.
-
-
INSTALL NAVIGATION ECU
-
INSTALL NO. 4 RADIO BRACKET
-
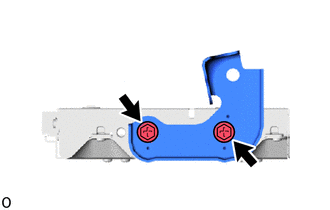
Install the No. 4 radio bracket with the 2 screws.
- Torque:
- 2.0 N*m { 20 kgf*cm, 18 in.*lbf }
-
-
INSTALL NO. 3 RADIO BRACKET
-

Install the No. 3 radio bracket with the 2 screws.
- Torque:
- 2.0 N*m { 20 kgf*cm, 18 in.*lbf }
-
-
INSTALL NAVIGATION ECU WITH BRACKET
-

Install the navigation ECU with bracket to the radio receiver assembly with bracket using the 2 screws.
-
-
INSTALL NO. 1 NAVIGATION WIRE
-

Connect the 2 connectors and install the No. 1 navigation wire.
-
-
INSTALL RADIO RECEIVER ASSEMBLY WITH BRACKET
-
CONNECT CABLE TO NEGATIVE BATTERY TERMINAL
Note
When disconnecting the cable, some systems need to be initialized after the cable is reconnected.
-
INSTALL LUGGAGE COMPARTMENT MAT SUB-ASSEMBLY
-
PERFORM DIAGNOSTIC SYSTEM CHECK
-
INSPECT SRS WARNING LIGHT