STARTER(w/ Stop And Start System) INSTALLATION
PROCEDURE
-
INSTALL STARTER ASSEMBLY
-
for Automatic Transmission:
-
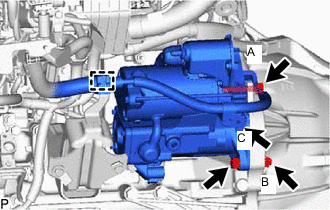
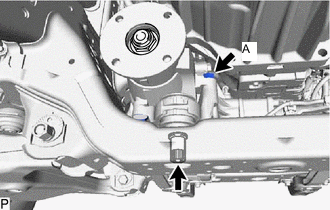
Temporarily install the starter assembly and connect the ground cable with the nut and 3 bolts.
-
Attach the clamp.
-
Tighten bolt A and nut B.
- Torque:
- 68 N*m { 693 kgf*cm, 50 ft.*lbf }
-
Tighten bolt C.
- Torque:
- 12.6 N*m { 128 kgf*cm, 9 ft.*lbf }
-
-
for Manual Transmission:
-
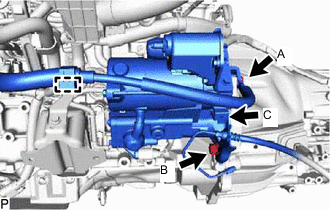
Temporarily install the starter assembly, No. 1 clutch tube bracket and connect the ground cable with the 3 bolts.
-
Attach the clamp.
-
Tighten bolt A and bolt B.
- Torque:
- 68 N*m { 693 kgf*cm, 50 ft.*lbf }
-
Tighten bolt C.
- Torque:
- 12.6 N*m { 128 kgf*cm, 9 ft.*lbf }
-
-
Install the starter wire with the nut.
- Torque:
- 21.1 N*m { 215 kgf*cm, 16 ft.*lbf }
-
Connect the 2 starter connectors.
-
-
INSTALL NO. 2 UREA TANK FILLER PIPE SUPPORT (w/ Urea SCR System)
-
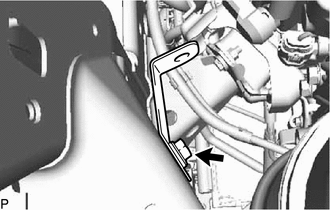
Install the No. 2 urea tank filler pipe support to the frame with the bolt.
- Torque:
- 14.3 N*m { 146 kgf*cm, 11 ft.*lbf }
-
-
INSTALL UREA TANK SUB-ASSEMBLY (w/ Urea SCR System)
-
CONNECT CLUTCH RELEASE CYLINDER ASSEMBLY (for Manual Transmission)
-
INSTALL CLUTCH FLEXIBLE HOSE BRACKET (for Manual Transmission)
-

Install the clutch flexible hose bracket with the 2 nuts.
- Torque:
- 15 N*m { 153 kgf*cm, 11 ft.*lbf }
-
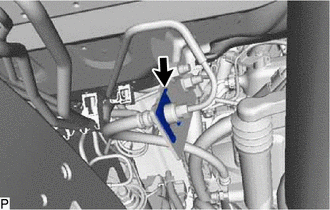
Install a new clip to the clutch flexible hose bracket.
-
-
CONNECT FRONT DIFFERENTIAL CARRIER ASSEMBLY (for 4WD)
-
Install the 2 upper differential mount stoppers to the front differential carrier assembly.
-
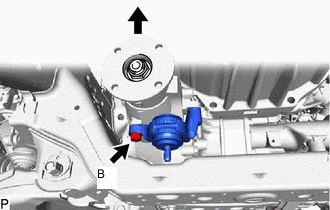
Lift up the front differential carrier assembly and temporarily install the No. 3 differential support with bolt B.
-
Temporarily install the 2 front mounting bolts, 2 nuts and 2 lower differential mount stoppers.
-
Lower the transmission jack a little at a time and temporarily install the front differential carrier assembly with bolt A and the differential mount nut.
-
Remove the transmission jack.
-
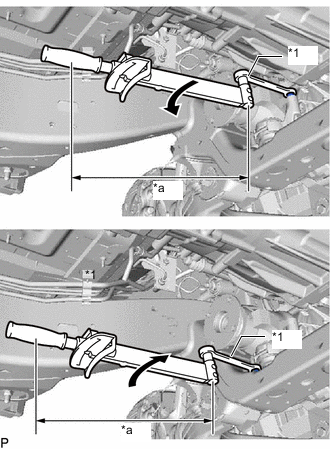
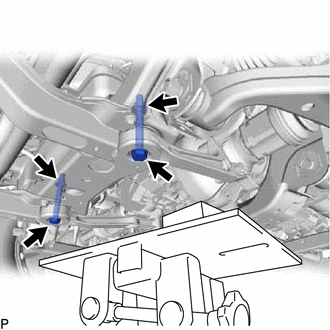
*1 17 mm Ball Joint Lock Nut Wrench *a Fulcrum Length Using a 17 mm ball joint lock nut wrench, tighten the 2 bolts.
- Torque:
- Specified tightening torque
- 107.9 N*m { 1100 kgf*cm, 80 ft.*lbf }
Tech Tips
-
Calculate the torque wrench reading when changing the fulcrum length of the torque wrench.
-
When using a ball joint lock nut wrench (fulcrum length of 149 mm (5.87 in.)) + torque wrench (fulcrum length of 380 mm (15.0 in.)): 77.5 N*m (790 kgf*cm, 57 ft.*lbf)
-
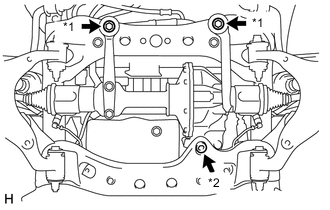
*1 Front Mounting Bolt *2 Differential Mounting Nut Tighten the 2 front mounting bolts.
- Torque:
- 105 N*m { 1071 kgf*cm, 77 ft.*lbf }
-
Using a 12 mm hexagon socket wrench, tighten the differential mount nut.
- Torque:
- 93.5 N*m { 953 kgf*cm, 69 ft.*lbf }
-
Install the bracket with the bolt.
- Torque:
- 18.6 N*m { 190 kgf*cm, 14 ft.*lbf }
-
Connect the differential oil temperature sensor connector.
-
Install the bracket with the bolt.
- Torque:
- 18.6 N*m { 190 kgf*cm, 14 ft.*lbf }
-
Connect the differential motor actuator connector.
-
Connect the hose to the front differential union.
-
Connect the hose to the differential motor actuator assembly.
-
Install the front differential breather tube bracket with the bolt.
- Torque:
- 12.7 N*m { 130 kgf*cm, 9 ft.*lbf }
-
-
INSTALL FRONT PROPELLER SHAFT ASSEMBLY (for 4WD)
-
INSTALL FRONT FENDER SEAL LH
-
Install the front fender seal LH with 6 new clips.
-
-
INSTALL NO. 2 ENGINE UNDER COVER
-
INSTALL NO. 1 ENGINE UNDER COVER ASSEMBLY
-
CONNECT CABLE TO NEGATIVE BATTERY TERMINAL
Note
When disconnecting the cable, some systems need to be initialized after the cable is reconnected.