REAR DRIVE SHAFT ASSEMBLY INSTALLATION
CAUTION / NOTICE / HINT
Use the same procedure for the RH and LH sides.
The procedure listed below is for the LH side.
PROCEDURE
INSTALL REAR DRIVE SHAFT INBOARD JOINT SHAFT SNAP RING LH
Install a new rear drive shaft inboard joint shaft snap ring LH.
INSTALL REAR DRIVE SHAFT ASSEMBLY LH
Align the matchmarks and connect the rear drive shaft to the axle hub
Apply MP grease to the splines of the rear drive shaft inboard joint assembly LH.
-
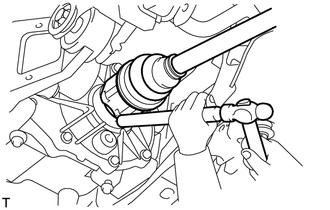
Align the splines of the rear drive shaft inboard joint assembly LH and, using a brass bar and hammer, tap in the rear drive shaft assembly LH.
Note:Face the cutout section of the rear drive shaft inboard joint shaft snap ring LH downward.
Do not damage the oil seal during the insertion.
Do not strike the tip of the outboard joint with the hammer.
Tip:Determine whether or not the rear drive shaft assembly LH is completely tapped in by checking for changes in sound or the reaction force of the brass bar.
INSTALL DIFFERENTIAL CARRIER ASSEMBLY
CONNECT REAR SPEED SENSOR LH
INSTALL REAR AXLE SHAFT NUT LH
INSTALL REAR WHEEL
103 N*m
1050 kgf*cm
76 ft.*lbf
CHECK SPEED SENSOR SIGNAL
w/ VSC: (Click here)
w/o VSC: (Click here)
INSPECT AND ADJUST REAR WHEEL ALIGNMENT