BACK DOOR OUTSIDE GARNISH(for Wagon) INSTALLATION
PROCEDURE
INSTALL BACK DOOR OUTSIDE GARNISH PROTECTOR
Wipe off any tape adhesive residue with cleaner.
Remove the release paper from a new back door outside garnish protector.
Tip:After removing the release paper, keep the exposed adhesive free from foreign matter.
-
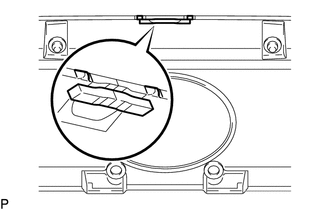
Install the new back door outside garnish protector as shown in the illustration.
INSTALL NO. 2 BACK DOOR OUTSIDE GARNISH PROTECTOR
Wipe off any tape adhesive residue with cleaner.
Remove the release paper from a new No. 2 back door outside garnish protector.
Tip:After removing the release paper, keep the exposed adhesive free from foreign matter.
-
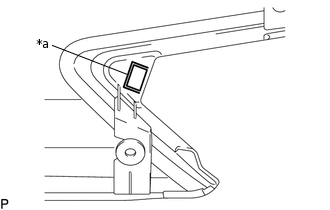
*a
Line
Install the new No. 2 back door outside garnish protector.
Tip:Stick the No. 2 back door outside garnish protector on the line marked on the back door outside garnish sub-assembly.
Use the same procedure for the RH side and LH side.
INSTALL NO. 1 BACK DOOR OUTSIDE GARNISH PROTECTOR
Wipe off any tape adhesive residue with cleaner.
Remove the release paper from a new No. 1 back door outside garnish protector.
Tip:After removing the release paper, keep the exposed adhesive free from foreign matter.
-
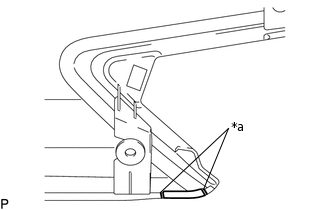
*a
Line
Install the new No. 1 back door outside garnish protector.
Tip:Stick the No. 1 back door outside garnish protector on the line marked on the back door outside garnish sub-assembly.
Use the same procedure for the RH side and LH side.
INSTALL NO. 1 BACK DOOR EMBLEM
INSTALL BACK DOOR OUTSIDE GARNISH SUB-ASSEMBLY
Install new 2 gaskets to the back door outside garnish sub-assembly.
Install new 8 clips to the back door outside garnish sub-assembly.
-
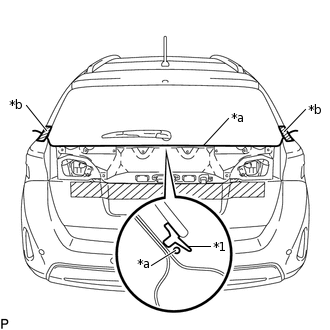
*1
Back Window Lower Moulding
*a
String
*b
Masking Tape
Pass a string behind the back window lower moulding and tape both ends with masking tape as shown in the illustration.
Engage the 8 clips to install the back door outside garnish sub-assembly.
Tip:Make sure not to dislodge the string under the back window lower moulding.
Apply soapy water to the back window lower moulding.
-

*1
Back Window Lower Moulding
*2
Back Door Outside Garnish Sub-assembly
*a
String
Pull out the string slowly, starting from one end and working to the other end, as shown in the illustration.
Note:Make sure not to damage the back window lower moulding.
Check that the back window lower moulding is not caught behind the back door outside garnish sub-assembly.
Install the 2 bolts.
INSTALL BACK DOOR OPENER SWITCH ASSEMBLY
INSTALL REAR LIGHT ASSEMBLY LH
INSTALL REAR LIGHT ASSEMBLY RH
Tip:Use the same procedure as for the LH side.