SFI SYSTEM Turbocharger Oil Leak and White Smoke
| DTC Code | DTC Name |
|---|---|
| Turbocharger Oil Leak and White Smoke |
DESCRIPTION
*a |
Fig. 4 |
*b |
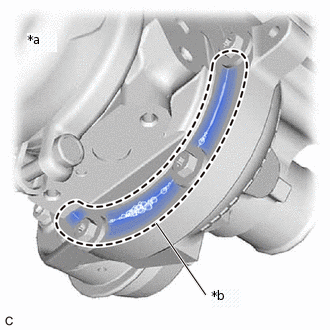
In an actual oil leak, oil leaks from the FIPG seal. |
*a |
Fig. 1 |
Type of Oil Leak |
Outline |
Major Trouble Area |
|---|---|---|
Internal oil leak (white smoke) |
Oil leak from the bearing housing into the compressor housing (intake side) or turbine housing (exhaust side) through the seal ring. Internal oil leaks cannot be seen from outside the turbocharger. If an oil leak occurs from the turbine seal, a large amount of white smoke is emitted from the exhaust pipe. |
|
External oil leak |
Oil leak from inside to outside the turbocharger. (Example: FIPG seal, oil pipe flange, or oil pipe union) Includes oil leaks that are visible outside the turbocharger. |
|
Turbocharger oil leaks are classified into two types, internal oil leaks and external oil leaks.
The following illustration shows the parts of the turbocharger.
If an oil leak or white smoke occurs, sometimes the turbocharger is replaced even though it is not the cause of the problem.
Oil may leak from the seal ring if the turbocharger is placed with its shaft vertical. However, this is unrelated to oil leaks during operation.
Oil traces on the compressor housing surface or oil at the compressor inlet or outlet can mistakenly be evaluated as a leak from the turbocharger.
Although a small amount of engine oil may be found in the air by-pass valve connector, it does not indicate a malfunction.

*1 |
Bearing Housing |
*2 |
Seal Ring |
*3 |
Compressor Inlet |
*4 |
Compressor Impeller |
*5 |
Compressor Housing |
*6 |
Turbine Housing |
*7 |
Turbine Wheel |
*8 |
Turbine Shaft |
*9 |
Oil Drain |
- |
- |
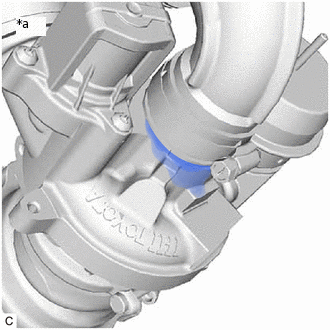
*a |
Internal oil leak to compressor housing |
*b |
Internal oil leak to turbine housing |
*c |
FIPG Sealing Part |
- |
- |
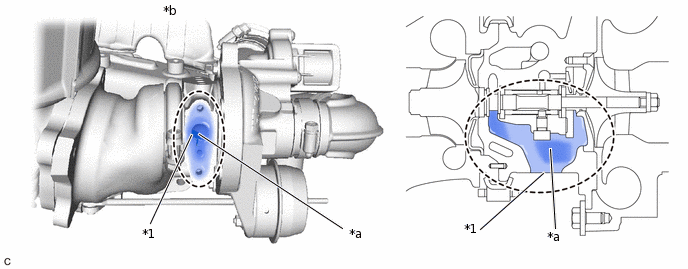
Oil staining, as shown in Illustration 1, may result from oil sprayed from turbocharger peripheral parts or oil leaks from the air cleaner hose. Oil staining on the outer surface of the turbocharger does not indicate an oil leak from the turbocharger. It is also unrelated to white smoke. To identify actual turbocharger external oil leaks, check only the seal areas shown in Illustrations 2 and 3.
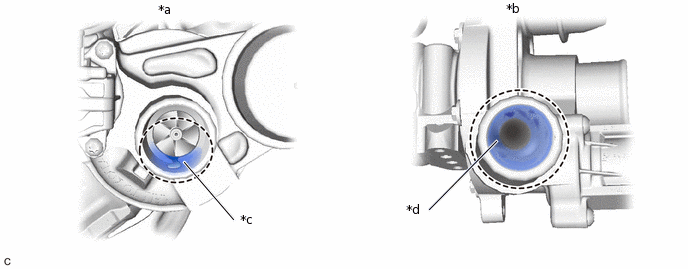
*a |
Fig. 2 |
*b |
Fig. 3 |
*c |
Oil Existence at Compressor Inlet (Max. 5 cm3) |
*d |
Oil Existence at Compressor Outlet |
As the blowby gas containing oil mist is returned to the intake system by the PCV, a certain amount of oil enters the intake system. The amount of oil at the compressor inlet shown in Illustration 2 is the normal amount and does not indicate an oil leak (internal oil leak) from the turbocharger. The amount of oil shown at the compressor outlet in Illustration 3 is also the normal amount.
The surface of the compressor impeller may be blackened by the blowby gas. This does not indicate a malfunction.
Illustration 4 shows how to check for air leaks from the position of an oil leak using soapy water. Bubbles form where the leak is occurring.
Faults and Symptoms of Turbocharger Parts
Main fault |
Seal ring damage |
Symptom |
|
Note |
|
Main fault |
Seal ring damage |
Symptom |
|
Note |
|
Main fault |
Blocked oil drain due to oil coking |
Symptom |
Large amount of white smoke emitted from the exhaust pipe |
Oil coking results due to inadequate oil management
If the oil drain is blocked due to oil coking, the oil cannot be removed smoothly. Oil leaking from the bearing housing into the compressor housing and turbine housing generates a large amount of white smoke in the exhaust pipe.
*1 |
Oil Drain |
- |
- |
*a |
Coked Oil |
*b |
Oil Drain Clogged with Coked Oil |
Main fault |
|
Symptom |
|
Note |
|
Main fault |
Damage |
Symptom |
|
Note |
|
Main fault |
Oil leak from the FIPG seal |
Symptom |
|
PROCEDURE
CHECK TURBOCHARGER SUB-ASSEMBLY (OIL LEAK CHECK)
Check whether the oil leak is internal or external.
Tip:White smoke is unrelated to external oil leaks.
Type of Oil Leak
Outline
Internal oil leak (white smoke)
An internal oil leak from the bearing housing into the compressor housing (intake side) or turbine housing (exhaust side) through the seal ring cannot be seen from outside the turbocharger. If an oil leak occurs from the turbine seal, a large amount of white smoke is emitted from the exhaust pipe.
External oil leak
Oil leak from inside to outside the turbocharger. (Example: FIPG seal, oil pipe flange, or oil pipe union)Includes oil leaks that are visible outside the turbocharger.
Result
Result
Proceed to
External oil leak
A
Internal oil leak
B
B CHECK TURBOCHARGER SUB-ASSEMBLY (SPECIFIED OIL LEAK POSITION)Click here
REPLACE DEFECTIVE PARTS (PARTS LEAKING OIL)
Replace the turbocharger sub-assembly.
Tip:If oil is leaking from between the seal plate and compressor housing or bearing housing, seal failure has occurred, and it is necessary to replace the turbocharger sub-assembly.
If oil is leaking from between the compressor housing and air inlet duct sub-assembly or air tube sub-assembly, improper installation (loose clamp, etc.) or failure of the air inlet duct sub-assembly or air tube sub-assembly is suspected.
Result
Result
NEXT
NEXT END
CHECK TURBOCHARGER SUB-ASSEMBLY (SPECIFIED OIL LEAK POSITION)
Check for excessive oil or oil deposits at the compressor inlet.
Tip:The PCV gas contains a certain amount of oil mist. This can accumulate in front of the compressor inlet, creating a certain amount of oil, as shown in Illustration 2.
Excessive oil at the compressor inlet may cause a malfunction in the PCV system.
A certain amount of oil on the compressor housing surface results from oil mist in the blowby gas and is not a malfunction.
Check for excessive oil or oil deposits at the compressor outlet.
Tip:The PCV gas contains a certain amount of oil mist. This can create a certain amount of oil, as shown in Illustration 3.
Remove the exhaust manifold converter sub-assembly.
Check for excessive oil or oil deposits in the turbine housing.
Tip:Do not mistake carbon soot for oil.
If the turbocharger shaft is tilted, a small amount of oil flows out of the bearing housing. Do not mistake oil that flows out of the bearing housing during and after removal of the turbocharger sub-assembly for oil that existed before the turbocharger assembly was removed.
Excessive oil or oil deposits in the turbine inlet comes from a cylinder exhaust port and may indicate a problem with one or more cylinders.
Result
Result
Proceed to
No excessive oil in the compressor inlet or outlet or the turbine housing
A
Excessive oil in the compressor inlet or outlet
B
Excessive oil in the turbine housing
C
A END (CAUSE CHECK EXCEPT THE TURBO CHARGER)
C CHECK TURBOCHARGER SUB-ASSEMBLY (INSPECT TURBINE WHEEL AND TURBINE HOUSING)Click here
CHECK TURBOCHARGER SUB-ASSEMBLY (INSPECT COMPRESSOR IMPELLER AND COMPRESSOR HOUSING)
Check for damage to the compressor impeller.
Check for interference between the compressor impeller and the compressor housing.
Result
Result
Proceed to
No damage or interference
A
Damage or interference exists
B
A CHECK TURBOCHARGER SUB-ASSEMBLY (INSPECT TURBINE SHAFT)Click here
B REPLACE TURBOCHARGER SUB-ASSEMBLY (COMPRESSOR IMPELLER OR COMPRESSOR HOUSING MALFUNCTION)
CHECK TURBOCHARGER SUB-ASSEMBLY (INSPECT TURBINE WHEEL AND TURBINE HOUSING)
Check for damage to the turbine wheel.
Check for interference between the turbine wheel and the turbine housing.
Result
Result
Proceed to
The turbine wheel is not damaged and there is no interference between the turbine wheel and turbine housing
A
turbine wheel is damaged
(there is interference between the turbine wheel and turbine housing)
B
B REPLACE TURBOCHARGER SUB-ASSEMBLY (TURBINE WHEEL OR TURBINE HOUSING MALFUNCTION)
CHECK TURBOCHARGER SUB-ASSEMBLY (INSPECT TURBINE SHAFT)
Check that the turbine shaft rotates smoothly, without catching.
Check for loose turbine mounting nuts and for axial play in the turbine shaft.
Tip:If the turbine shaft catches or there is no play, seal failure due to seizure or improper operation due to accumulation of deposits is suspected.
Result
Result
Proceed to
No turbine shaft malfunction
A
Turbine shaft malfunction
B
CHECK TURBO OIL INLET PIPE SUB-ASSEMBLY
Remove the turbo oil inlet pipe sub-assembly.
Check for blockage of the turbo oil inlet pipe sub-assembly due to accumulated deposits or deformation.
Tip:If no malfunction exists in the turbo oil inlet pipe sub-assembly, there may be a seal defect due to oil coking in the bearing housing.
Result
Result
Proceed to
No clogging
A
Clogging
B