ELECTRICAL KEY OSCILLATOR(for Center Floor) REMOVAL
PROCEDURE
-
REMOVE REAR NO. 1 SEAT ASSEMBLY (for LH Side)
-
REMOVE REAR NO. 1 SEAT ASSEMBLY (for RH Side)
Tech Tips
Use the same procedure as for the LH side.
-
REMOVE REAR NO. 1 SEAT ASSEMBLY (for Center)
-
REMOVE REAR NO. 2 SEAT ASSEMBLY
-
REMOVE DECK BOARD ASSEMBLY
-
REMOVE NO. 1 DECK BOARD
-
REMOVE NO. 2 DECK BOARD
-
REMOVE REAR DECK FLOOR BOX
-
REMOVE DECK FLOOR BOX RH
-
REMOVE TONNEAU COVER ASSEMBLY (w/ Tonneau Cover)
-
REMOVE BACK DOOR SCUFF PLATE
-
REMOVE REAR DOOR SCUFF PLATE LH
-
DISCONNECT REAR DOOR OPENING TRIM WEATHERSTRIP LH
-
Disconnect the rear door opening trim weatherstrip LH.
-
-
REMOVE NO. 1 DECK TRIM COVER (for LH Side)
-
REMOVE LUGGAGE HOLD BELT STRIKER ASSEMBLY (for LH Side)
-
REMOVE FRONT DECK SIDE TRIM COVER LH
-
REMOVE NO. 2 CUP HOLDER
-
DISCONNECT REAR NO. 1 SEAT OUTER BELT ASSEMBLY LH
-
DISCONNECT REAR NO. 2 SEAT OUTER BELT ASSEMBLY LH
-
REMOVE NO. 2 ROOM LIGHT ASSEMBLY
-
REMOVE DECK TRIM SIDE PANEL ASSEMBLY LH
-
REMOVE REAR DOOR SCUFF PLATE RH
-
DISCONNECT REAR DOOR OPENING TRIM WEATHERSTRIP RH
Tech Tips
Use the same procedure for the RH side and LH side.
-
REMOVE NO. 1 DECK TRIM COVER (for RH Side)
-
REMOVE LUGGAGE HOLD BELT STRIKER ASSEMBLY (for RH Side)
-
REMOVE FRONT DECK SIDE TRIM COVER RH
-
REMOVE NO. 1 CUP HOLDER
-
DISCONNECT REAR NO. 1 SEAT OUTER BELT ASSEMBLY RH
Tech Tips
Use the same procedure as for the LH side.
-
DISCONNECT REAR NO. 2 SEAT OUTER BELT ASSEMBLY RH
Tech Tips
Use the same procedure as for the LH side.
-
REMOVE DECK TRIM SIDE PANEL ASSEMBLY RH
-
REMOVE NO. 3 INDOOR ELECTRICAL KEY ANTENNA ASSEMBLY
-
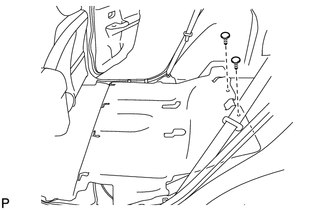
Remove the 2 clips from the floor carpet.
-
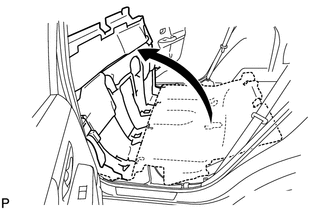
Turn over the floor carpet as shown in the illustration.
-
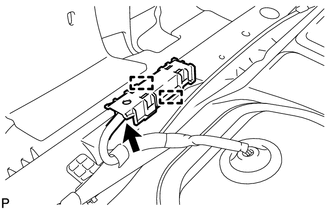
Disengage the 2 clamps.
-
Disconnect the connector to remove the No. 3 indoor electrical key antenna assembly.
Note
Be careful when removing the No. 3 indoor electrical key antenna assembly. If the antenna is dropped, replace it with a new one.
-