EASY ACCESS BUCKLE SYSTEM, Diagnostic DTC:B264F
| DTC Code | DTC Name |
|---|---|
| B264F | Easy Access Buckle Sensor Malfunction |
DESCRIPTION
When the buckle motor is in operation, this will be output if there is no sensor input to the position control ECU assembly despite movement in the normal and reverse directions.
| DTC No. | Detection Item | DTC Detection Condition | Trouble Area |
|---|---|---|---|
| B264F | Easy Access Buckle Sensor Malfunction | The lock detection positions for both normal and reverse directions of the sensor match |
|
WIRING DIAGRAM
-
for Driver Side
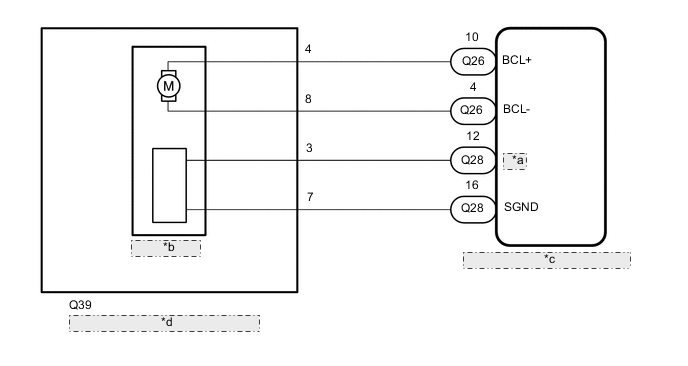
for LHD *a SSLB *b Buckle Motor *c Position Control ECU Assembly *d Front Seat Inner Belt Assembly LH 
for RHD *a SSLB *b Buckle Motor *c Position Control ECU Assembly *d Front Seat Inner Belt Assembly RH -
for Front Passenger Side
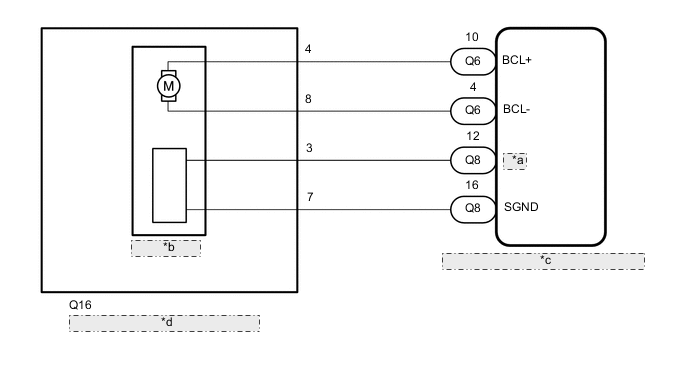
for LHD *a SSLB *b Buckle Motor *c No. 2 Position Control ECU Assembly *d Front Seat Inner Belt Assembly RH 
for RHD *a SSLB *b Buckle Motor *c No. 2 Position Control ECU Assembly *d Front Seat Inner Belt Assembly LH
CAUTION / NOTICE / HINT
Note
Perform the initialization procedure and stored memory will be reset.
Tech Tips
After replacing the position control ECU assembly, seat assembly and parts (including removal and installation), initialize the position control ECU assembly.
PROCEDURE
-
CLEAR DTC
-
Clear the DTCs.
Body Electrical > Driver Seat > Clear DTCs
Body Electrical > Passenger Seat > Clear DTCsResult Proceed to NEXT
NEXT 
-
-
CHECK FOR DTC
-
Check for DTCs.
Body Electrical > Driver Seat > Trouble Codes
Body Electrical > Passenger Seat > Trouble CodesOK DTC B264F is not output. Result Result Proceed to OK A NG (for Driver Side) B NG (for Front Passenger Side) C
A 
USE SIMULATION METHOD TO CHECK Click here
C 
CHECK VEHICLE CONDITION Click here
B
-
-
CHECK VEHICLE CONDITION
-
Check vehicle condition.
Result Proceed to for LHD for RHD
for RHD
PERFORM ACTIVE TEST USING GTS (EASY ACCESS BUCKLE) Click here
for LHD
-
-
PERFORM ACTIVE TEST USING GTS (EASY ACCESS BUCKLE)
-
Connect the GTS to the DLC3.
-
Turn the engine switch on (IG).
-
Turn the GTS on.
-
Enter the following menus: Body Electrical / Driver Seat / Active Test.
-
Perform Active Test according to the display on the GTS.
Body Electrical > Driver Seat > Active TestTester Display Measurement Item Control Range Diagnostic Note Easy Access Buckle Operate the buckle motor UP/DOWN -
Body Electrical > Driver Seat > Active TestTester Display Easy Access Buckle Result Proceed to OK NG
NG
INSPECT FRONT SEAT INNER BELT ASSEMBLY LH Click here
OK
-
-
CHECK POSITION CONTROL ECU ASSEMBLY
-
Disconnect the position control ECU assembly connector.
-
Measure the voltage according to the value(s) in the table below.
Standard Voltage Tester Connection Condition Specified Condition Q39-4 - Q39-8 Always 4.87 to 5.1 V Result Proceed to OK NG
OK
REPLACE FRONT SEAT INNER BELT ASSEMBLY LH Click here
NG
-
-
CHECK HARNESS AND CONNECTOR (POSITION CONTROL ECU ASSEMBLY - FRONT SEAT INNER BELT ASSEMBLY LH (BUCKLE MOTOR))
-
Disconnect the Q28 position control ECU assembly connector.
-
Disconnect the Q39 front seat inner belt assembly LH (buckle motor) connector.
-
Measure the resistance according to the value(s) in the table below.
Standard Resistance Tester Connection Condition Specified Condition Q28-12 (SSLB) - Q39-3 Always Below 1 Ω Q28-12 (SSLB) or Q39-3 - Other terminals and body ground Always 10 kΩ or higher Q28-16 (SGND) - Q39-7 Always Below 1 Ω Result Proceed to OK NG
OK
REPLACE POSITION CONTROL ECU ASSEMBLY Click here
NG
REPAIR OR REPLACE HARNESS OR CONNECTOR
-
-
INSPECT FRONT SEAT INNER BELT ASSEMBLY LH
-
Remove the front seat inner belt assembly LH (buckle motor).
-
Inspect the front seat inner belt assembly LH (buckle motor).
Result Proceed to OK NG
NG
REPLACE FRONT SEAT INNER BELT ASSEMBLY LH Click here
OK
-
-
CHECK HARNESS AND CONNECTOR (POSITION CONTROL ECU ASSEMBLY - FRONT SEAT INNER BELT ASSEMBLY LH (BUCKLE MOTOR))
-
Disconnect the Q26 position control ECU assembly connector.
-
Disconnect the Q39 front seat inner belt assembly LH (buckle motor) connector.
-
Measure the resistance according to the value(s) in the table below.
Standard Resistance Tester Connection Condition Specified Condition Q26-10 (BCL+) - Q39-4 Always Below 1 Ω Q26-10 (BCL+) or Q39-4 - Other terminals and body ground Always 10 kΩ or higher Q26-4 (BCL-) - Q39-8 Always Below 1 Ω Q26-4 (BCL-) or Q39-8 - Other terminals and body ground Always 10 kΩ or higher Result Proceed to OK NG
OK
REPLACE POSITION CONTROL ECU ASSEMBLY Click here
NG
REPAIR OR REPLACE HARNESS OR CONNECTOR
-
-
PERFORM ACTIVE TEST USING GTS (EASY ACCESS BUCKLE)
-
Connect the GTS to the DLC3.
-
Turn the engine switch on (IG).
-
Turn the GTS on.
-
Enter the following menus: Body Electrical / Driver Seat / Active Test.
-
Perform Active Test according to the display on the GTS.
Body Electrical > Driver Seat > Active TestTester Display Measurement Item Control Range Diagnostic Note Easy Access Buckle Operate the buckle motor UP/DOWN -
Body Electrical > Driver Seat > Active TestTester Display Easy Access Buckle Result Proceed to OK NG
NG
INSPECT FRONT SEAT INNER BELT ASSEMBLY RH Click here
OK
-
-
CHECK POSITION CONTROL ECU ASSEMBLY
-
Disconnect the position control ECU assembly connector.
-
Measure the voltage according to the value(s) in the table below.
Standard Voltage Tester Connection Condition Specified Condition Q16-4 - Q16-8 Always 4.87 to 5.1 V Result Proceed to OK NG
OK
REPLACE FRONT SEAT INNER BELT ASSEMBLY RH Click here
NG
-
-
CHECK HARNESS AND CONNECTOR (POSITION CONTROL ECU ASSEMBLY - FRONT SEAT INNER BELT ASSEMBLY RH (BUCKLE MOTOR))
-
Disconnect the Q8 position control ECU assembly connector.
-
Disconnect the Q16 front seat inner belt assembly RH (buckle motor) connector.
-
Measure the resistance according to the value(s) in the table below.
Standard Resistance Tester Connection Condition Specified Condition Q8-12 (SSLB) - Q16-3 Always Below 1 Ω Q8-12 (SSLB) or Q16-3 - Other terminals and body ground Always 10 kΩ or higher Q8-16 (SGND) - Q16-7 Always Below 1 Ω Result Proceed to OK NG
OK
REPLACE POSITION CONTROL ECU ASSEMBLY Click here
NG
REPAIR OR REPLACE HARNESS OR CONNECTOR
-
-
INSPECT FRONT SEAT INNER BELT ASSEMBLY RH
-
Remove the front seat inner belt assembly RH (buckle motor).
-
Inspect the front seat inner belt assembly RH (buckle motor).
Result Proceed to OK NG
NG
REPLACE FRONT SEAT INNER BELT ASSEMBLY RH Click here
OK
-
-
CHECK HARNESS AND CONNECTOR (POSITION CONTROL ECU ASSEMBLY - FRONT SEAT INNER BELT ASSEMBLY RH (BUCKLE MOTOR))
-
Disconnect the Q6 position control ECU assembly connector.
-
Disconnect the Q16 front seat inner belt assembly RH (buckle motor) connector.
-
Measure the resistance according to the value(s) in the table below.
Standard Resistance Tester Connection Condition Specified Condition Q6-10 (BCL+) - Q16-4 Always Below 1 Ω Q6-10 (BCL+) or Q16-4 - Other terminals and body ground Always 10 kΩ or higher Q6-4 (BCL-) - Q16-8 Always Below 1 Ω Q6-4 (BCL-) or Q16-8 - Other terminals and body ground Always 10 kΩ or higher Result Proceed to OK NG
OK
REPLACE POSITION CONTROL ECU ASSEMBLY Click here
NG
REPAIR OR REPLACE HARNESS OR CONNECTOR
-
-
CHECK VEHICLE CONDITION
-
Check vehicle condition.
Result Proceed to for LHD for RHD
for RHD
PERFORM ACTIVE TEST USING GTS (EASY ACCESS BUCKLE) Click here
for LHD
-
-
PERFORM ACTIVE TEST USING GTS (EASY ACCESS BUCKLE)
-
Connect the GTS to the DLC3.
-
Turn the engine switch on (IG).
-
Turn the GTS on.
-
Enter the following menus: Body Electrical / Driver Seat / Active Test.
-
Perform Active Test according to the display on the GTS.
Body Electrical > Passenger Seat > Active TestTester Display Measurement Item Control Range Diagnostic Note Easy Access Buckle Operate the buckle motor UP/DOWN -
Body Electrical > Passenger Seat > Active TestTester Display Easy Access Buckle Result Proceed to OK NG
NG
INSPECT FRONT SEAT INNER BELT ASSEMBLY RH Click here
OK
-
-
CHECK NO. 2 POSITION CONTROL ECU ASSEMBLY
-
Disconnect the No. 2 position control ECU assembly connector.
-
Measure the voltage according to the value(s) in the table below.
Standard Voltage Tester Connection Condition Specified Condition Q16-4 - Q16-8 Always 4.87 to 5.1 V Result Proceed to OK NG
OK
REPLACE FRONT SEAT INNER BELT ASSEMBLY RH Click here
NG
-
-
CHECK HARNESS AND CONNECTOR (NO. 2 POSITION CONTROL ECU ASSEMBLY - FRONT SEAT INNER BELT ASSEMBLY RH (BUCKLE MOTOR))
-
Disconnect the Q8 No. 2 position control ECU assembly connector.
-
Disconnect the Q16 front seat inner belt assembly RH (buckle motor) connector.
-
Measure the resistance according to the value(s) in the table below.
Standard Resistance Tester Connection Condition Specified Condition Q8-12 (SSLB) - Q16-3 Always Below 1 Ω Q8-12 (SSLB) or Q16-3 - Other terminals and body ground Always 10 kΩ or higher Q8-16 (SGND) - Q16-7 Always Below 1 Ω Result Proceed to OK NG
OK
REPLACE NO. 2 POSITION CONTROL ECU ASSEMBLY Click here
NG
REPAIR OR REPLACE HARNESS OR CONNECTOR
-
-
INSPECT FRONT SEAT INNER BELT ASSEMBLY RH
-
Remove the front seat inner belt assembly RH (buckle motor).
-
Inspect the front seat inner belt assembly RH (buckle motor).
Result Proceed to OK NG
NG
REPLACE FRONT SEAT INNER BELT ASSEMBLY RH Click here
OK
-
-
CHECK HARNESS AND CONNECTOR (NO. 2 POSITION CONTROL ECU ASSEMBLY - FRONT SEAT INNER BELT ASSEMBLY RH (BUCKLE MOTOR))
-
Disconnect the Q6 No. 2 position control ECU assembly connector.
-
Disconnect the Q16 front seat inner belt assembly RH (buckle motor) connector.
-
Measure the resistance according to the value(s) in the table below.
Standard Resistance Tester Connection Condition Specified Condition Q6-10 (BCL+) - Q16-4 Always Below 1 Ω Q6-10 (BCL+) or Q16-4 - Other terminals and body ground Always 10 kΩ or higher Q6-4 (BCL-) - Q16-8 Always Below 1 Ω Q6-4 (BCL-) or Q16-8 - Other terminals and body ground Always 10 kΩ or higher Result Proceed to OK NG
OK
REPLACE NO. 2 POSITION CONTROL ECU ASSEMBLY Click here
NG
REPAIR OR REPLACE HARNESS OR CONNECTOR
-
-
PERFORM ACTIVE TEST USING GTS (EASY ACCESS BUCKLE)
-
Connect the GTS to the DLC3.
-
Turn the engine switch on (IG).
-
Turn the GTS on.
-
Enter the following menus: Body Electrical / Driver Seat / Active Test.
-
Perform Active Test according to the display on the GTS.
Body Electrical > Passenger Seat > Active TestTester Display Measurement Item Control Range Diagnostic Note Easy Access Buckle Operate the buckle motor UP/DOWN -
Body Electrical > Passenger Seat > Active TestTester Display Easy Access Buckle Result Proceed to OK NG
NG
INSPECT FRONT SEAT INNER BELT ASSEMBLY LH Click here
OK
-
-
CHECK NO. 2 POSITION CONTROL ECU ASSEMBLY
-
Disconnect the No. 2 position control ECU assembly connector.
-
Measure the voltage according to the value(s) in the table below.
Standard Voltage Tester Connection Condition Specified Condition Q39-4 - Q39-8 Always 4.87 to 5.1 V Result Proceed to OK NG
OK
REPLACE FRONT SEAT INNER BELT ASSEMBLY LH Click here
NG
-
-
CHECK HARNESS AND CONNECTOR (NO. 2 POSITION CONTROL ECU ASSEMBLY - FRONT SEAT INNER BELT ASSEMBLY LH (BUCKLE MOTOR))
-
Disconnect the Q28 No. 2 position control ECU assembly connector.
-
Disconnect the Q39 front seat inner belt assembly LH (buckle motor) connector.
-
Measure the resistance according to the value(s) in the table below.
Standard Resistance Tester Connection Condition Specified Condition Q28-12 (SSLB) - Q39-3 Always Below 1 Ω Q28-12 (SSLB) or Q39-3 - Other terminals and body ground Always 10 kΩ or higher Q28-16 (SGND) - Q39-7 Always Below 1 Ω Result Proceed to OK NG
OK
REPLACE NO. 2 POSITION CONTROL ECU ASSEMBLY Click here
NG
REPAIR OR REPLACE HARNESS OR CONNECTOR
-
-
INSPECT FRONT SEAT INNER BELT ASSEMBLY LH
-
Remove the front seat inner belt assembly LH (buckle motor).
-
Inspect the front seat inner belt assembly LH (buckle motor).
Result Proceed to OK NG
NG
REPLACE FRONT SEAT INNER BELT ASSEMBLY LH Click here
OK
-
-
CHECK HARNESS AND CONNECTOR (NO. 2 POSITION CONTROL ECU ASSEMBLY - FRONT SEAT INNER BELT ASSEMBLY LH (BUCKLE MOTOR))
-
Disconnect the Q26 No. 2 position control ECU assembly connector.
-
Disconnect the Q39 front seat inner belt assembly LH (buckle motor) connector.
-
Measure the resistance according to the value(s) in the table below.
Standard Resistance Tester Connection Condition Specified Condition Q26-10 (BCL+) - Q39-4 Always Below 1 Ω Q26-10 (BCL+) or Q39-4 - Other terminals and body ground Always 10 kΩ or higher Q26-4 (BCL-) - Q39-8 Always Below 1 Ω Q26-4 (BCL-) or Q39-8 - Other terminals and body ground Always 10 kΩ or higher Result Proceed to OK NG
OK
REPLACE NO. 2 POSITION CONTROL ECU ASSEMBLY Click here
NG
REPAIR OR REPLACE HARNESS OR CONNECTOR
-