FRONT BUMPER DISASSEMBLY
PROCEDURE
-
REMOVE FOG LIGHT ASSEMBLY LH
-
REMOVE FOG LIGHT ASSEMBLY RH
Tech Tips
Use the same procedure for the LH side.
-
REMOVE CORNERING LIGHT ASSEMBLY LH (w/ Cornering Light)
-
REMOVE CORNERING LIGHT ASSEMBLY RH (w/ Cornering Light)
Tech Tips
Use the same procedure for the LH side.
-
REMOVE MILLIMETER WAVE RADAR SENSOR ASSEMBLY (w/ Pre-crash Safety System)
-
REMOVE FRONT TELEVISION CAMERA ASSEMBLY (w/ Panoramic View Monitor System)
-
REMOVE NO. 1 ULTRASONIC SENSOR (w/ LEXUS Parking Assist-sensor System)
-
REMOVE NO. 2 ULTRASONIC SENSOR (w/ LEXUS Parking Assist-sensor System)
-
REMOVE NO. 2 ULTRASONIC SENSOR RETAINER (w/ LEXUS Parking Assist-sensor System)
-
REMOVE NO. 4 ENGINE ROOM WIRE (w/ LEXUS Parking Assist-sensor System)
-
Disengage the 13 clamps and remove the No. 4 engine room wire.
-
-
REMOVE HEADLIGHT WASHER COVER LH (w/ Headlight Cleaner System)
-
REMOVE HEADLIGHT WASHER COVER RH (w/ Headlight Cleaner System)
Tech Tips
Use the same procedure for the LH side.
-
REMOVE HEADLIGHT WASHER ACTUATOR SUB-ASSEMBLY LH (w/ Headlight Cleaner System)
-
REMOVE HEADLIGHT WASHER ACTUATOR SUB-ASSEMBLY RH (w/ Headlight Cleaner System)
Tech Tips
Use the same procedure for the LH side.
-
REMOVE WASHER HOSE (w/ Headlight Cleaner System)
-
Disengage the 9 claws and remove the washer hose.
-
-
REMOVE NO. 2 WASHER BRACKET (w/ Headlight Cleaner System)
Tech Tips
When removing the No. 2 washer bracket, heat the front bumper cover using a heat light.
Standard Item Temperature No. 2 Washer Bracket and Front Bumper Assembly 40 to 60°C (104 to 140°F) CAUTION:
-
Do not touch the heat light and heated parts, touching the heat light may result in burns.
-
Touching heated parts for a long time may result in burns.
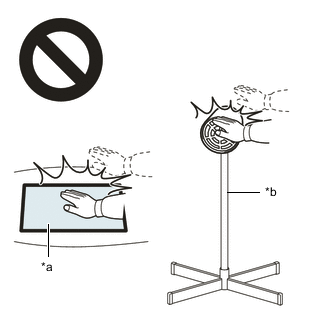
*a Heated Part *b Heat Light
-
Using a heat light, heat the No. 2 washer bracket and front bumper assembly.
-
Remove the No. 2 washer bracket.
-
-
REMOVE NO. 1 WASHER BRACKET (w/ Headlight Cleaner System)
Tech Tips
Use the same procedure for the No. 2 washer bracket.
-
REMOVE BRACKET
-

Remove the 3 screws and bracket.
-
-
REMOVE FOG LIGHT COVER LH
-
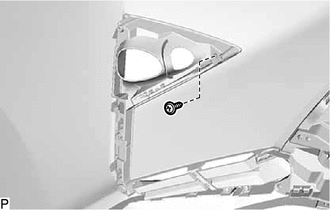
Remove the screw.
-
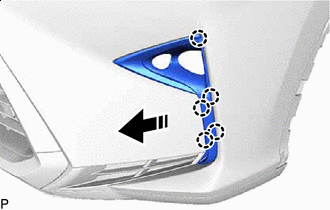

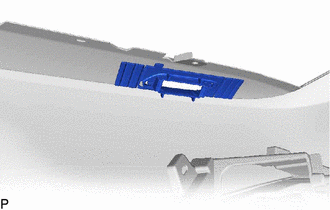
Remove in this Direction Disengage the 5 claws as shown in the illustration to remove the fog light cover LH with radiator grille garnish.
-
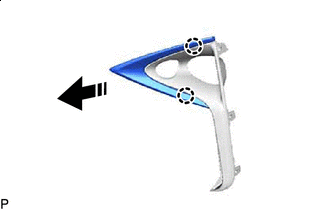
Remove in this Direction Disengage the 2 claws as shown in the illustration to remove the fog light cover LH.
-
-
REMOVE FOG LIGHT COVER RH
Tech Tips
Use the same procedure for the LH side.
-
REMOVE HOOD TO RADIATOR GRILLE SEAL
-
Disengage the 16 clips as shown in the illustration to remove the hood to radiator grille seal.
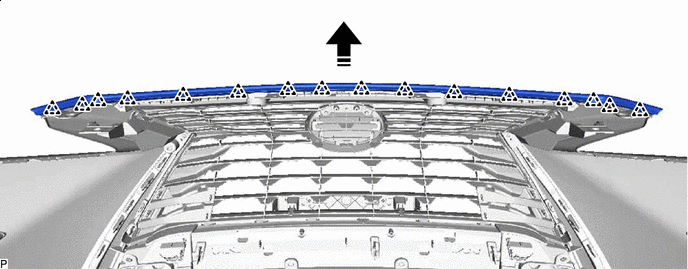
Remove in this Direction - -
-
-
REMOVE FRONT BUMPER EXTENSION MOUNTING BRACKET (w/o Telematics Transceiver)
-
for Type A:
-
Remove the 2 screws.
-

Remove in this Direction Disengage the 2 claws as shown in the illustration to remove the front bumper extension moulding bracket.
-
-
for Type B:
-
Remove the 2 screws.
-
Remove in this Direction Disengage the 4 claws as shown in the illustration to remove the front bumper extension moulding bracket.
-
-
-
REMOVE FRONT BUMPER EXTENSION MOUNTING BRACKET (w/ Telematics Transceiver)
-
Remove the 2 screws.
-
Remove in this Direction Disengage the 4 claws and remove the front bumper extension moulding bracket as shown in the illustration.
-
-
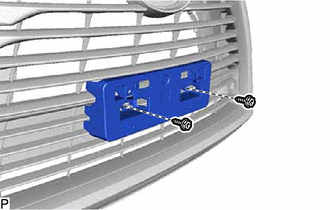
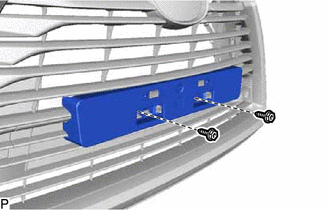
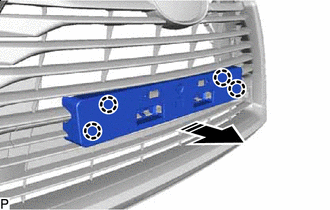
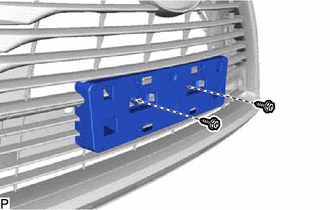
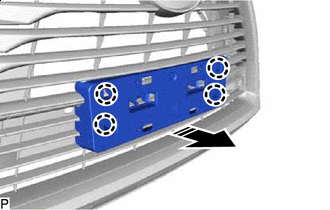
REMOVE RADIATOR GRILLE (OR FRONT PANEL) EMBLEM
-
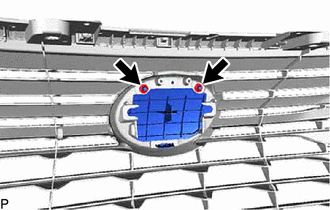
Remove the 2 spring nuts.
-
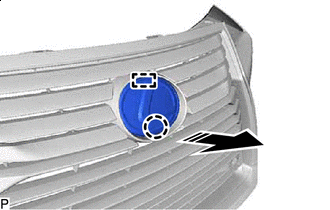
Remove in this Direction Disengage the claw and guide as shown in the illustration to remove the radiator grille (or front panel) emblem.
-
-
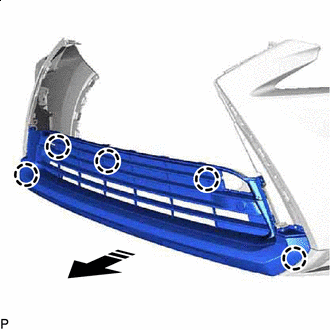
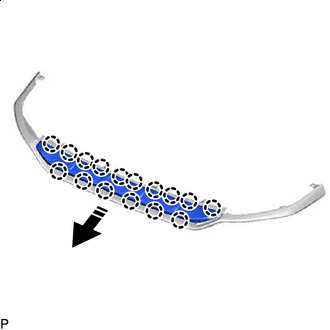
REMOVE RADIATOR GRILLE MOULDING (for Bar Type Radiator Grille)
-
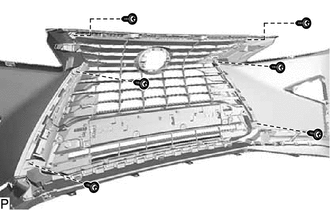
Remove the 6 screws.
-
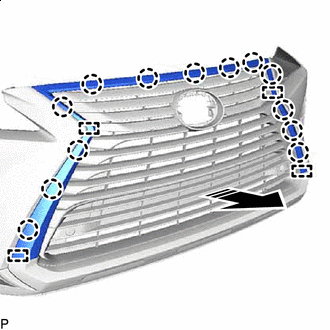
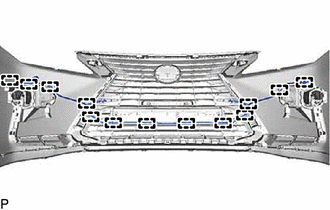
Remove in this Direction Disengage the 13 claws and 4 guides as shown in the illustration to remove the radiator grille moulding.
-
-
REMOVE RADIATOR GRILLE MOULDING (for Mesh Type Radiator Grille)
-
Remove the 6 screws.
-
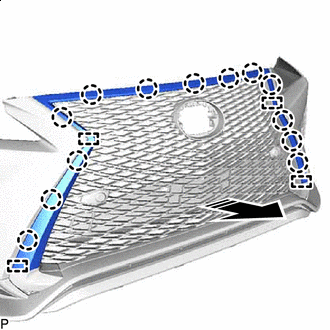
Remove in this Direction Disengage the 13 claws and 4 guides as shown in the illustration to remove the radiator grille moulding.
-
-
REMOVE LOWER RADIATOR GRILLE MOULDING LH (for Mesh Type Radiator Grille)
-
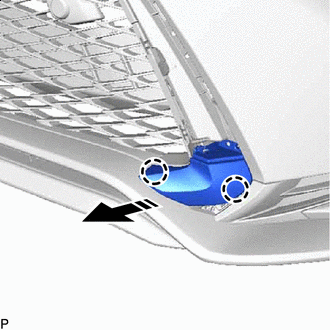
Remove in this Direction Disengage the 2 claws as shown in the illustration to remove the lower radiator grille mounting LH.
-
-
REMOVE LOWER RADIATOR GRILLE MOULDING RH (for Mesh Type Radiator Grille)
Tech Tips
Use the same procedure for the LH side.
-
REMOVE RADIATOR GRILLE (for Bar Type Radiator Grille)
-
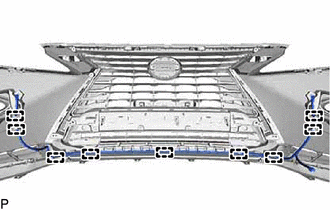
Remove in this Direction Disengage the 10 claws as shown in the illustration to remove the radiator grille.
-
-
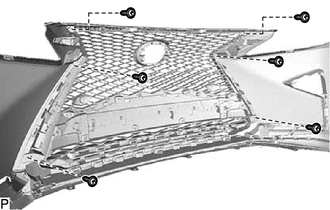
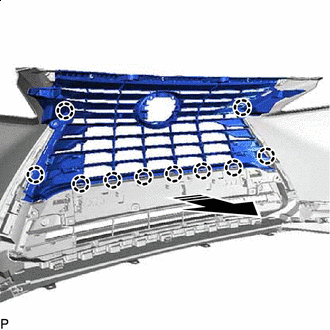
REMOVE RADIATOR GRILLE (for Mesh Type Radiator Grille)
-
Remove the 6 screws.
-
Remove in this Direction Disengage the 8 claws as shown in the illustration to remove the radiator grille.
-
-
REMOVE FRONT BUMPER GUARD (for Bar Type Radiator Grille)
-
Remove the 2 clips.
-
Disengage the 8 claws as shown in the illustration to remove the front bumper guard.
Remove in this Direction - -
-
-
REMOVE FRONT BUMPER GUARD COVER LH (for Bar Type Radiator Grille)
-
Remove the 3 screws.
-
Remove in this Direction Disengage the 5 claws as shown in the illustration to remove the front bumper guard cover LH.
-
-
REMOVE FRONT BUMPER GUARD COVER RH (for Bar Type Radiator Grille)
Tech Tips
Use the same procedure for the LH side.
-
REMOVE FRONT BUMPER HOLE COVER LH
-
*a Hook Remove in this Direction Disengage the 4 claws as shown in the illustration.
-
Disengage the hook to remove the front bumper hole cover LH.
-
-
REMOVE FRONT BUMPER HOLE COVER RH
Tech Tips
Use the same procedure for the LH side.
-
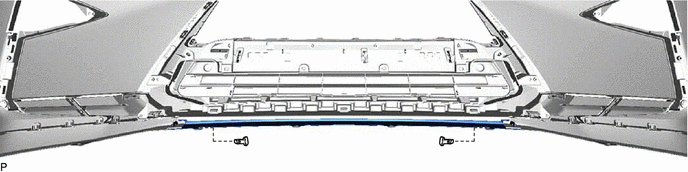
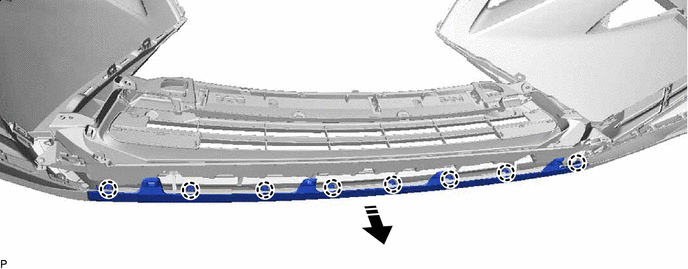
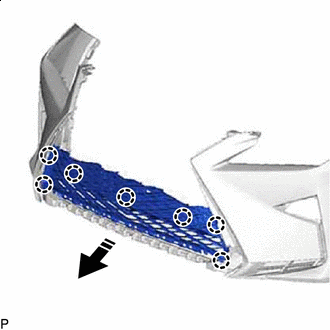
REMOVE LOWER RADIATOR GRILLE MOULDING (for Bar Type Radiator Grille)
-
Remove in this Direction Disengage the 5 claws as shown in the illustration to remove the lower radiator grille moulding with lower radiator grille.
-

Remove in this Direction Disengage the 8 claws as shown in the illustration to remove the lower radiator grille moulding.
-
-
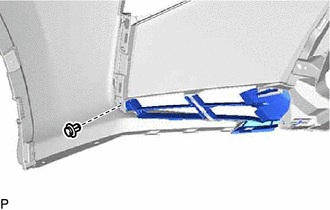
REMOVE FRONT BUMPER ARM HOLE COVER LH (for Bar Type Radiator Grille)
-
Remove the clip.
-
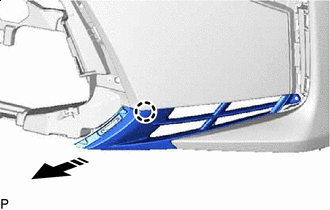
Remove in this Direction Disengage the claw as shown in the illustration to remove the front bumper arm hole cover LH.
-
-
REMOVE FRONT BUMPER ARM HOLE COVER RH (for Bar Type Radiator Grille)
Tech Tips
Use the same procedure for the LH side.
-
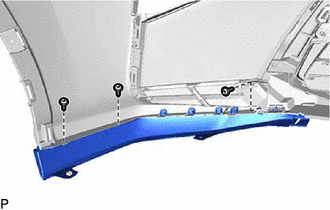
REMOVE FRONT BUMPER EXTENSION (for Mesh Type Radiator Grille)
-
Remove the 10 screws.
-
Disengage the 18 claws as shown in the illustration to remove the front bumper extension.
Remove in this Direction - -
-
-
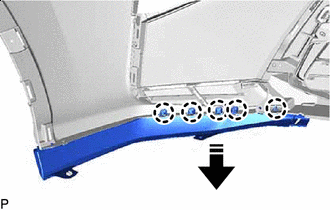
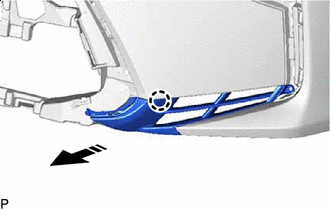
REMOVE FRONT BUMPER SIDE SUPPORT LH (for Mesh Type Radiator Grille)
-
Remove the screw.
-
Remove in this Direction Disengage the 2 claws as shown in the illustration to remove the front bumper side support LH.
-
-
REMOVE FRONT BUMPER SIDE SUPPORT RH (for Mesh Type Radiator Grille)
Tech Tips
Use the same procedure for the LH side.
-
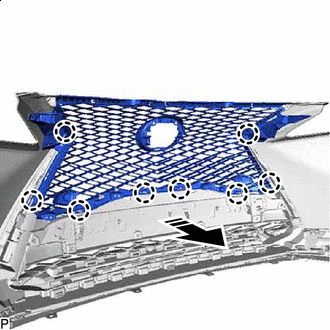
REMOVE LOWER RADIATOR GRILLE MOULDING (for Mesh Type Radiator Grille)
-
Remove the 2 screws.
-
Remove in this Direction Disengage the 16 claws as shown in the illustration to remove the lower radiator grille moulding from the front bumper extension sub-assembly.
-
-
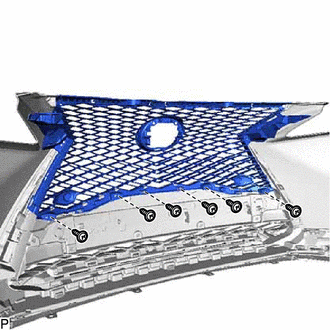
REMOVE LOWER RADIATOR GRILLE (for Mesh Type Radiator Grille)
-
Remove in this Direction Disengage the 7 claws as shown in the illustration to remove the lower radiator grille.
-
-
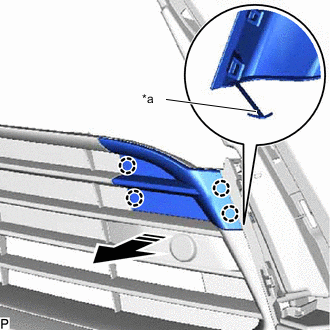
REMOVE FRONT BUMPER ARM HOLE COVER LH (for Mesh Type Radiator Grille)
-
Remove the clip.
-
Remove in this Direction Disengage the claw as shown in the illustration to remove the front bumper arm hole cover LH.
-
-
REMOVE FRONT BUMPER ARM HOLE COVER RH (for Mesh Type Radiator Grille)
Tech Tips
Use the same procedure for the LH side.
-
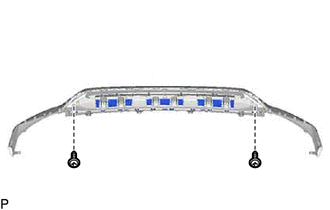
REMOVE FRONT BUMPER ENERGY ABSORBER (for Type A)
-
Remove in this Direction Remove the front bumper energy absorber as shown in the illustration.
-
-
REMOVE FRONT BUMPER ENERGY ABSORBER (for Type B)
-
Remove in this Direction Remove the front bumper energy absorber as shown in the illustration.
-
-
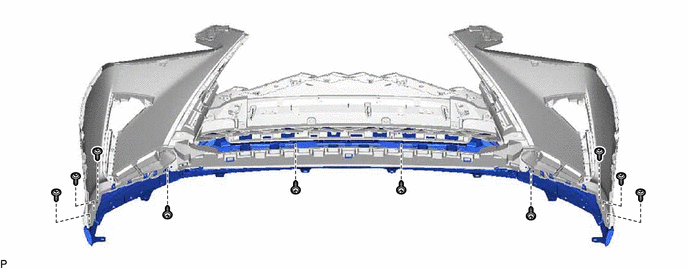
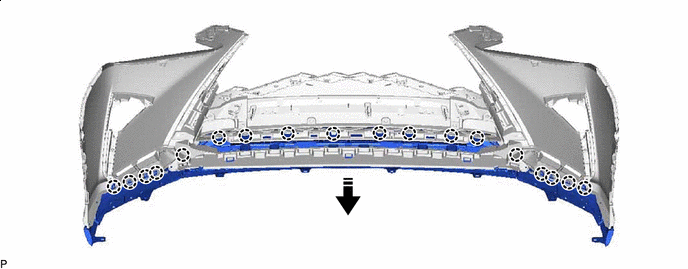
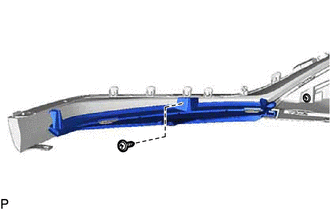
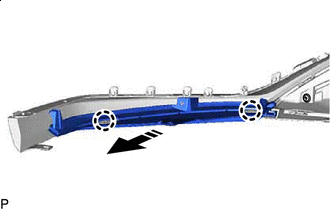
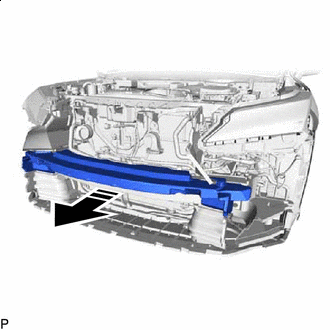
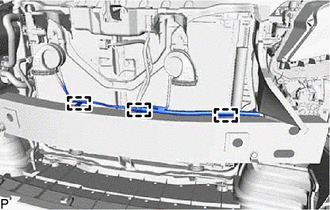
REMOVE FRONT BUMPER REINFORCEMENT SUB-ASSEMBLY (for Type A)
-
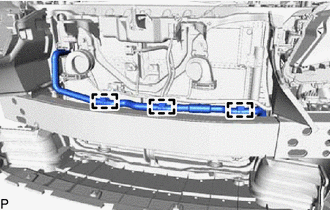
Disengage the 3 clamps.
-
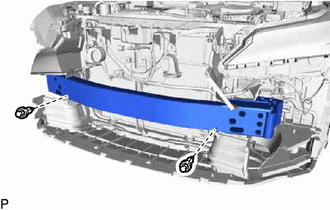
Remove the 2 clips.
-
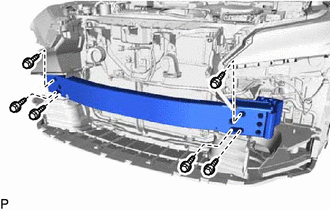
Remove the 6 bolts and front bumper reinforcement sub-assembly.
-
-
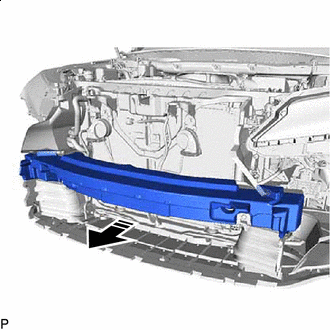
REMOVE FRONT BUMPER REINFORCEMENT SUB-ASSEMBLY (for Type B)
-
Disengage the 3 clamps.
-
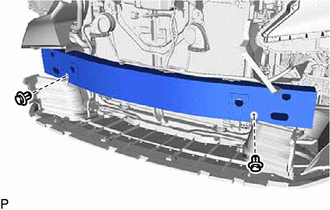
Remove the 2 clips.
-
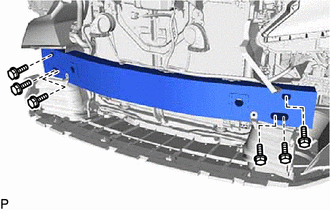
Remove the 6 bolts and front bumper reinforcement sub-assembly.
-
-
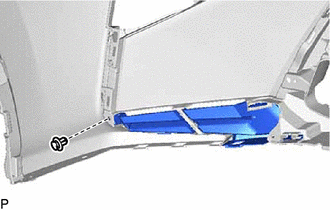
REMOVE FRONT BUMPER SIDE RETAINER LH
-
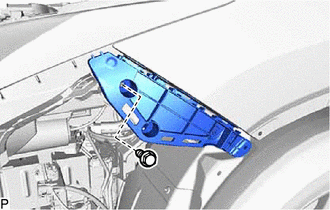
Remove the bolt.
-

Remove in this Direction (1) 
Remove in this Direction (2) Disengage the clip as shown in the illustration.
-
Disengage the claw as shown in the illustration to remove the front bumper side retainer LH.
-
-
REMOVE FRONT BUMPER SIDE RETAINER RH
Tech Tips
Use the same procedure for the LH side.