COMPRESSOR REMOVAL
PROCEDURE
RECOVER REFRIGERANT FROM REFRIGERATION SYSTEM
for HFC-134a(R134a):
for HFO-1234yf(R1234yf):
REMOVE BATTERY SERVICE HOLE COVER
REMOVE HYBRID BATTERY SERVICE PLUG COVER
REMOVE SERVICE PLUG GRIP
CHECK TERMINAL VOLTAGE
REMOVE FRONT WHEEL RH
REMOVE REAR ENGINE UNDER COVER RH
DISCONNECT DISCHARGE HOSE SUB-ASSEMBLY
-
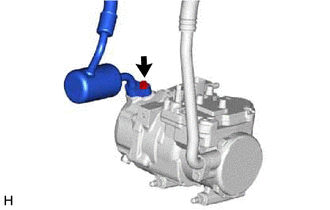
Remove the bolt and disconnect the discharge hose sub-assembly.
Remove the O-ring from the discharge hose sub-assembly.
Note:Seal the openings of the disconnected parts using vinyl tape to prevent entry of moisture and foreign matter.
-
DISCONNECT SUCTION HOSE SUB-ASSEMBLY
-
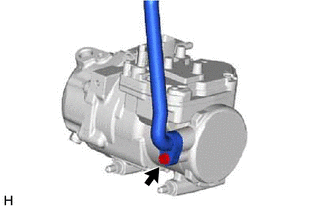
Remove the bolt and disconnect the suction hose sub-assembly.
Remove the O-ring from the suction hose sub-assembly.
Note:Seal the openings of the disconnected parts using vinyl tape to prevent entry of moisture and foreign matter.
-
REMOVE COMPRESSOR ASSEMBLY WITH MOTOR
-
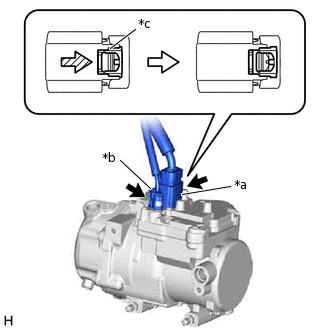
*a
Connector A
*b
Connector B
*c
Green-colored Lock
Using a screwdriver, slide the green-colored lock of connector A as shown in the illustration to release it and disconnect the connector.
CAUTION:Make sure to wear insulating gloves.
Note:Insulate the disconnected terminals and connector with insulating tape.
Disconnect connector B.
-
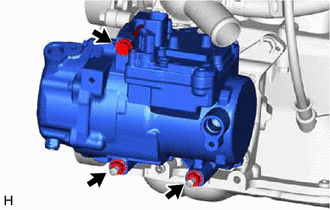
Remove the bolt and 2 nuts.
-
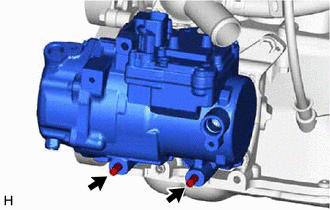
Using an E8 ''TORX'' socket wrench, remove the 2 stud bolts and the compressor assembly with motor.
-