REAR COMBINATION LIGHT ASSEMBLY INSTALLATION
CAUTION / NOTICE / HINT
Tech Tips
-
Use the same procedure for the RH and LH sides.
-
The procedure described below is for the LH side.
PROCEDURE
-
INSTALL REAR COMBINATION LIGHT ASSEMBLY
-
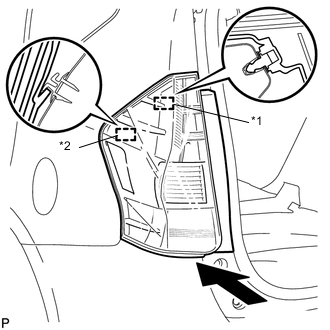
Text in Illustration *1 Pin *2 Guide Engage the guide and pin, and install the rear combination light assembly as shown in the illustration.
CAUTION:
When installing the rear combination light assembly, check that the wire harness is not caught between the rear combination light assembly and the body. Failure to do so may cause a short circuit.
-
Install the 3 nuts.
- Torque:
- 5.9 N*m { 60 kgf*cm, 52 in.*lbf }
-
Connect the connector.
-
-
INSTALL DECK TRIM SIDE PANEL ASSEMBLY
-
INSTALL NO. 2 ROOM LIGHT ASSEMBLY
-
CONNECT REAR NO. 2 SEAT OUTER BELT ASSEMBLY
-
CONNECT REAR NO. 1 SEAT OUTER BELT ASSEMBLY
-
INSTALL NO. 2 CUP HOLDER
-
INSTALL FRONT DECK SIDE TRIM COVER
-
INSTALL LUGGAGE HOLD BELT STRIKER ASSEMBLY
-
INSTALL NO. 1 DECK TRIM COVER
-
INSTALL REAR DOOR OPENING TRIM WEATHERSTRIP
for LH Side: Click here
for RH Side: Click here
-
INSTALL REAR DOOR SCUFF PLATE
-
INSTALL BACK DOOR SCUFF PLATE
-
INSTALL TONNEAU COVER ASSEMBLY (w/ Tonneau Cover)
-
INSTALL DECK FLOOR BOX RH
-
INSTALL REAR DECK FLOOR BOX
-
INSTALL NO. 1 DECK BOARD
-
INSTALL NO. 2 DECK BOARD
-
INSTALL DECK BOARD ASSEMBLY