BACK DOOR REASSEMBLY
PROCEDURE
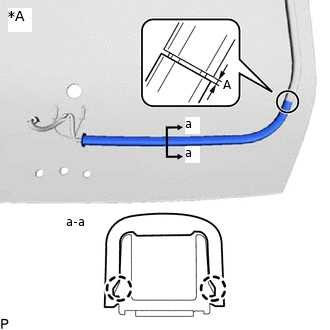
INSTALL BACK DOOR HINGE RETAINER
-
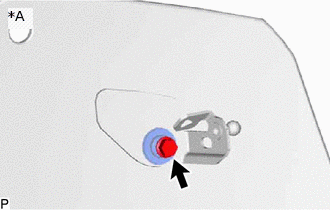
*A
Back Side
Install the back door hinge retainer and bush with a new bolt.
7.5 N*m
76 kgf*cm
66 in.*lbf
Tip:Use the same procedure for the RH side and LH side.
-
INSTALL NO. 3 WIRING HARNESS PROTECTOR
Clean the back door glass.
Remove the release paper from a new No. 3 wiring harness protector.
Tip:After removing the release paper, keep the exposed adhesive free from foreign matter.
-
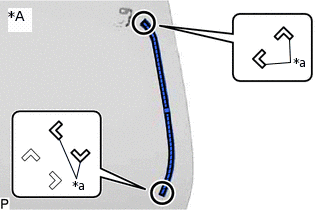
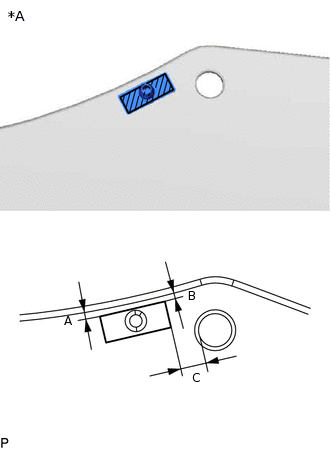
*A
Back Side
*a
Reference Point

Double-sided Tape
Install the No. 3 wiring harness protector as shown in the illustration.
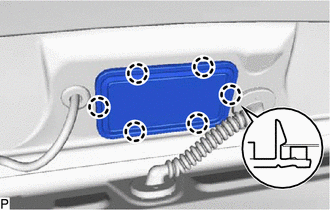
INSTALL NO. 4 WIRING HARNESS PROTECTOR
Clean the back door glass.
Remove the release paper from a new No. 4 wiring harness protector.
Tip:After removing the release paper, keep the exposed adhesive free from foreign matter.
-
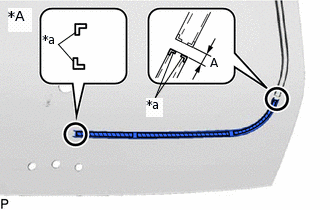
*A
Back Side
*a
Reference Point
Double-sided Tape
Install the No. 4 wiring harness protector as shown in the illustration.
Area
Measurement
A
7.0 to 9.0 mm (0.276 to 0.354 in.)
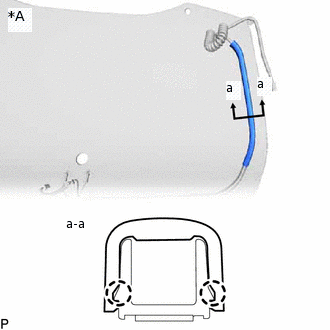
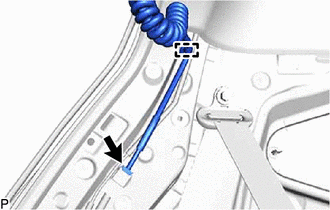
INSTALL NO. 1 BACK DOOR WIRE
-

*A
Back Side
*a
Wiring Color (Blue)
*b
Wiring Color (Black)
Connect the 2 connectors and install the No. 1 back door wire as shown in the illustration.
-
INSTALL NO. 1 WIRING HARNESS PROTECTOR COVER
-
*A
Back Side
Engage the 2 claws to install the No. 1 wiring harness protector cover.
-
INSTALL NO. 2 WIRING HARNESS PROTECTOR COVER
-
*A
Back Side
Engage the 2 claws to install the No. 2 wiring harness protector cover as shown in the illustration.
Area
Measurement
A
1.0 mm or less (0.0394 in. or less)
-
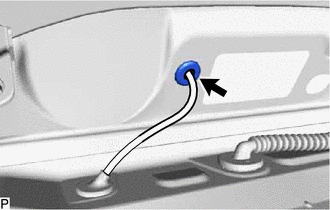
INSTALL BACK WINDOW GLASS CLIP
Clean the back door glass.
Apply double-sided tape with weak adhesive force to the back window glass clip.
-
*A
Back Side
Double-sided Tape
Install the back window glass clip as shown in the illustration.
Reference Measurement
Area
Measurement
A
2.9 mm (0.114 in.)
B
2.7 mm (0.106 in.)
C
11.9 mm (0.469 in.)
Tip:Use the same procedure for the RH side and LH side.
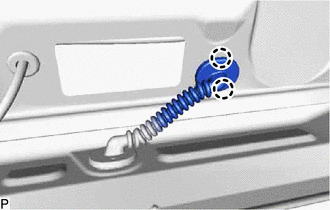
INSTALL BACK DOOR HINGE COLLAR
Clean the back door glass.
Remove the release paper from a new back door hinge collar.
Tip:After removing the release paper, keep the exposed adhesive free from foreign matter.
-
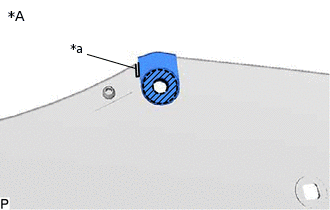
*A
Back Side
*a
Ceramic Notch
Double-sided Tape
Install the back door hinge collar as shown in the illustration.
Tip:Use the same procedure for the RH side and LH side.
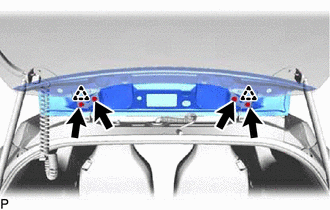
INSTALL BACK DOOR GLASS
-
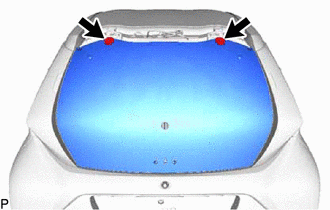
Temporarily install the back door glass with the 2 nuts.
Note:To prevent damage, when installing the back door glass, make sure that there are enough people available to hold it securely.
-
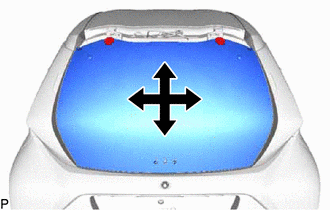
Adjust the back door glass horizontally and vertically.
Tighten the back door glass after adjustment.
16.5 N*m
168 kgf*cm
12 ft.*lbf
-
Engage the clamp.
Connect the connector and No. 1 back door wire.
-
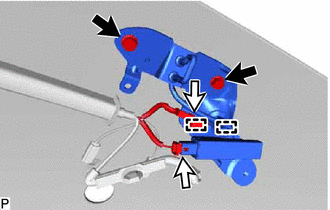
INSTALL BACK DOOR STAY COVER LH
INSTALL BACK DOOR STAY COVER RH
Tip:Use the same procedure as for the LH side.
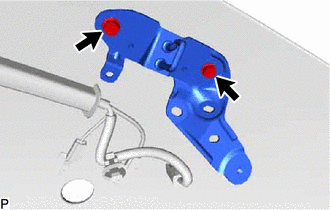
INSTALL BACK DOOR STAY ASSEMBLY LH
INSTALL BACK DOOR STAY ASSEMBLY RH
Tip:Use the same procedure as for the LH side.
INSTALL NO. 3 INDOOR ELECTRICAL KEY ANTENNA ASSEMBLY (w/ Entry and Start System)
INSTALL BACK WINDOW LOCK STRIKER ASSEMBLY (w/o Entry and Start System)
-
Install the back window lock striker assembly and back door outside handle assembly with the 2 bolts.
10.5 N*m
107 kgf*cm
8 ft.*lbf
-
INSTALL BACK WINDOW LOCK STRIKER ASSEMBLY (w/ Entry and Start System)
-
Install the back window lock striker assembly and glass hatch opener switch assembly with the 2 bolts.
10.5 N*m
107 kgf*cm
8 ft.*lbf
Engage the 2 clamps.
Connect the 2 connectors.
-
INSTALL REAR WIPER MOTOR ASSEMBLY
INSTALL BACK DOOR PANEL SUB-ASSEMBLY
Install the 2 grommets.
-
Engage the 2 clips.
Install the back door panel sub-assembly with the 4 bolts.
19.5 N*m
199 kgf*cm
14 ft.*lbf
-
Engage the grommet.
-
Engage the 2 claws to connect the grommet.
INSTALL CENTER STOP LIGHT ASSEMBLY
INSTALL REAR LIGHT COVER
-
Engage the 6 claws to install the rear light cover.
-
INSTALL INNER ROOF SIDE GARNISH LH (for 5 Door)
INSTALL INNER ROOF SIDE GARNISH LH (for 3 Door)
INSTALL ROOF SIDE GARNISH END COVER LH (for 3 Door)
INSTALL INNER ROOF SIDE GARNISH COVER LH (w/o Luggage Compartment Room Light)
INSTALL NO. 1 LUGGAGE COMPARTMENT LIGHT ASSEMBLY (w/ Luggage Compartment Room Light)
INSTALL REAR SEAT SIDE GARNISH LH (for 5 Door)
INSTALL FRONT QUARTER TRIM PANEL ASSEMBLY LH (for 3 Door)
CONNECT NO. 1 REAR SEAT OUTER BELT ASSEMBLY LH (for 5 Door)
CONNECT NO. 1 REAR SEAT OUTER BELT ASSEMBLY LH (for 3 Door)
CONNECT FRONT SEAT OUTER BELT ASSEMBLY LH (for 3 Door)
INSTALL REAR DOOR OPENING TRIM WEATHERSTRIP LH (for 5 Door)
INSTALL FRONT DOOR OPENING TRIM WEATHERSTRIP LH (for 3 Door)
INSTALL COWL SIDE TRIM SUB-ASSEMBLY LH (for 3 Door)
INSTALL REAR SEAT ASSEMBLY (for Separate Seat Type)
INSTALL REAR SEAT ASSEMBLY (for Bench Seat Type)
INSTALL REAR FLOOR MAT ASSEMBLY
INSTALL PACKAGE TRAY TRIM PANEL ASSEMBLY (w/ Package Tray Trim)
INSTALL NO. 2 BACK DOOR NAME PLATE
INSTALL NO. 1 BACK DOOR NAME PLATE
ADJUST BACK DOOR