ROOF HEADLINING(for Wagon) REASSEMBLY
PROCEDURE
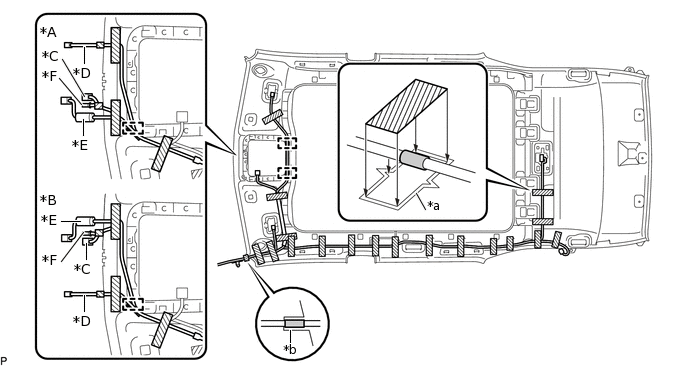
INSTALL NO. 1 ROOF WIRE (for Standard Roof)
Align the positioning tape on the front part of the No. 1 roof wire with the front tab of the roof headlining.

*A
w/o Vanity Light
*B
w/ Vanity Light
*C
for LHD
*D
for RHD
*E
w/ EC Mirror
*F
w/ Rain Sensor
*G
w/ Pre-crash Safety System
*H
w/ Pre-Crash Safety City Heater
*a
Marking
*b
Front Tab

Positioning Tape

Adhesive Tape
Align the positioning tape on the No. 1 roof wire with the markings on the roof headlining.
Install the No. 1 roof wire to the roof headlining with adhesive tape.
Note:Apply the tape securely in place.
Do not touch the adhesive surface when applying the tape to prevent adhesion failure.
INSTALL NO. 1 ROOF WIRE (for Glass Roof)
Align the positioning tape on the front part of the No. 1 roof wire with the front tab of the roof headlining.
*A
for LHD
*B
for RHD
*C
w/ EC Mirror
*D
w/ Rain Sensor
*E
w/ Pre-crash Safety System
*F
w/ Pre-Crash Safety City Heater
*a
Marking
*b
Front Tab
Positioning Tape
Adhesive Tape
Engage each clamp.
Align the positioning tape on the No. 1 roof wire with the markings on the roof headlining.
Install the No. 1 roof wire to the roof headlining with adhesive tape.
Note:Apply the tape securely in place.
Do not touch the adhesive surface when applying the tape to prevent adhesion failure.
INSTALL CENTER ROOF HEADLINING PAD (for Standard Roof with Vanity Light)
-
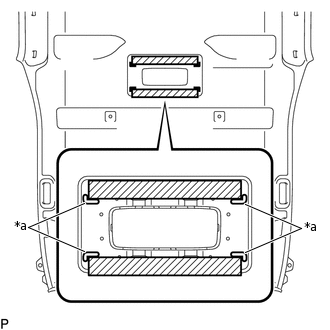
*a
Marking
Remove the release paper from 2 new center roof headlining pads.
Tip:After removing the release paper, keep the exposed adhesive free from foreign matter.
Align the 2 center roof headlining pads with the markings on the roof headlining assembly and install the pads as shown in the illustration.
-
INSTALL NO. 2 ROOF SILENCER PAD (for Standard Roof)
-
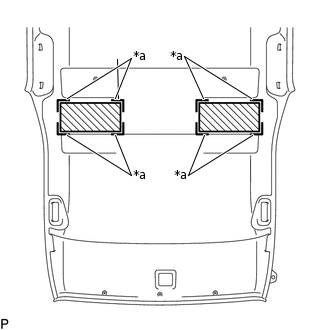
*a
Marking
Align the 2 No. 2 roof silencer pads with the markings on the roof headlining assembly and install the pads using hot-melt glue as shown in the illustration.
-
INSTALL NO. 1 ROOF SILENCER PAD (for Standard Roof)
Align the 5 No. 1 roof silencer pads with the markings on the roof headlining assembly and install the pads using hot-melt glue as shown in the illustration.
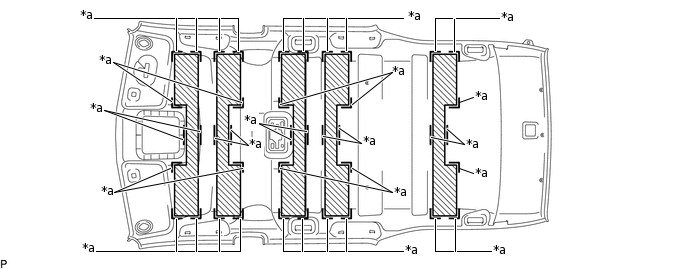
*a
Marking
-
-
INSTALL NO. 3 ANTENNA CORD SUB-ASSEMBLY
INSTALL VANITY LIGHT ASSEMBLY (w/ Vanity Light)
INSTALL NO. 1 ROOM LIGHT ASSEMBLY (for Push Switch Type)