ROOF RACK(w/o Rear No. 2 Seat) INSTALLATION
CAUTION / NOTICE / HINT
Tech Tips
-
Use the same procedure for the RH side and LH side.
-
The following procedure is for the LH side.
PROCEDURE
-
INSTALL NO. 2 ROOF CARRIER SEAL
Tech Tips
When installing the No. 2 roof carrier seal, heat the roof rack assembly using a heat light.
Heating Temperature Item Temperature Roof Rack Assembly 40 to 60°C (104 to 140°F) CAUTION:
-
Do not touch the heat light and heated parts, touching the heat light may result in burns.
-
Touching heated parts for a long time may result in burns.
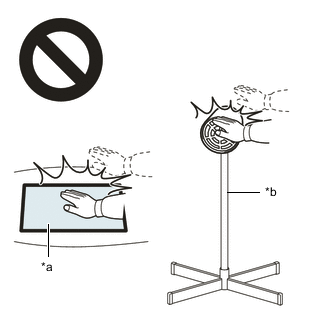
*a Heated Part *b Heat Light Note
Do not heat the roof rack assembly excessively.
-
Clean the roof rack assembly surface.
-
Using a heat light, heat the roof rack assembly surface.
-
Remove the double-sided tape from the roof rack assembly.
-
Wipe off any tape adhesive residue with cleaner.
-
-
Using a heat light, heat the roof rack assembly.
-
Remove the release paper from the 3 new No. 2 roof carrier seals.
Tech Tips
After removing the release paper, keep the exposed adhesive free from foreign matter.
-
Install the 3 No. 2 roof carrier seals.
-
-
INSTALL FRONT ROOF RACK LEG CUSHION LH
-
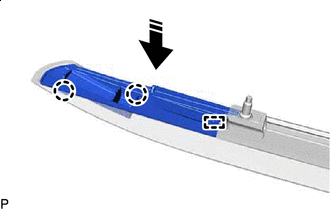

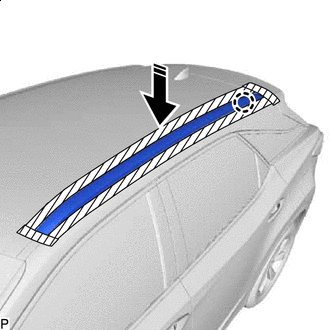
Install in this Direction Engage the 2 claws and guide as shown in the illustration to install the front roof rack leg cushion LH.
-
-
INSTALL NO. 1 ROOF CARRIER PROTECTOR
-
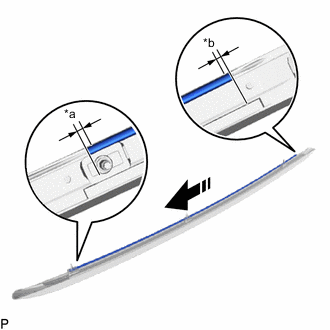
*a 3.0 mm (0.118 in.) *b 0.5 mm (0.0197 in.) Install in this Direction Install the No. 1 roof carrier protector as shown in the illustration.
Tech Tips
Make sure to install the No. 1 roof carrier protector so that the ends of the No. 1 roof carrier protector are within each area shown in the illustration.
-
-
INSTALL REAR ROOF RACK LEG CUSHION LH
-
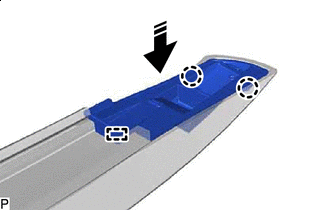
Install in this Direction Engage the 2 claws and guide as shown in the illustration to install the rear roof rack leg cushion LH.
-
-
INSTALL NO. 2 ROOF CARRIER PROTECTOR
Tech Tips
When installing the No. 2 roof carrier protector, heat the roof rack assembly using a heat light.
Heating Temperature Item Temperature Roof Rack Assembly 40 to 60°C (104 to 140°F) Note
Do not heat the roof rack assembly excessively.
-
Clean the roof rack assembly surface.
-
Using a heat light, heat the roof rack assembly surface.
-
Remove the double-sided tape from the roof rack assembly.
-
Wipe off any tape adhesive residue with cleaner.
-
-
Using a heat light, heat the roof rack assembly.
-
Remove the release paper from a new No. 2 roof carrier protector.
Tech Tips
After removing the release paper, keep the exposed adhesive free from foreign matter.
-
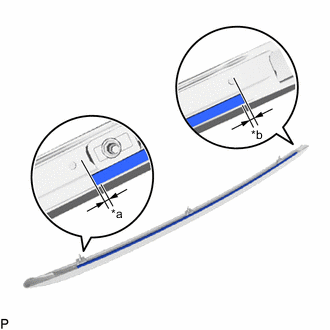
*a 3.0 mm (0.118 in.) *b 0.5 mm (0.0197 in.) Install the No. 2 roof carrier protector as shown in the illustration.
Tech Tips
Make sure to install the No. 2 roof carrier protector so that the ends of the No. 2 roof carrier protector are within each area shown in the illustration.
-
-
INSTALL FRONT ROOF RACK RETAINER LH
-
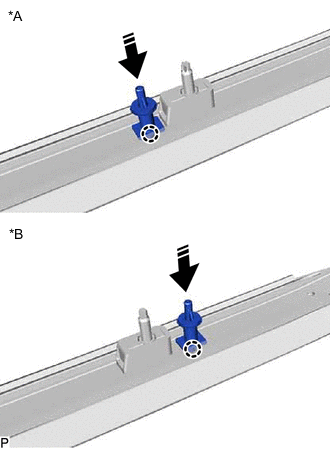
*A except Panoramic Moon Roof *B for Panoramic Moon Roof Install in this Direction Engage the claw as shown in the illustration to install the front roof rack retainer LH.
-
-
INSTALL ROOF RACK ASSEMBLY LH
-
Engage the claw as shown in the illustration.
-
Install the roof rack assembly LH with the 3 nuts.
- Torque:
- 32 N*m { 326 kgf*cm, 24 ft.*lbf }
-
-
INSTALL FRONT SLIDING ROOF HOUSING MOUNTING BRACKET LH (for Panoramic Moon Roof)
-
INSTALL CURTAIN SHIELD AIRBAG ASSEMBLY LH